Kaydeethree (talk | contribs) |
Kaydeethree (talk | contribs) |
||
| Line 88: | Line 88: | ||
== See also == |
== See also == |
||
*[[List of scepter holders by server]] |
*[[List of scepter holders by server]] |
||
| + | |||
| + | ==Summary== |
||
| + | This is part of {{item|The Scepter of the Shifting Sands|icon=}} quest chain introduction: |
||
| + | # {{questlong|Neutral|60|What Tomorrow Brings}} |
||
| + | # {{questlong|Neutral|60R|Only One May Rise}} |
||
| + | # {{questlong|Neutral|60G|The Path of the Righteous}} (repeatable) |
||
| + | # {{questlong|Neutral|60|Anachronos}} (requires {{neutral}} with [[Brood of Nozdormu]]) |
||
| + | # {{questlong|Neutral|60|Long Forgotten Memories}} |
||
| + | # {{questlong|Neutral|60|A Pawn on the Eternal Board}} |
||
| + | |||
| + | This is part of the {{item|Blue Scepter Shard|icon=}} fork of {{item|The Scepter of the Shifting Sands|icon=}} quest chain: |
||
| + | #{{Questlong|Neutral|60|Azuregos's Magical Ledger}} |
||
| + | #*{{item|500 Pound Chicken|icon=}} |
||
| + | #*#{{Questlong|Neutral|60|Never Ask Me About My Business}} |
||
| + | #*#{{Questlong|Neutral|60R|The Isle of Dread!}} |
||
| + | #*#{{Questlong|Neutral|60|Dirge's Kickin' Chimaerok Chops}} |
||
| + | #*#{{Questlong|Neutral|60|Return to Narain}} |
||
| + | #*{{item|Narain's Scrying Goggles|icon=}} |
||
| + | #*#{{Questlong|Neutral|60|Stewvul, Ex-B.F.F.}} |
||
| + | #*#{{Questlong|Neutral|60R|Scrying Goggles? No Problem!}} |
||
| + | #*{{item|Draconic For Dummies: Volume II|icon=}} |
||
| + | #*#{{Questlong|Neutral|60|Draconic for Dummies}} |
||
| + | #*#*{{Questlong|Neutral|60|Love Song for Narain}} (necessary to complete Draconic for Dummies) |
||
| + | #*#{{Questlong|Neutral|60|rAnS0m}} |
||
| + | #*#{{Questlong|Neutral|60G|Decoy!}} |
||
| + | #*#{{Questlong|Neutral|60R|The Only Prescription}} |
||
| + | #{{mob|Maws}} |
||
| + | ##{{Questlong|Neutral|60|The Good News and The Bad News}} |
||
| + | ##{{Questlong|Neutral|60R|The Wrath of Neptulon}} |
||
| + | |||
| + | This is part of the {{item|Green Scepter Shard|icon=}} fork of {{item|The Scepter of the Shifting Sands|icon=}} quest chain: |
||
| + | # {{Questlong|Neutral|60|Eranikus, Tyrant of the Dream}} |
||
| + | # {{Questlong|Neutral|60|Tyrande and Remulos}} |
||
| + | # {{Questlong|Neutral|60R|The Nightmare's Corruption}} |
||
| + | # {{Questlong|Neutral|60R|The Nightmare Manifests}} |
||
| + | # {{Questlong|Neutral|60|The Champion Returns}} |
||
| + | |||
| + | This is part of the {{item|Red Scepter Shard|icon=}} fork of {{item|The Scepter of the Shifting Sands|icon=}} quest chain: |
||
| + | *{{questlong|neutral|60R|Nefarius's Corruption}} |
||
== External links == |
== External links == |
||
Revision as of 06:50, 31 December 2007
- The Scepter of the Shifting Sands
- Binds when picked up
- Unique
- Item Level 60

Scepter of the Shifting Sands
The Scepter of the Shifting Sands is an item created from an extremely long quest chain. The beginning of this quest chain starts in Cenarion Hold. This scepter is required to ring the gong that opens the gates to Ahn'Qiraj, thus allowing the entire server access to both the Ruins of Ahn'Qiraj and the Temple of Ahn'Qiraj. This quest is still accessible even if the gates are already open. A Raid group is required during some parts of the quest.
Walkthrough
Beginning
- Receive the quest
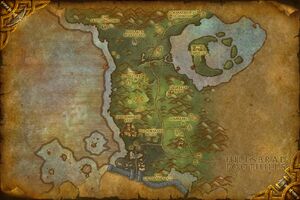
 [60] What Tomorrow Brings in Cenarion Hold in Silithus which starts with Baristolth of the Shifting Sands. This quest requires you to find Anachronos at the Caverns of Time in Tanaris [65, 48]. You do not have to kill any of the elite dragons around Anachronos to complete this quest.
 - After completing this quest, you will receive the follow-up quest [60R] Only One May Rise. Kill Broodlord Lashlayer and loot the [Head of the Broodlord Lashlayer]. Return to Baristolth to receive the elite quest [60G] The Path of the Righteous. Even if the gates have already been opened on your server and you have gained neutral reputation from the Ahn'Qiraj instances you will still need to have completed this quest to proceed with the quest chain.
- Completing this quest awards the [Proxy of Nozdormu], which enables you to loot [Silithid Carapace Fragments] from the elite silithid in Silithus. 200 fragments are required for each turn-in and the reward is 500 reputation with the Brood of Nozdormu. Before the quest line can continue, you must attain reputation with the Brood. If the gates are open on your server, you can get reputation with the Brood by killing creatures and bosses in Ahn'Qiraj and turning in [Qiraji Lord's Insignias] inside the Temple of Ahn'Qiraj. If not, you must loot thousands of fragments. Each silithid drops at least one fragment, often two or more. Each turn-in also awards another Proxy of Nozdormu. This can be used on another person and allows them to loot fragments as well. The fragments do not bind on pickup so they can be sold or traded.
- After attaining reputation with the Brood of Nozdormu, return to Baristolth and accept the quest [60] Anachronos. He asks you to return to Anachronos.
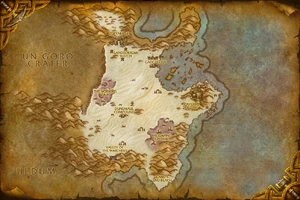
- Anachronos, now being neutral with you, offers the quest [60] Long Forgotten Memories. This quest is completed in Silithus by locating the crystalline red tear just outside the Gates of Ahn'Qiraj [28, 89]. This activates a small cutscene. When it finishes, you will receive a new quest, [60] A Pawn on the Eternal Board, which has you speaking with Anachronos once again.
Charge of the Dragonflights
The questline seemingly ends at Anachronos, but this is not the case. Anachronos wants you to locate the 3 dragon shards located somewhere in Azeroth, specifically the blue, green, and red shards. ![]() File:IconSmall Red.gif Vaelastrasz,
File:IconSmall Red.gif Vaelastrasz, ![]() File:IconSmall Blue.gif Azuregos, and
File:IconSmall Blue.gif Azuregos, and ![]() File:IconSmall Green.gif Eranikus hold the secret to these shards. Completing the previous quest chain enables you to begin these shard quests. Note that the blue shard chain is the most involved, while the red chain is the simplest.
File:IconSmall Green.gif Eranikus hold the secret to these shards. Completing the previous quest chain enables you to begin these shard quests. Note that the blue shard chain is the most involved, while the red chain is the simplest.
Green Scepter Shard
- Enter the Temple of Atal'Hakkar to begin this quest. Approach the Shade of Eranikus and Malfurion Stormrage will appear, offering the quest [60] Eranikus, Tyrant of the Dream. You do not need to kill the trolls surrounding Eranikus to activate Malfurion. You must then go to Teldrassil to complete the followup.
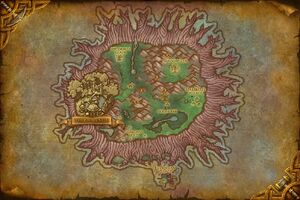
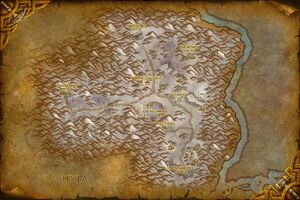
- In Teldrassil at [37, 47] is a Forest Wisp you need to speak with. It gives the follow up [60] Tyrande and Remulos, where you must find Keeper Remulos in Moonglade
- After talking with Keeper Remulos you receive the next quest, [60] The Nightmare's Corruption. To complete this quest you must farm the Dragonkin by the Four Dragons portals. This can take many many hours and requires a party. Finally, the fragment in Duskwood is actually received from a Twilight Corrupter, a 40-man raid satyr located in Duskwood.
- When you return the fragments to Remulos, you receive [60R] The Nightmare Manifests. When you accept the quest, the corrupted Eranikus enters Moonglade and summons a host of Shades. At the same time, someone must travel to Darnassus to give a message to Tyrande. Your job is to defend Keeper Remulos from the Shades until Tyrande can arrive and redeem Eranikus. After Tyrande redeems him, Eranikus will give you the green shard.
The reward for completing this chain is either [Drake Tooth Necklace] or [Drudge Boots].
Blue Dragon Shard
- Speak with File:IconSmall Blue.gif Azuregos in Azshara. If Azuregos has already been killed, you can talk to the Spirit of Azuregos at any time. You need your signet ring with you to talk to him and if the spirit is not in the living world, you will need to die and speak with him while dead. After much explaining, Azuregos says that the blue shard is being held by a minnow, and to summon the minnow you need to read [60] Azuregos's Magical Ledger. Unfortunately, you are unable to read this book and must talk to Narain Soothfancy in Tanaris.
- Go to Tanaris, just north of Steamwheedle Port, and you will find Narain Soothfancy. He explains that he cannot read the book you have given him. He requires 3 items: A giant chicken, some scrying goggles, and a translating guide to understand the text. These 3 items involve 3 different quest lines.
Chicken
- The first quest in this series is [60] Never Ask Me About My Business, which involves simply talking to Dirge Quikcleave in the Gadgetzan Inn.
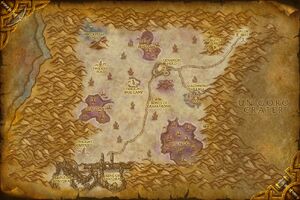
- Dirge gives the quest [60R] The Isle of Dread!. Go to Feralas at [29, 72] and you will find Lord Lakmaeran, a large chimera. Lord Lakmaeran requires 7-10 people to kill. After killing him one person may loot his carcass for the quest. In addition, the surrounding Chimaeroks need to be killed for the 20 required tenderloins. Chimaeroks can be successfully 2-manned.
- After gathering the meat, return to Dirge for the follow up quest [60] Dirge's Kickin' Chimaerok Chops. This quest requires 20 Goblin Rocket Fuel and 20 Deeprock Salt. The reward is [Recipe: Dirge's Kickin' Chimaerok Chops] and 20 [Dirge's Kickin' Chimaerok Chops]. Return to Narain.
Goggles
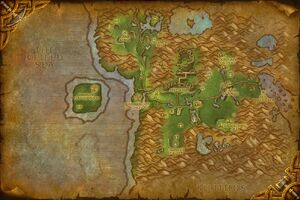
- Narian explains his goggles were stolen by his ex-B.F.F. (ex-best friend forever), a gnome named Stewvul. Stewvul is located in southern Silverpine Forest next to Greymane Wall.
- Stewvul is inside a crate at location [46, 86] in Silverpine forest. He says the goggles were lost inside Molten Core, and gives you the followup quest [60R] Scrying Goggles? No Problem!
- The Scrying Goggles have a chance to drop off any mob inside Molten Core. Return them to Narain to complete this quest, and receive 3 [Major Rejuvenation Potions] as a corollary reward.
Draconic for Dummies
- The quest begins with [60] Draconic for Dummies. Narain says he left his book on an island in far southern Tanaris. Getting to this island is somewhat unusual since it exists far past Fatigue waters and you cannot swim to it by conventional means.
- Before you can reach the island you must first speak with the Meridith the Mermaiden, who is located at approximately [57, 95]. She is underwater, close to the shore. She does move around a bit so you may have to search for a while. When you speak with her she offers the quest [60] Love Song for Narain, which simply requires you to return to Narain.
- After completing Love Song for Narain, there is no followup quest. However, if you return to Meridith she will buff you with a large increase in swim speed. This will enable you to swim to the island in question. Look south and you will see the island. Swim directly toward it and you should reach it without the fatigue bar full draining. Note there are 2 islands, and the book is located on the southern island.
- Upon reaching the southern island, an actionable 'Freshly Dug Dirt' exists. Inside is a note yielding the quest [60] rAnS0m. The Book has been stolen and a ransom demand is made. Return to Narain again.
- Narain gives you a package containing a robe, a turban, a bag of fake gold, and a map. You have to go to Winterspring to the drop off point, and use the Turban which will turn you into Narain. The coordinates of the drop location are [70, 73]. After dropping off the gold, Dr. Weavil arrives, realizes the trap, and sends Number Two, his ape pet, to attack you. Weavil escapes. The ape pet hits tanks for about 600-700 damage and can be killed with a party of 3-5 fairly easily. Once No. 2 is dead, return the quest to Narain.
- From here, you receive [60R] The Only Prescription. The book required to translate the Draconic text has been torn in 8 separate pieces, and all 8 pieces must be acquired to complete the quest. The locations are as follows:
- [Chapter I]: Located on Alcaz Island in Dustwallow Marsh. You must defeat Dr. Weavil to receive the book. He is much harder than No. 2 and requires about 15 people to defeat.
- [Chapter II]: Felguard Elites and Doomguards in the Blasted Lands have a chance to drop it. These require 4-5 people to farm effectively. (~4% drop rate)
- [Chapter III]: Hederine Initiates & Hederine Slayers in Winterspring at Darkwhisper Gorge have a chance to drop it. These require 1-2 people to farm effectively. (~6% drop rate)
- [Chapter IV]: Located in Undercity[77, 38] on a table in the Magic Quarter.
- [Chapter V]: Located in the Stormwind Keep library [72, 6] (turn left as you walk in).
- [Chapter VI]: Dropped by File:IconSmall Black.gif Onyxia.
- [Chapter VII]: In Blackwing Lair in the room after File:IconSmall Black.gif Broodlord Lashlayer, along File:IconSmall Black.gif Firemaw's patrol path. It is on a table on the ramp in the corner to the left of the wyrmguard + 3 overseer pack.
- [Chapter VIII] Dropped by Ragnaros.
- Note: These pieces are white items thus they are in the round-robin loot table and cannot be master-looted. That means, for chapter 1, 6, 8 that require a raid, you have to ask the raid leader to change the loot rule to 'Free for all', or, to ask every member to check boss' corpse even they don't have this quest. In the later case, a single logged or HSed member may make your effort in vain.
- Completing the quest [60] The Only Prescription rewards the [Gnomish Turban of Psychic Might].
- [Chapter I]: Located on Alcaz Island in Dustwallow Marsh. You must defeat

Only one Chapter drops per kill. Assemble the text, get the chicken, get the goggles, and the quest line merges.
Good news and bad news
After all 3 components of the blue shard are done, Narain offers the quest ![]() [60] The Good News and The Bad News. This quest requires 20 [Arcanite Bars], 10 [Elementium Ores], 10 [Blue Sapphires], and 10 [Azerothian Diamonds]. He will then give you an [Arcanite Buoy] and the next quest,
[60] The Good News and The Bad News. This quest requires 20 [Arcanite Bars], 10 [Elementium Ores], 10 [Blue Sapphires], and 10 [Azerothian Diamonds]. He will then give you an [Arcanite Buoy] and the next quest, ![]() [60R] The Wrath of Neptulos. Take the buoy deep off the coast of Azshara and spawn
[60R] The Wrath of Neptulos. Take the buoy deep off the coast of Azshara and spawn ![]() Maws, the "minnow" carrying the shard. The arcanite buoy is used up when you summon Maws but if you fail Narain will give you another one. When you kill the shark the blue shard drops. Return the Shard to Anachronos to complete the Blue Shard line.
Maws, the "minnow" carrying the shard. The arcanite buoy is used up when you summon Maws but if you fail Narain will give you another one. When you kill the shark the blue shard drops. Return the Shard to Anachronos to complete the Blue Shard line.
The reward for completing this chain is either the [Band of Icy Depths] or [Darkwater Robes].
Red Dragon Shard
Speak with ![]() File:IconSmall Red.gif Vaelastrasz in Blackwing Lair and he will offer you the quest
File:IconSmall Red.gif Vaelastrasz in Blackwing Lair and he will offer you the quest ![]() [60R] Nefarius's Corruption, and explains that
[60R] Nefarius's Corruption, and explains that ![]() File:IconSmall Black.gif Nefarian has the [Red Scepter Shard]. Defeat Nefarian in 5 hours after engaging Vaelastrasz and the Red Scepter Shard will be lootable off his corpse. Only one shard will drop per Nefarian kill.
File:IconSmall Black.gif Nefarian has the [Red Scepter Shard]. Defeat Nefarian in 5 hours after engaging Vaelastrasz and the Red Scepter Shard will be lootable off his corpse. Only one shard will drop per Nefarian kill.
The timer stops if EVERYONE leaves - if one person sits in there, the timer still runs. If you fail, you will need to abandon the quest and talk to Vaelastrasz again.
If someone happens to prematurely start the Vaelastrasz encounter before you can accept Nefarius's Corruption, there is a short period of time where he is friendly while doing his dialog in which you can still accept the quest.
The rewards for completing this quest are either [Onyx Embedded Leggings] or [Amulet of Shadow Shielding].
Rewards
See also
Summary
This is part of The Scepter of the Shifting Sands quest chain introduction:
- [60] What Tomorrow Brings
- [60R] Only One May Rise
- [60G] The Path of the Righteous (repeatable)
- [60] Anachronos (requires with Brood of Nozdormu)
- [60] Long Forgotten Memories
- [60] A Pawn on the Eternal Board
This is part of the [Blue Scepter Shard] fork of The Scepter of the Shifting Sands quest chain:
- [60] Azuregos's Magical Ledger
- [500 Pound Chicken]
- [60] Never Ask Me About My Business
- [60R] The Isle of Dread!
- [60] Dirge's Kickin' Chimaerok Chops
- [60] Return to Narain
- [Narain's Scrying Goggles]
- [60] Stewvul, Ex-B.F.F.
- [60R] Scrying Goggles? No Problem!
- [Draconic For Dummies: Volume II]
- [60] Draconic for Dummies
- [60] Love Song for Narain (necessary to complete Draconic for Dummies)
- [60] rAnS0m
- [60G] Decoy!
- [60R] The Only Prescription
- [500 Pound Chicken]
- Maws
This is part of the [Green Scepter Shard] fork of The Scepter of the Shifting Sands quest chain:
- [60] Eranikus, Tyrant of the Dream
- [60] Tyrande and Remulos
- [60R] The Nightmare's Corruption
- [60R] The Nightmare Manifests
- [60] The Champion Returns
This is part of the [Red Scepter Shard] fork of The Scepter of the Shifting Sands quest chain:
- [60R] Nefarius's Corruption