Tekkub56883@legacy41576006 (talk | contribs) |
Whitedragon254@legacy41581870 (talk | contribs) (Created page with "right|thumb|The Gilnean Stronghold is the Alliance starting point.|320px The '''Gilnean Stronghold''' is the starting point for t...") |
||
| Line 1: | Line 1: | ||
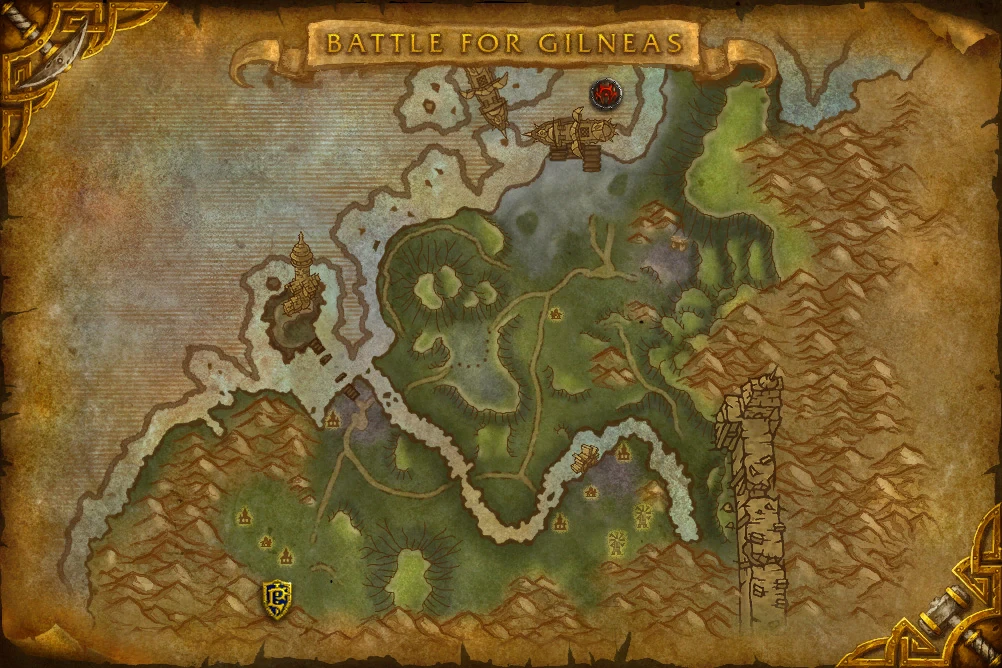
| + | [[Image:BattleforGilneasGilneanStronghold.jpg|right|thumb|The Gilnean Stronghold is the Alliance starting point.|320px]] |
||
| − | {{lang|fr=le_conservateur}} |
||
| − | {{Npcbox |
||
| − | |name = The Curator |
||
| − | |image = curator.JPG |
||
| − | |race = Arcane Guardian |
||
| − | |creature=Mechanical |
||
| − | |level = ?? |
||
| − | |type = Boss |
||
| − | |location = [[Menagerie|The Menagerie]], [[Karazhan]] |
||
| − | |status=Killable |
||
| − | |health=690,000 |
||
| − | |mana=67,740 |
||
| − | |money={{cost|38|94|26}} |
||
| − | |faction=Combat |
||
| − | |instance=Karazhan |
||
| − | }} |
||
| − | '''The Curator''' is an [[Arcane Guardian]] boss in the Menagerie in [[Karazhan]]. It is not optional. Raids wanting to reach the bosses behind it must first defeat The Curator. The encounter is not difficult to learn, but requires good gear. A raid able to defeat this boss is in principle equipped well enough to defeat all the following bosses, save perhaps [[Nightbane (boss)|Nightbane]] and [[Prince Malchezaar]]. |
||
| + | The '''Gilnean Stronghold''' is the starting point for the [[Alliance]] players in the [[Battle for Gilneas]] [[battleground]]. It possesses a graveyard that will always remain in Alliance possession throughout the game. It is the Alliance headquarters on the [[Gilnean Coast]], the main area is walled off with several buildings inside and a gate, as well as a Well and several other objects. There is also another building outside of the walls. |
||
| − | == Abilities == |
||
| − | ===The Curator=== |
||
| − | *Immune to [[arcane]], [[bleed]], [[poison]] and mana drain spells and effects. |
||
| − | *'''Basic Melee''': Around 3000 on a tank |
||
| − | *'''Hateful Bolt''': An arcane bolt that hits a non-tank character for 4435-5999 Arcane damage. |
||
| − | *'''Summon Astral Flare''':Summon one [[Astral Flare]] every 10 seconds (Flare Phase) |
||
| − | *'''Evocation''': Go completely inactive for 20 seconds while re-filling mana and increasing damage taken by 200% (Evocation Phase) |
||
| − | *'''Enrage''': At 15% health, increase melee attack speed and Hateful Bolt cast rate while ceasing new Evocations or Astral Flare summons |
||
| − | *'''Berserk''': After 10 minutes, give all raid members an non-removable debuff which increases arcane damage taken by 500% |
||
| + | ==Notes== |
||
| − | === Astral Flare === |
||
| + | *It is the Battle for Gilneas equivalent of [[Trollbane Hall]]. |
||
| − | *'''Health''': 12000 HP |
||
| − | *Melee: none |
||
| − | *[[Arcing Sear]]: Rapid-fire chained attack which hits up to three targets within ten yards for 675-825 arcane damage each |
||
| − | *Immune to taunts, stuns, roots, and snares |
||
| − | == |
+ | == Patch changes == |
| + | *{{Patch 4.0.3|note=Added}} |
||
| − | Killing the Curator is basically a gear check. It's not a coincidence that this boss drops the first class set tokens - they really want to be earned. There's not much strategy or room for fancy maneuvers - either the raid has the required DPS and the necessary mana endurance, or it does not. |
||
| + | {{Battle for Gilneas}} |
||
| − | The fight consists of four possible phases. Most of the fight consists of two alternating phases: a Flare Phase (which lasts 90 seconds) followed by an Evocation Phase (which lasts 20 seconds). Once the Curator's health drops below 15% it enters the Enrage phase, when it stops summoning Flares and Evocating, but melees and casts Hateful Bolts more rapidly. If it is still alive ten minutes after the pull, it enters the Berserk phase and wipes the raid in a few seconds. |
||
| − | |||
| − | === Flare phase === |
||
| − | During the Flare Phase, The Curator summons ten Astral Flares, hits the tank with moderate melee damage, and casts Hateful Bolts. |
||
| − | |||
| − | The Curator summons one Astral Flare every 10 seconds, at a cost of 10% of its mana. Each Flare spawns with about 1000 threat from a random, non-tank player character and advances in that character's direction while hitting nearby enemies with Arcing Sear. |
||
| − | |||
| − | Each Flare ''must'' be destroyed within 10 seconds, before the next one spawns. Failure to do so will result in multiple Flares dealing damage at the same time - this situation will usually mean a wipe. It is not necessary to damage the Curator at all during this phase. Damaging the Curator ''is'' permissible, but only when no Flares are up (unless the raid has excess DPS: see Positioning below). |
||
| − | |||
| − | This cannot be over-emphasized: ''By far, the most important part of the fight is killing the Astral Flares as quickly as possible.'' Wipes on The Curator usually happen because the healers run out of mana. They run out of mana because the Flares live too long. The solution is almost always to kill the Flares faster. The faster each Flare dies, the easier the healers' job becomes. |
||
| − | |||
| − | While it is not necessary to tank the Flares, doing so gets them to hold still and makes them easier to kill. A hunter pet with attack power buffs and specced for arcane resistance and stamina is ideal for this task. Warriors, bear druids, paladins, and enhancement shamans can do the job, too. |
||
| − | |||
| − | The Curator casts a Hateful Bolt every 10 to 15 seconds on a non-tank player character. The current best theory is that the Hateful Bolt hits the non-tank character that has generated the most threat on The Curator since the last Evocation and currently has enough health to survive the damage from the Bolt. |
||
| − | |||
| − | It is possible to assign one character - preferably a warlock or a shadow priest - as Hateful Bolt soaker. This character attracts most of the Hateful Bolts by steadily damaging The Curator. Equipping the soaker with arcane resistance gear negates a substantial amount of the damage from the Hateful Bolts. Note that using a soaker is reasonable only when the raid is still able to kill the Flares fast enough. It's typically done when using only two healers. |
||
| − | |||
| − | === Evocation phase === |
||
| − | Immediately after The Curator summons the tenth Astral Flare with the last of its mana, it enters a state of Evocation for 20 seconds while it refills its mana. While it does so, it goes completely inactive and all damage dealt against it is tripled. |
||
| − | |||
| − | Most raids must first concentrate on killing the tenth and last Flare before switching damage over to the Curator. Otherwise, there may be two Flares up after the Evocation, which is bad (see above). Killing the Flare quickly also grants the healers a few seconds break for mana regeneration. Overgeared raids can attack The Curator immediately to speed up the fight, and clean up the extra Flares after Evocation. |
||
| − | |||
| − | Cooldown and single-use abilities that temporarily increase damage output should be saved up for this moment and be activated at the beginning of the phase to quickly kill the last Astral Flare and to make the most out of the Curator's temporary vulnerability. |
||
| − | |||
| − | Once the Curator has finished refilling mana, the fight continues with the next Flare Phase (or the Enrage Phase, if its health is brought down below 15% during the Evocation). |
||
| − | |||
| − | === Enrage phase === |
||
| − | Once The Curator's health drops below 15%, it stops summoning Astral Flares, ceases Evocations, and increases melee damage output and Hateful Bolt frequency. This means that the healers have to give the main tank and Hateful Bolt victims more attention while everyone else just nukes The Curator. This phase is actually the easiest part of the fight. |
||
| − | |||
| − | As of Patch 2.3, The Curator breaks Evocation and enrages as soon as its health reaches 15%. Prior to patch 2.3, it finished its Evocation before it enraged. |
||
| − | |||
| − | == Positioning == |
||
| − | Positioning is a secondary concern, but it can help raids with marginal gear. A concentrated setup increases damage on the Flares by eliminating the need for melee damage-dealers to chase down Flares. A distributed setup reduces damage from the Flares by reducing the chaining of Arcing Sear. |
||
| − | |||
| − | === Concentrated === |
||
| − | If melee damage dealers are needed on the Flares, everybody except the hunters sets up close together, with the hunters as close as possible, just at their minimum range. The main tank is on one side of The Curator, and everybody else is on top of each other on its back (within melee range). This makes it easy for the melee characters to damage the Flares and quickly switch to The Curator when no Flares are up. The drawback of this method is that the Flare damage is maximized. This is offset to some extent because multi-target heal spells like [[Chain Heal]] also have their maximum effect. More importantly, the Flares die more quickly in this formation, so they have less time to do damage. |
||
| − | |||
| − | === Distributed === |
||
| − | If the raid's ranged DPS is high enough to kill the Flares quickly (in less than eight seconds) without support from the melee characters, the melee group sets up close to The Curator and stays put. The ranged damage dealers and healers spread out and each stays at least ten yards away from everybody else. This significantly reduces Flare damage, because Arcing Sear doesn't jump farther than ten yards. Also, the melee group is on the Curator all the time, which shortens the fight. |
||
| − | |||
| − | If melee characters have to help killing Flares, the distributed setup does not work well. Even a single melee damage dealer chasing Flares breaks the ten yard pattern, and thus the Flare damage is maximized anyways. Worse, that melee character loses a lot of damage output while running around. Because of this, a concentrated setup is best for most raids new to this encounter. |
||
| − | |||
| − | == Miscellaneous Tips == |
||
| − | * For most problems on The Curator, the solution is to kill the Flares faster. If that doesn't work, the best solution is usually to come back later with better gear, better specs, and more [[consumables]]. Underpowered raids simply cannot win this fight. |
||
| − | * Mana is an issue in this fight. Make sure everyone has enough mana potions and mana regeneration consumables. |
||
| − | * Threat is not an issue in this fight. Use buffs or totems that facilitate quick Flare-killing. Don't use buffs like Salvation that reduce threat. |
||
| − | * Multi-target heals are very effective, especially [[Chain Heal]] and [[Prayer of Mending]]. |
||
| − | * The following simple macro is handy to help damage-dealers target live Astral Flares quickly:<br><pre>/cleartarget
/target Astral Flare
/stopmacro [nodead, harm]
/target The Curator</pre> |
||
| − | * While it's tempting to use arcane resistance gear, it slows down Flare-killing. It's somewhat useful on the tank, any Hateful Bolt soaker, and any Flare tank, but generally harmful on other characters. |
||
| − | * Flares spawn to the left or right of The Curator in a pattern. Learn the pattern to pick them up faster. |
||
| − | * When The Curator starts evocating, some DPS meter chasers are tempted to cheat by attacking The Curator before the last Flare is dead. This can and does lead to wipes in marginal raids. Watch out for cheaters and stop them. Note, however, that this is actually useful in well-geared raids. |
||
| − | * The fight can be reset by running down the last stairs before the room. |
||
| − | * Astral Flares do not live long enough for damage-over-time spells to be effective. Warlocks can use [[Searing Pain]] or [[Shadow Bolt]] instead. |
||
| − | * If there are multiple hunters, they should spread out from each other. This avoids more than one being forced into melee combat when an Astral Flare comes their way. Feign death and (manually cast) Growl can keep the Flares at range. |
||
| − | * Using a [[Cauldron of Major Arcane Protection]] gives the healers a break at the start of the fight. |
||
| − | * Warlocks can cast [[Curse of Doom]] on the Curator somewhere between the summoning of the fourth and sixth Astral Flares. It's best to time it such that it goes off right at the start of the Evocation, so that it can be replaced by [[Curse of the Elements]], [[Curse of Recklessness]], or even [[Curse of Shadow]] when the the rest of the raid starts to deal damage. |
||
| − | * Priests can use their [[Shadowfiend]] during the Evocation phase. Due to the triple damage during Evocation, the Shadowfiend can completely refill the priest's mana. |
||
| − | * Shamans should use their [[Bloodlust or Heroism]] during the eighth Flare. |
||
| − | * If The Curator is mistakenly pulled while other players are elsewhere in the dungeon (i.e.: repairing in Midnights room), those player may be teleported up into The Menagerie. This will cause certain death if the players cannot get to the stairs to reset the Curator. |
||
| − | |||
| − | == Quotes == |
||
| − | ;Aggro |
||
| − | :The Menagerie is for guests only. |
||
| − | ;Adds Spawn |
||
| − | :This curator is equipped for gallery protection. |
||
| − | :Gallery rules will be strictly enforced. |
||
| − | ;Evocate |
||
| − | :Your request cannot be processed. |
||
| − | ;Enrage |
||
| − | :Failure to comply will result in offensive action. |
||
| − | ;Player death |
||
| − | :You are not a guest. |
||
| − | :Do not touch the displays. |
||
| − | ;Death |
||
| − | :Curator is no longer op... er... ation... al. |
||
| − | |||
| − | == Loot == |
||
| − | {{Lootbox|[[Tier 4]] glove tokens |
||
| − | |Gloves of the Fallen Champion |
||
| − | |Gloves of the Fallen Defender |
||
| − | |Gloves of the Fallen Hero}} |
||
| − | |||
| − | {{Lootbox|Curator Loot |
||
| − | |Dragon-Quake Shoulderguards |
||
| − | |Forest Wind Shoulderpads |
||
| − | |Garona's Signet Ring |
||
| − | |Pauldrons of the Solace-Giver |
||
| − | |Staff of Infinite Mysteries |
||
| − | |Wrynn Dynasty Greaves |
||
| − | |Badge of Justice}} |
||
| − | |||
| − | == Patches and Hotfixes == |
||
| − | {{Patched|patch=2.1.0|note=The arcane creatures that spawn in the Menagerie will now respawn less frequently.}} |
||
| − | |||
| − | == External links == |
||
| − | {{elinks-NPC|15691}} |
||
| − | {{elink|type=bosskillers|link=http://www.bosskillers.com/cgi-bin/bbguild/index.cgi?action=bosspage&bossid=123}} |
||
| − | {{elink|site=MMO-Champion|link=http://www.mmo-champion.com/index.php?page=114}} |
||
| − | {{elink|site=Boss Slayers|link=http://feeds.feedburner.com/BossSlayersPresentedBySolarShockPictures|desc=Instructional videos on all the KZ bosses.}} |
||
| − | <!-- Movies --> |
||
| − | {{elink|type=video|site=CS (Arthas)|link=http://www.dailymotion.com/thehighway/video/2609520|desc=Warrior POV}} |
||
| − | {{elink|type=video|site=Damnation (Wildhammer US)|desc=Rogue PoV|http://files.filefront.com/Kara+-+Curator/;8281941;/fileinfo.html}} |
||
| − | {{elink|type=video|site=Fist of Entropy (Wildhammer US)|desc=Hunter PoV|http://files.filefront.com/Curatorwmv/;7476253;/fileinfo.html}} |
||
| − | {{elink|type=video|site=FlaVa (Ner'zhul US)|link=http://flavaguild.com/phpbb/viewtopic.php?t=216|desc=Mage PoV}} |
||
| − | {{elink|type=video|site=Going Merry (Kilrogg)|link=http://www.youtube.com/watch?v=zXXRwYkEySg|desc=Hunter POV, "clump together" tactic}} |
||
| − | {{elink|type=video|site=Asterick (Azjol-Nerub)|link=http://www.youtube.com/watch?v=T7uzMKhrdV8|desc=Mage PoV}} |
||
| − | {{elink|type=video|site=Undead Presence (Kilrogg EU)|link=http://www.youtube.com/watch?v=PqXqivVXrYo}} |
||
| − | |||
| − | {{DEFAULTSORT:Curator, The}} |
||
| − | [[Category:Arcane Guardians]] |
||
| − | [[Category:Bosses]] |
||
| − | [[Category:Karazhan mobs]] |
||
| − | [[Category:Unique Voice]] |
||
Revision as of 22:50, 4 November 2011
The Gilnean Stronghold is the Alliance starting point.
The Gilnean Stronghold is the starting point for the Alliance players in the Battle for Gilneas battleground. It possesses a graveyard that will always remain in Alliance possession throughout the game. It is the Alliance headquarters on the Gilnean Coast, the main area is walled off with several buildings inside and a gate, as well as a Well and several other objects. There is also another building outside of the walls.
Notes
- It is the Battle for Gilneas equivalent of Trollbane Hall.
Patch changes
 Patch 4.0.3 (2010-11-16): Added
| ||||||||||||||