Drunkendruid16032@legacy41536919 (talk | contribs) m (Spelling) |
Celton9291@legacy41530466 (talk | contribs) (→Quests) |
||
| Line 73: | Line 73: | ||
== Quests == |
== Quests == |
||
* {{questlong|Neutral|69|The Lexicon Demonica}} Given by [[David Wayne]] at Wayne's Refuge in [[Terokkar Forest]]. |
* {{questlong|Neutral|69|The Lexicon Demonica}} Given by [[David Wayne]] at Wayne's Refuge in [[Terokkar Forest]]. |
||
| + | * {{questlong|Neutral|70|The Book of Fel Names}} |
||
* {{questlong|Neutral|70|Entry Into Karazhan}} Given by [[Khadgar]] at the [[Terrace of Light]] in [[Shattrath City]], this is step 5 in a quest chain to obtain [[the Master's Key]] that starts with [[Archmage Alturus]] at the entrance to [[Karazhan]] in [[Deadwind Pass]]. |
* {{questlong|Neutral|70|Entry Into Karazhan}} Given by [[Khadgar]] at the [[Terrace of Light]] in [[Shattrath City]], this is step 5 in a quest chain to obtain [[the Master's Key]] that starts with [[Archmage Alturus]] at the entrance to [[Karazhan]] in [[Deadwind Pass]]. |
||
* {{questlong|Neutral|72|Trouble at Auchindoun}} Given by [[Spymistress Mehlisah Highcrown]] at the [[Terrace of Light]] in [[Shattrath City]]. |
* {{questlong|Neutral|72|Trouble at Auchindoun}} Given by [[Spymistress Mehlisah Highcrown]] at the [[Terrace of Light]] in [[Shattrath City]]. |
||
Revision as of 11:33, 16 June 2007
Template:Auchindoun
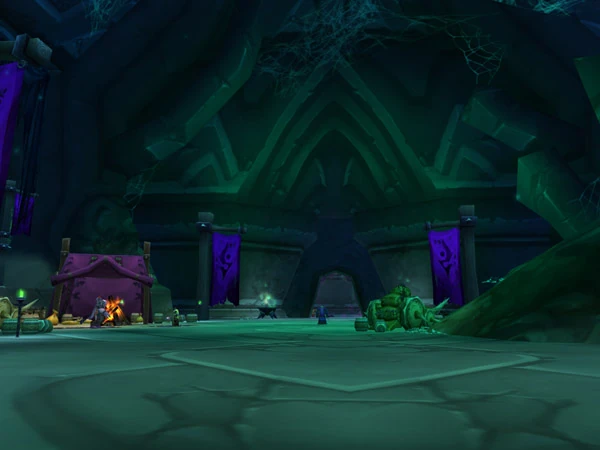
Shadow Labyrinth entrance
A Shadow Labryinth is a wing of the Auchindoun instance.
Summary
- Also known as "SL", "Slabs", and "Shadow Lab".
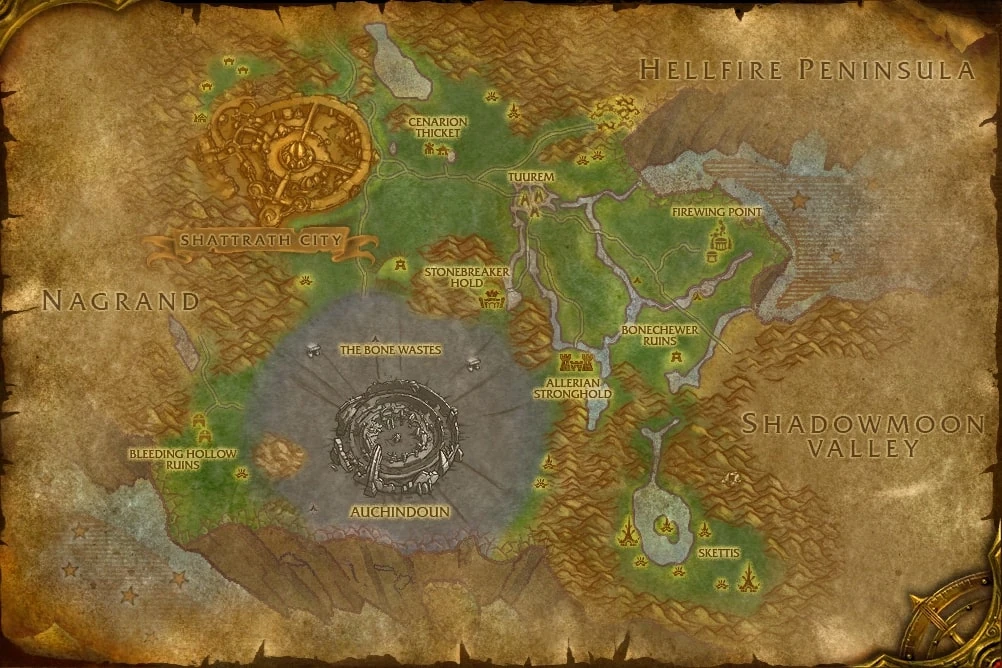
- Found in Auchindoun in Terokkar Forest
- Enemy Level Range: 69+
- Expected time to complete: 2 hours +
A key is mandatory to have access to this wing or a 350 lockpicking level rogue can open it. If one member of the party has the key, he can unlock it and allow the rest of the group to enter. The key drops on the last boss of Auchindoun third wing Sethekk Halls. A warlock, like always can also kill themselves beside the door and resurrect on the other side. Anyone with a flying mount can dismount (removing their gear to save durability damage) and plummet to their death, resurrecting on the other side of the door. It is recommended you be level 69+ to enter.
History
Shadow Labrinth is populated by forces of the Shadow Council.
Reputation
- Normal trash mobs will give 12 to Lower City per kill and larger mobs (Fel Overseers and Malicious Instructors) give 24. Bosses give 120 and Murmur gives 240. An average run, killing only the mobs needed to pass, will give about 2,000 reputation. There is also 168 reputation worth of extra mobs in the first room that are usually ignored, except when they guard Ancient Lichens that a Herbalist wants to harvest.
Walkthrough
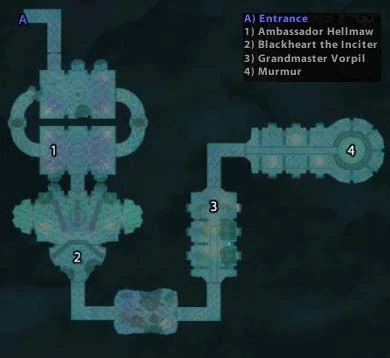
Bosses
- Ambassador Hellmaw Hellmaw is kept banished by a number of shadow council minions in the second large room in the Shadow Labyrinth. Defeating the last group of banishers frees him. He has an area effect fear with about a 40 yard range, and a nature based venom spit that also reduces armor.
- Blackheart the Inciter Blackheart's primary special ability is "incite chaos", which is like a mind control on all party members, who then fight each other using all available cooldowns.
- Grandmaster Vorpil When attacked, Vorpil calls for aid, causing voidwalkers to spawn at an increasing rate. The voidwalkers move slowly to Vorpil, and when they reach him heal him and damage the party. Many consider Vorpil the most difficult boss of this instance in normal mode. In Heroic, he also has a banish ability
- Murmur Murmur is a powerful sound based elemental who has been summoned by the Shadow Council, who seem to be having trouble keeping him under control. Murmur does not move in combat; his special abilities include a sonic boom area damage effect, a spell that causes an explosion centered on a target player character, and when no player characters are in melee range, a debuff increasing vulnerability to nature damage. In heroic mode, he also has an ability that causes damage to those outside the range of his sonic boom and the explosion effect teleports all players to the target.
See the individual boss pages for more detailed information and strategies.
Trash
Throughout this instance, careful pulling may be required to avoid fighting more than one group at a time, particularly in the rooms with patrols. Even with good pulling, there are some difficult groups of 5 or 6 enemies and good crowd control is essential. Keep the cultists off the healers in your group, and take down the caster enemies first.
- Humanoids
- Cabal Acolyte - Hits for ~640 normal, 740 heroic; ~16k health normal, 25k heroic. Casts
 [Heal] to heal itself and other mobs. They have a 'Shadow Protection' buff which absorbs 2100 to 3200 shadow damage that can be applied to members of the party when the Acolyte is mind controlled.
- Heroic: can heal for about half a health bar on a 3 second interruptible cast.
- Cabal Assassin - Spawns during the pulls prior to Blackheart the Inciter.
- Assassins appear to spawn periodically; the longer you spend in the entry to Blackheart's room, the more times you will see them spawn. There are reports of them spawning two at a time on occasion.
- Cabal Cultist - Interrupts casting and prevents casting from that school of magic.
- Heroic: Can't Mind Control.
- Cabal Deathsworn - Mild damage, minor knockback, Shadow Cleave.
- Heroic: Normal hits for 1600, Black Cleave hits for 4000.
- Heroic: Immune to MC.
- Cabal Executioner
- Cabal Fanatic - very fast, hard attack speed. Can be MCed to kill a Zealot. Also has a Fixate ability that keeps the mob on that Fixated person for a short amount of time. The only way to get it off is with taunt or a similar ability. Heroic: Can't Mind Control.
- Cabal Ritualist
- with daggers - Gouges, hits about 1500 on cloth, low health.
- with staff or single blade - 3 different types of casters
- Arcane - Arcane Missles, Addle Humanoid
- Fire -
 [Fire Blast], Flame Buffet (small amount of damage and DoT)
 - Frost -
 [Frostbolt]
- Heroic: can dispel CC, such as Trap and Polymorph. Tank and kill away from other CC'd Ritualists.
- Heroic: immune to MC
- Cabal Shadow Priest -
 [Mind Flay] (around 900 damage per sec) and [Shadow Word: Pain]. Can be Mind Controlled.
- Heroic: [Mind Flay] (deals 1500 damage per sec) and [Shadow Word: Pain] (700 damage every 3 sec) Can be Mind Controlled.
- Heroic:
- Cabal Spellbinder - Uses [Mind Control], Earth Shock]]
- Cabal Summoner - Will summon additional mobs. Kill first or CC.
- Cabal Warlock - Has Shadowbolt, [Seed of Corruption], comes with a Succubus or Felhunter pet.
- Cabal Zealot - Shadowbolt, turns into a mini-Magmadar at low health, cannot cast but does extremely heavy melee damage. The form can be spellstolen, and then cancelled. The zealot will not recast it.
- Demons
The demons can be pulled solo but are several times as strong as the regular elites.
- Fel Overseer - Hits very hard, [Intimidating Shout] (AoE [Fear]), random [Charge], self heal at low hp, very resistant, 76k life, immune to Disarm and all slowing effects, CC immune (hint: if you die midcombat, release and run back). Pull well away from other groups to avoid being feared into them.
- Heroic: [Mortal Strike] for ~6000-8000 damage, Uppercut for 1600, Normal for 1400
- Heroic: They no longer charge when they fear their target
- Heroic:
- Malicious Instructor - Hits fairly hard melee, has an AoE Shadow Nova that hits between 1-1.5k, and a debuff, Mark of Malice, which increases melee damage taken. Immune to Enslave Demon and [Banish]. Also cannot be shield bashed to interrupt casting.
- Heroic: Disarms main tank.
There are several trash pulls just before Murmur. After the first two guards, these are in rows of four, with mages in between. If you pull a row while a mage is between that row and the next, both the mage and the next row are likely to come along. Any CC is very helpful. Pulling far back and using timed fear bombs can also help.
The best way to handle these pulls is to wait for Murmur to kill the mage behind the row to be pulled. About 15 seconds after a mage dies, a new one will spawn. Use this time to pull the whole row back. Avoid using crowd control abilities like sap or sheep near where the mobs start, or the mage respawn will come out and bring the next row with it. Instead, fear or sheep the adds as far back as possible after the pull. Done correctly, this limits the pull to 4 mobs. Once each row is killed, the 'filler' mage stops respawning.
Maps
Quests
- [69] The Lexicon Demonica Given by David Wayne at Wayne's Refuge in Terokkar Forest.
- [70] The Book of Fel Names
- [70] Entry Into Karazhan Given by Khadgar at the Terrace of Light in Shattrath City, this is step 5 in a quest chain to obtain [The Master's Key] that starts with Archmage Alturus at the entrance to Karazhan in Deadwind Pass.
- [72] Trouble at Auchindoun Given by Spymistress Mehlisah Highcrown at the Terrace of Light in Shattrath City.
- [72] The Codex of Blood Given by Field Commander Mahfuun outside of the entrance to the Shadow Labyrinth.
- [72] Into the Heart of the Labyrinth Starts at The Codex of Blood inside the instance.
- [72] Find Spy To'gun Given by Spy Grik'tha outside of the entrance to the Shadow Labyrinth.
- [72] The Soul Devices Given by Spy To'gun inside the instance.
External links
| ||||||||