Cronje11458@legacy41532535 (talk | contribs) m (fixed a typo) |
Keyesc30761@legacy41551040 (talk | contribs) (Correct/clarify/add details) |
||
| Line 12: | Line 12: | ||
| id = 7487 |
| id = 7487 |
||
}} |
}} |
||
| − | '''Attunement to the Core''' is obtained by speaking to the [[blood elf]] {{NPC||Lothos Riftwaker}} outside of [[Blackrock Depths]]. It is strongly advised to complete this quest since once completed, {{NPC||Lothos Riftwaker}} can teleport you directly inside. (Note that this is not really an attunement, but a quest to enable a shortcut to enter the Core, see [[Molten Core#Notes|Molten Core/Notes]] for more info.) |
+ | '''Attunement to the Core''' is obtained by speaking to the [[blood elf]] {{NPC||Lothos Riftwaker}} outside of [[Blackrock Depths]]. It is strongly advised to complete this quest since once completed, {{NPC||Lothos Riftwaker}} can teleport you directly inside. (Note that this is not really an attunement, but a quest to enable a shortcut to enter the Core, see [[Molten Core#Notes|Molten Core/Notes]] for more info.) |
<br><br> |
<br><br> |
||
The {{Loot|Common|Core Fragment}} you are asked to obtain is just outside the entrance portal to [[Molten Core]] inside the [[Blackrock Depths]] instance. |
The {{Loot|Common|Core Fragment}} you are asked to obtain is just outside the entrance portal to [[Molten Core]] inside the [[Blackrock Depths]] instance. |
||
| Line 18: | Line 18: | ||
== Quest text == |
== Quest text == |
||
=== Objectives === |
=== Objectives === |
||
| − | Venture to the Molten Core entry portal in Blackrock Depths and recover a {{Loot|Common|Core Fragment}}. Return to Lothos Riftwaker in Blackrock Mountain when you have recovered the Core Fragment. |
+ | Venture to the Molten Core entry portal in Blackrock Depths and recover a {{Loot|Common|Core Fragment}}. Return to Lothos Riftwaker in Blackrock Mountain when you have recovered the Core Fragment. |
=== Description === |
=== Description === |
||
| − | Rifts stir, tear, and collapse all around us, <race>. Not two paces from where I stand is a tear leading through the depths of Blackrock Mountain, into the maw of the Firelord. |
+ | Rifts stir, tear, and collapse all around us, <race>. Not two paces from where I stand is a tear leading through the depths of Blackrock Mountain, into the maw of the Firelord. |
Surprised? Pity... The mortal races cannot comprehend that which they cannot see, touch, or feel. |
Surprised? Pity... The mortal races cannot comprehend that which they cannot see, touch, or feel. |
||
| Line 27: | Line 27: | ||
I assure you, the portal is there and access is possible. |
I assure you, the portal is there and access is possible. |
||
| − | I've piqued your interest? Attunement is simple. Venture into Blackrock Depths and retrieve a core fragment. Return it to me and I shall attune your essence with the portal. |
+ | I've piqued your interest? Attunement is simple. Venture into Blackrock Depths and retrieve a core fragment. Return it to me and I shall attune your essence with the portal. |
=== Completion === |
=== Completion === |
||
| Line 33: | Line 33: | ||
==With a group== |
==With a group== |
||
| − | The entrance is just off the path to [[General Angerforge]], and people will often do Attunement to the Core during '''A shred of hope''', which is part of the [[Drakefire Amulet]], better known as the [[Onyxia]] key quest line. (The [[Drakefire Amulet]] is no longer needed to enter [[Onyxia's Lair]]) |
+ | The entrance is just off the path to [[General Angerforge]], and people will often do Attunement to the Core during '''A shred of hope''', which is part of the [[Drakefire Amulet]], better known as the [[Onyxia]] key quest line. (The [[Drakefire Amulet]] is no longer needed to enter [[Onyxia's Lair]]) |
==Solo play== |
==Solo play== |
||
| − | Soloing Attunement to the Core, the [[Molten Core]] access quest, while not entirely straightforward, is doable. You will need: |
+ | Soloing Attunement to the Core, the [[Molten Core]] access quest, while not entirely straightforward, is doable. You will need: |
* Though the quest can be obtained at level 55, it would be a good idea to be over level 60, considering the reduced [[Aggro Radius]] |
* Though the quest can be obtained at level 55, it would be a good idea to be over level 60, considering the reduced [[Aggro Radius]] |
||
* Several invisibility potions or the ability to [[Stealth]] / [[Prowl]]. |
* Several invisibility potions or the ability to [[Stealth]] / [[Prowl]]. |
||
| − | * A way to get past the Shadowforge Door. Any of these will do: |
+ | * A way to get past the Shadowforge Door. Any of these will do: |
** The [[Shadowforge Key]] |
** The [[Shadowforge Key]] |
||
** [[Lockpicking]] |
** [[Lockpicking]] |
||
| − | ** A friend who can use their key or pick the locks. This is only for the three doors a the very start and won't take more than a minute. |
+ | ** A friend who can use their key or pick the locks. This is only for the three doors a the very start and won't take more than a minute. |
** A lot of patience and patrol dodging skills |
** A lot of patience and patrol dodging skills |
||
| − | * Some way to cross some lava and several mob packs without taking lethal damage. Any of these will do: |
+ | * Some way to cross some lava and several mob packs without taking lethal damage. Any of these will do: |
** Fire Protection Potions |
** Fire Protection Potions |
||
** Power Word: Shield |
** Power Word: Shield |
||
| Line 54: | Line 54: | ||
===Getting past the Shadowforge Door=== |
===Getting past the Shadowforge Door=== |
||
====Without key or lockpicking==== |
====Without key or lockpicking==== |
||
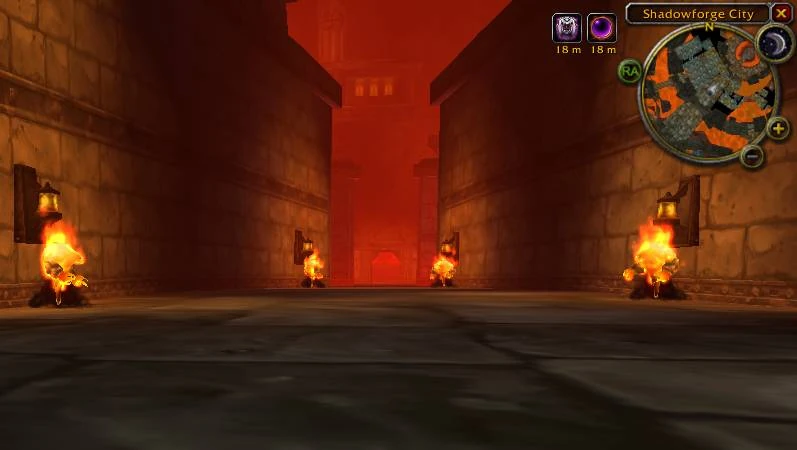
| − | + | Using an invisibility potion, [[Invisibility]], [[Prowl]], or [[Stealth]] to sneak past the guards, make your way into the tunnel (one of the Halls of the Law) directly across the Detention Block from the entrance, avoiding the demon hounds (who see through stealth). Take the 1st left into the Ring of the Law, and step into the middle of the arena to activate the event. Move back to the arena entrance, up against the iron gate that closed behind you. Mobs will enter from the right, and despawn after five minutes, opening the gate on the left. Sneak again up the ramp into the East Garrison. The ramp heading down in front of you is the ramp you will come up after opening the East Garrison Door in the directions below. Do not take the ramp, but turn right and follow the rest of the directions below. the opening downstairs and you will be able to jump down onto the path to the bridge leading to Lord Incendius. |
|
====With key or lockpicking==== |
====With key or lockpicking==== |
||
| − | From the entrance, |
+ | From the entrance, open the Shadowforge Gate on your left. Bypass or kill the patrolling elemental. Open the 1st door on your right (the 2nd Shadowforge Gate). Open the East Garrison Door immediately on your left. There is a fireguard patrolling the ramp on your right. Avoid the patrol and go up the ramp, where there will be another patrolling fireguard. |
| − | Your goal is the window |
+ | Your goal is the window down the hall to your left and around the corner. You can either stealth, or you can run through three packs of mobs, because they will de-aggro once you jump through the window. If you choose to run, use any avoidance/damage mitigation measures you have, including fear. The hall turns hard left at the end, and there are windows on both sides; you will take the window on the right with the cannons in front of it (essentially straight ahead of you if you just angle/jog a bit left at the end of the hall). Jump through the window onto the small ledge outside and stop (so you don't fall off). As soon as you hit the ledge, all the mobs will de-aggro. |
| − | |||
| − | * If one finds this method difficult, consider using a lesser invisibility potion to stop the mobs in the hall from seeing you. |
||
[[Image:Soloattune-corridor.jpg|thumb|Keep to the center and all but the last pair will ignore you.]] |
[[Image:Soloattune-corridor.jpg|thumb|Keep to the center and all but the last pair will ignore you.]] |
||
| − | You will land just behind the |
+ | Turn left and walk off the ledge. You will land just behind the Shadowforge Door, on a bridge with a patrol near the middle and two elementals at the far end. Keep to the right edge, skirt the patrol, and move to the middle of the bridge, where you can then walk between the first three pairs of elementals. Pause before the last set of elementals and watch [[Lord Incendius]] doing laps around the [[Black Anvil]]. Wait until he is moving away from you. Run in and make an immediate left off the bridge and into the lava, and quickly out of the lava onto the ledge ahead on your left (if you have Levitate, you can reach the ledge without hitting the lava). Jumping up out of the lava as you move seems to avoid some damage, so do this when possible. |
| + | Follow this ledge north around the cavern, passing one island, keeping out of the lava where possible, until the ledge angles up out of the lava and ends. You will see a second island ahead of you to the east with Four Fireguard Destroyers. The Molten Core bridge that is your ultimate destination is just beyond this island. |
||
| − | Repeatedly jumping up out of the lava as you move seems to save some damage, so try and do this whenever possible. Your next goal is the wall of the cavern, and it is only a few steps on your left. Follow this wall north around the cavern, passing one island, until you are on a small bluff overlooking a second island with Four Fireguard Destroyers. You will be able to see the destroyers only when correctly positioned on the bluff, so use that as a guide. The island is underneath the bridge to Molten Core that is your ultimate destination. |
||
===Getting to the Molten Core bridge=== |
===Getting to the Molten Core bridge=== |
||
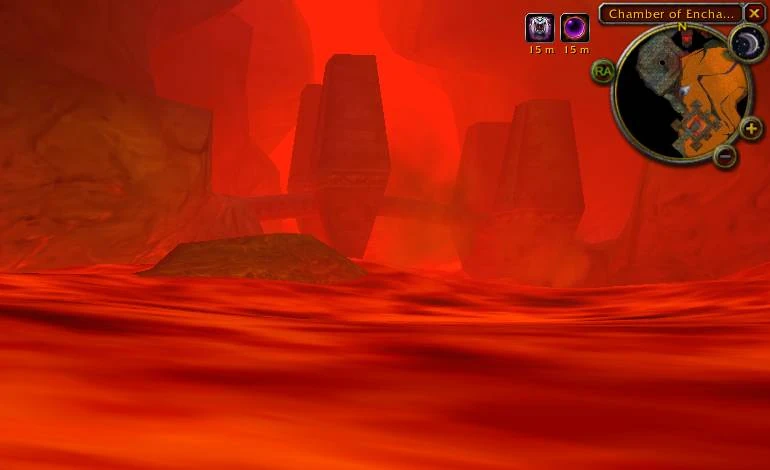
[[Image:Soloattune-islandgoal.jpg|thumb|We're going to the island over yonder, behind which is visible the bridge to the Core.]] |
[[Image:Soloattune-islandgoal.jpg|thumb|We're going to the island over yonder, behind which is visible the bridge to the Core.]] |
||
| + | |||
| − | Now you need to cross the lava and stand on the edge of that island. There are several Fireguard Destroyers patrolling around in the lava between you and the island that can be extremely difficult to spot. The best and easiest way to get past this is to invite a friend or guildmate so that you are in a party, tab target them, and then put a marker above their heads so that you can easily dodge their patrol path. If you don't have any friends, you'll simply have to use trial and error. |
||
| + | Now you need to cross the lava and stand on the near edge of that island. Avoid the Fireguard Destroyers patrolling the lava between you and the island, which are easy to spot if you have Show Enemy Name Plates enabled (default toggle-key 'V'), and swim-jump to the edge of the island, out of aggro range of the elementals there (see screenshot). Take a breather and heal up. Your final goal is in sight. |
||
[[Image:Soloattune-wheretostand.jpg|thumb|Our intrepid heroine demonstrates where to stand.]] |
[[Image:Soloattune-wheretostand.jpg|thumb|Our intrepid heroine demonstrates where to stand.]] |
||
| − | + | Wait for the Fireguard nearest you to head to the right, and then jump back into the lava on the left. Continue east through the lava, hugging the left wall, to a ramp leading out of the lava, passing under the bridge. Turn left, and hug the right wall very tightly, as you come out very close to an elemental on your left. You now stand before the bridge to [[Molten Core]]. |
|
===Getting past the bridge elementals=== |
===Getting past the bridge elementals=== |
||
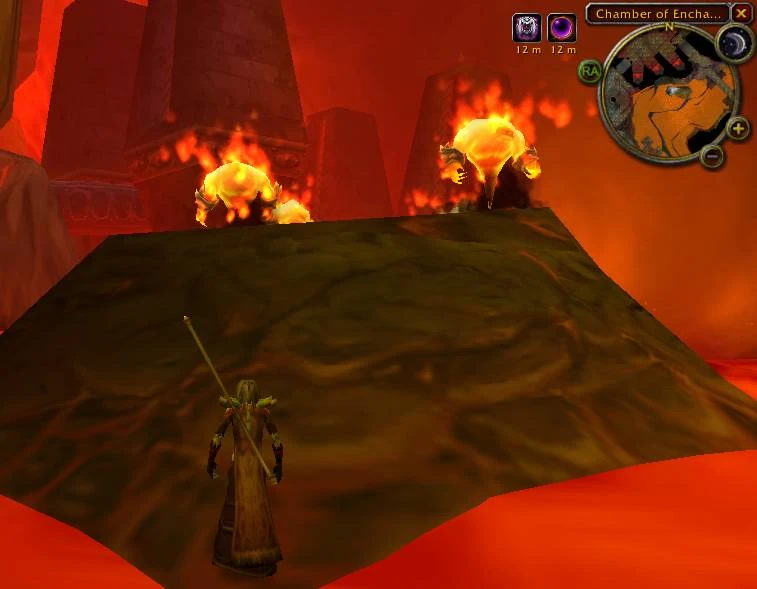
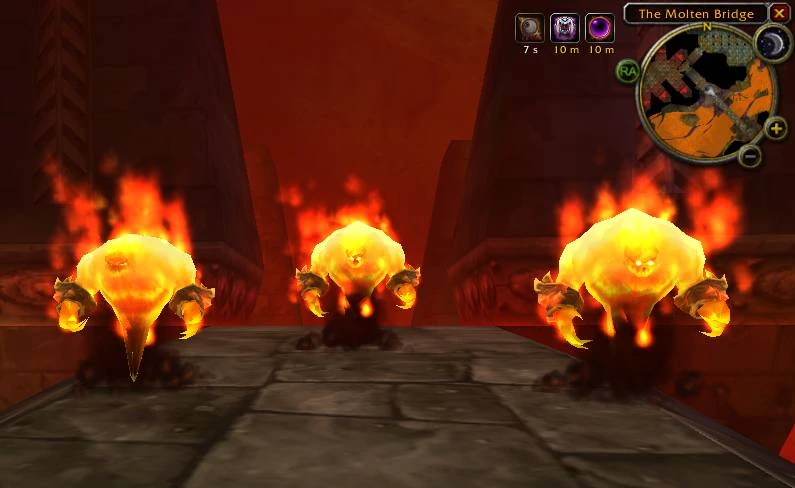
[[Image:Soloattune-bridge.jpg|thumb|Some of Ragnaros's minor minions waiting to welcome you into the Core.]] |
[[Image:Soloattune-bridge.jpg|thumb|Some of Ragnaros's minor minions waiting to welcome you into the Core.]] |
||
| − | + | Stealth again to get past these three elementals, and the next three elementals at the far end of the bridge. |
|
| − | + | Get the [[Core Fragment]] from the stalagmite on the left next to the Molten Core entrance. |
|
| − | + | You can now exit Blackrock Depths by grouping with someone, converting to raid, then entering Molten Core and immediately exiting. It'll exit the instance and bring you right to Lothos Riftwalker where you can turn in the quest for your reward. You are now attuned to the Molten Core! |
|
== External links == |
== External links == |
||
Revision as of 00:45, 8 January 2010
| Start | Lothos Riftwaker |
|---|---|
| End | Lothos Riftwaker |
| Level | 60 (Requires 55) |
| Type | Dungeon |
| Category | Blackrock Depths |
| Experience |
6600 (39 |
| Rewards | Attunement to Molten Core |
Attunement to the Core is obtained by speaking to the blood elf Lothos Riftwaker outside of Blackrock Depths. It is strongly advised to complete this quest since once completed, Lothos Riftwaker can teleport you directly inside. (Note that this is not really an attunement, but a quest to enable a shortcut to enter the Core, see Molten Core/Notes for more info.)
The [Core Fragment] you are asked to obtain is just outside the entrance portal to Molten Core inside the Blackrock Depths instance.
Quest text
Objectives
Venture to the Molten Core entry portal in Blackrock Depths and recover a [Core Fragment]. Return to Lothos Riftwaker in Blackrock Mountain when you have recovered the Core Fragment.
Description
Rifts stir, tear, and collapse all around us, <race>. Not two paces from where I stand is a tear leading through the depths of Blackrock Mountain, into the maw of the Firelord.
Surprised? Pity... The mortal races cannot comprehend that which they cannot see, touch, or feel.
I assure you, the portal is there and access is possible.
I've piqued your interest? Attunement is simple. Venture into Blackrock Depths and retrieve a core fragment. Return it to me and I shall attune your essence with the portal.
Completion
Upon completion, you will receive 6600 experience (or 39![]() compensation at level 70)
compensation at level 70)
With a group
The entrance is just off the path to General Angerforge, and people will often do Attunement to the Core during A shred of hope, which is part of the ![]() [Drakefire Amulet], better known as the Onyxia key quest line. (The
[Drakefire Amulet], better known as the Onyxia key quest line. (The ![]() [Drakefire Amulet] is no longer needed to enter Onyxia's Lair)
[Drakefire Amulet] is no longer needed to enter Onyxia's Lair)
Solo play
Soloing Attunement to the Core, the Molten Core access quest, while not entirely straightforward, is doable. You will need:
- Though the quest can be obtained at level 55, it would be a good idea to be over level 60, considering the reduced Aggro Radius
- Several invisibility potions or the ability to
 [Stealth] /
  [Prowl].
 - A way to get past the Shadowforge Door. Any of these will do:
- The
 [Shadowforge Key]
 - Lockpicking
- A friend who can use their key or pick the locks. This is only for the three doors a the very start and won't take more than a minute.
- A lot of patience and patrol dodging skills
- The
- Some way to cross some lava and several mob packs without taking lethal damage. Any of these will do:
- Fire Protection Potions
- Power Word: Shield
- Healing Potions
Getting past the Shadowforge Door
Without key or lockpicking
Using an invisibility potion, ![]() [Invisibility],
[Invisibility], ![]() [Prowl], or
[Prowl], or ![]() [Stealth] to sneak past the guards, make your way into the tunnel (one of the Halls of the Law) directly across the Detention Block from the entrance, avoiding the demon hounds (who see through stealth). Take the 1st left into the Ring of the Law, and step into the middle of the arena to activate the event. Move back to the arena entrance, up against the iron gate that closed behind you. Mobs will enter from the right, and despawn after five minutes, opening the gate on the left. Sneak again up the ramp into the East Garrison. The ramp heading down in front of you is the ramp you will come up after opening the East Garrison Door in the directions below. Do not take the ramp, but turn right and follow the rest of the directions below. the opening downstairs and you will be able to jump down onto the path to the bridge leading to Lord Incendius.
[Stealth] to sneak past the guards, make your way into the tunnel (one of the Halls of the Law) directly across the Detention Block from the entrance, avoiding the demon hounds (who see through stealth). Take the 1st left into the Ring of the Law, and step into the middle of the arena to activate the event. Move back to the arena entrance, up against the iron gate that closed behind you. Mobs will enter from the right, and despawn after five minutes, opening the gate on the left. Sneak again up the ramp into the East Garrison. The ramp heading down in front of you is the ramp you will come up after opening the East Garrison Door in the directions below. Do not take the ramp, but turn right and follow the rest of the directions below. the opening downstairs and you will be able to jump down onto the path to the bridge leading to Lord Incendius.
With key or lockpicking
From the entrance, open the Shadowforge Gate on your left. Bypass or kill the patrolling elemental. Open the 1st door on your right (the 2nd Shadowforge Gate). Open the East Garrison Door immediately on your left. There is a fireguard patrolling the ramp on your right. Avoid the patrol and go up the ramp, where there will be another patrolling fireguard.
Your goal is the window down the hall to your left and around the corner. You can either stealth, or you can run through three packs of mobs, because they will de-aggro once you jump through the window. If you choose to run, use any avoidance/damage mitigation measures you have, including fear. The hall turns hard left at the end, and there are windows on both sides; you will take the window on the right with the cannons in front of it (essentially straight ahead of you if you just angle/jog a bit left at the end of the hall). Jump through the window onto the small ledge outside and stop (so you don't fall off). As soon as you hit the ledge, all the mobs will de-aggro.

Keep to the center and all but the last pair will ignore you.
Turn left and walk off the ledge. You will land just behind the Shadowforge Door, on a bridge with a patrol near the middle and two elementals at the far end. Keep to the right edge, skirt the patrol, and move to the middle of the bridge, where you can then walk between the first three pairs of elementals. Pause before the last set of elementals and watch Lord Incendius doing laps around the Black Anvil. Wait until he is moving away from you. Run in and make an immediate left off the bridge and into the lava, and quickly out of the lava onto the ledge ahead on your left (if you have Levitate, you can reach the ledge without hitting the lava). Jumping up out of the lava as you move seems to avoid some damage, so do this when possible.
Follow this ledge north around the cavern, passing one island, keeping out of the lava where possible, until the ledge angles up out of the lava and ends. You will see a second island ahead of you to the east with Four Fireguard Destroyers. The Molten Core bridge that is your ultimate destination is just beyond this island.
Getting to the Molten Core bridge

We're going to the island over yonder, behind which is visible the bridge to the Core.
Now you need to cross the lava and stand on the near edge of that island. Avoid the Fireguard Destroyers patrolling the lava between you and the island, which are easy to spot if you have Show Enemy Name Plates enabled (default toggle-key 'V'), and swim-jump to the edge of the island, out of aggro range of the elementals there (see screenshot). Take a breather and heal up. Your final goal is in sight.

Our intrepid heroine demonstrates where to stand.
Wait for the Fireguard nearest you to head to the right, and then jump back into the lava on the left. Continue east through the lava, hugging the left wall, to a ramp leading out of the lava, passing under the bridge. Turn left, and hug the right wall very tightly, as you come out very close to an elemental on your left. You now stand before the bridge to Molten Core.
Getting past the bridge elementals

Some of Ragnaros's minor minions waiting to welcome you into the Core.
Stealth again to get past these three elementals, and the next three elementals at the far end of the bridge.
Get the ![]() [Core Fragment] from the stalagmite on the left next to the Molten Core entrance.
[Core Fragment] from the stalagmite on the left next to the Molten Core entrance.
You can now exit Blackrock Depths by grouping with someone, converting to raid, then entering Molten Core and immediately exiting. It'll exit the instance and bring you right to Lothos Riftwalker where you can turn in the quest for your reward. You are now attuned to the Molten Core!
External links
- Another short movie showing beginning to end attunement with a mage.