@DeletedUser40286997 (talk | contribs) |
|||
| Line 1: | Line 1: | ||
| + | {{for|lore and information on the old boss encounter|Jin'do|Jin'do the Hexxer}} |
||
| − | {{#data:itemtip |
||
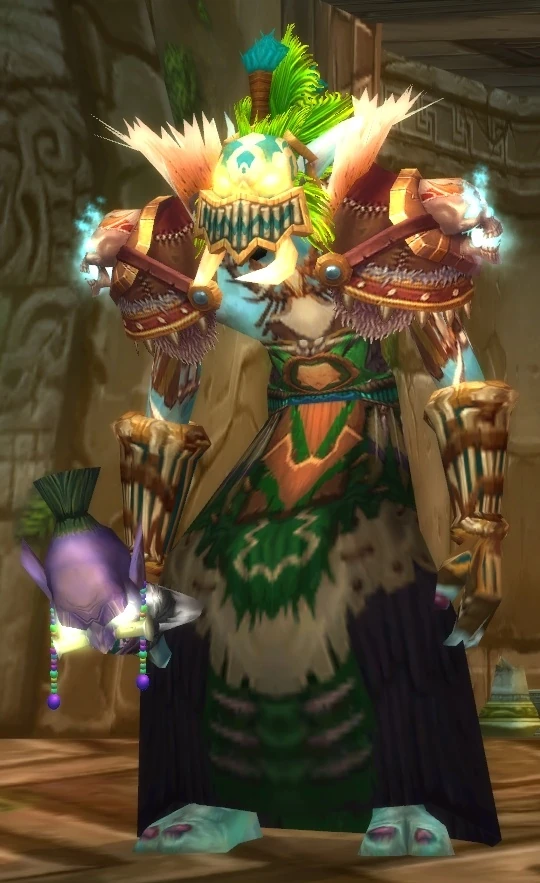
| + | {{npcbox |
||
| − | |name=Handguards of Revitalization |
||
| + | |image= Jin'do the Godbreaker.jpg |
||
| − | |quality=epic |
||
| + | | name = Jin'do the Godbreaker |
||
| − | |icon=inv_gauntlets_62 |
||
| + | | title = |
||
| − | |bind=BoP |
||
| + | | gender = Male |
||
| − | |slot=Hands |
||
| + | | race = Jungle troll |
||
| ⚫ | |||
| + | | creature = Humanoid |
||
| − | |armor=1524 |
||
| ⚫ | |||
| − | |strength=84 |
||
| ⚫ | |||
| − | |stamina=127 |
||
| + | | health = |
||
| − | |red-sockets=1 |
||
| + | | mana = |
||
| − | |yellow-sockets=1 |
||
| + | | aggro = {{aggro|-1|-1}} |
||
| − | |sockbonus=+9 Stamina |
||
| + | | repfaction = |
||
| − | |durability=55 |
||
| + | | affiliation = |
||
| ⚫ | |||
| + | | faction = Combat |
||
| − | |ilvl=239 |
||
| + | | location = [[Zul'Gurub (instance)|Zul'Gurub]] |
||
| − | |sellprice=81820 |
||
| + | | instance = Zul'Gurub |
||
| − | |itemid=45487 |
||
| + | | status = Alive |
||
| − | |parry=46 |
||
| + | | relatives = |
||
| − | |dodge=66}} |
||
| + | }} |
||
| + | '''Jin'do the Godbreaker''' is the final boss of the reopened level 85 heroic version of [[Zul'Gurub (instance)|Zul'Gurub]]. |
||
| − | == Source == |
||
| − | This item can be found inside [[Freya's Gift]] after defeating [[Freya (tactics)|Freya]] on [[hard mode]] in the 25-man version of [[Ulduar (instance)|Ulduar]]. |
||
| + | After his defeat in Zul'Gurub, Jin'do's spirit was tormented by his failure to serve Hakkar's wishes. Jin'do recently found a way back into the world and enslaved the Soulflayer. Bristling with the dead god's terrible powers, Jin'do's plans to restore the Gurubashi empire to its former glory. <ref>[[Encounter Journal]]</ref> |
||
| ⚫ | |||
| ⚫ | |||
| + | ==Abilities== |
||
| ⚫ | |||
| + | ===Phase 1=== |
||
| + | *{{abilities|Deadzone|Creates a field of deadened magic. Units in this field take 90% less magic damage, but hav their casting speed reduced by 90%.|id=97170|image=spell_shadow_antimagicshell}} |
||
| + | *{{abilities|Shadows of Hakkar|Jin'do charges his weapon, causing his attacks to unleash bursts of shadow energy that chain to additional targets, inflicting Shadow damage. 3 sec cast.|id=97172|image=spell_lightning_lightningbolt01}} |
||
| + | **{{abilities|Shadows of Hakkar|Strikes an enemy with Shadow energy that jumps to another nearby enemy, inflicting 121875 to 128125 Shadow damage. The spell affects up to 10 targets.|id=97173|image=spell_lightning_lightningbolt01}} |
||
| + | |||
| + | ===Phase 2=== |
||
| + | [[File:Jin'doBreakingHakkar.jpg|thumb|Jin'do "Breaking" Hakkar]] |
||
| + | ====Jin'do==== |
||
| + | *{{abilities|Shadow Spike|Deals 29750 to 40250 Shadow damage to enemies in a small area.|id=97161|image=inv_elemental_primal_shadow}} |
||
| + | *{{abilities|Summon Spirit|Calls forth a Twisted Spirit.|id=97123|image=ability_warlock_soulsiphon}} |
||
| + | |||
| + | ====Hakkar's Chains==== |
||
| + | *{{abilities|Brittle Barrier|Protected from all attacks and spells. Vulnerable to Body Slams from large, heavy, troll-like objects.|id=97417|image=spell_arcane_arcaneresilience}} |
||
| + | |||
| + | ====Gurubashi Spirit==== |
||
| + | *{{abilities|Frenzy|Attack speed increased by 20% for 20 sec. Stacks up to 10.|id=97088|image=spell_shadow_demonicfortitude}} |
||
| + | *{{abilities|Body Slam|Jumps onto a random target's location, dealing 14137 to 15862 damage to all enemies within 5 yards of that location, knocking them back. Also breaks the Brittle Barrier on Hakkar's Chains.|id=97198|image=ability_heroicleap}} |
||
| + | |||
| + | ==Strategy== |
||
| + | |||
| + | === Pre-encounter === |
||
| + | |||
| + | Before the fight begins, make sure to kill the two Gurubashi Spirit Warriors on either side of Jindo's stairs in order to release their spirits. It will be too late to kill them during the boss fight. |
||
| + | |||
| + | === Phase 1 === |
||
| + | |||
| + | The first phase is relatively straightforward. Jin'do will create Deadzones that reduce magic damage and casting time by 90%; make sure to drag him out of these. However, when he casts Shadows of Hakkar, everyone will need to stand in the deadzone until the buff wears off in order to survive it. Phase 1 ends when Jin'do reaches 70% health. |
||
| + | |||
| + | Tips: |
||
| + | |||
| + | * Try to ensure that Jin'do is outside the bubble as much as possible, including during Shadows of Hakkar. |
||
| + | * When he creates his next bubble, immediately pull Jin'do out of it so he will take full damage. |
||
| + | * Jin'do displays a buff icon that shows his channeling progress for Shadows of Hakkar. |
||
| + | |||
| + | === Phase 2 === |
||
| + | |||
| + | At 70%, Jin'do will pull the entire party into the spirit world, where he is draining the essence of [[Hakkar the Soulflayer]]. Jin'do cannot be attacked during this phase. Hakkar is attached to the ground by three chains. The end of each chain can be attacked and destroyed, but they are protected by Brittle Barriers. In order to destroy these barriers, you must pull one of the Gurubashi Spirits that you killed earlier up to the top of the temple. When they target someone with Body Slam, that person must stand on top of one of the barriers, as the Body Slam will shatter it. When the barrier is destroyed, kill the berserker, destroy the chain, and then pull up another berserker and repeat for the other two. The berserkers will respawn in case they are killed before the barriers are broken. The fight ends once all three chains are destroyed. |
||
| + | |||
| + | Besides the damage from the berserker itself, there are other factors to watch out for in this phase. The first is that the Body Slam leaves a zone that increases all damage taken by 100%. Do not stand in this zone if you can avoid it; the tank will likely die very quickly if he does not move out of it, especially since the berserker has a stacking frenzy buff that increases its attack speed. Jin'do also launches Shadow Spikes at random party members that do roughly 40k shadow damage. The impact point for these is clearly telegraphed, so move away from them. Jin'do will also summon Twisted Spirits throughout this phase. Though they are relatively weak, having only 24k health each, they deal moderately high shadow damage. If they are not killed, they can easily overwhelm the group with sheer numbers. The healer tends to generate a lot of healing aggro on the Twisted Spirits, so plan accordingly. |
||
| + | |||
| + | A simple procedure to follow is: |
||
| + | |||
| + | * Pull a Spirit Warrior to the platform. |
||
| + | * Allow it to slam one party member and break a brittle barrier. |
||
| + | * Keep the Spirit Warrior within the slam debuff, and kill it. |
||
| + | * Kill the chain, before the slam debuff zone expires if possible. |
||
| + | * Repeat with the next two chains. |
||
| + | |||
| + | Melee DPS may enter the slam debuff zone if they have no aggro. The tank, healer, and any DPS who are handling Twisted Spirits should stay clear. |
||
| + | |||
| + | This strategy takes full advantage of the slam debuff zones and minimizes danger to the tank from the Spirit Warriors' stacking frenzy buff. |
||
| + | |||
| + | Wait until the the current chain has been destroyed before pulling up the next warrior. The DPS have enough to worry about while attacking a chain, avoiding Shadow Spikes, and keeping Twisted Spirits off the healer. |
||
| + | |||
| + | === Healer protection === |
||
| + | |||
| + | Keeping the healer alive is one of the challenges of this fight. The healer cannot survive long without assistance, so one or more other party members must neutralize the Twisted Spirits. |
||
| + | |||
| + | '''Tank healer protection''' |
||
| + | |||
| + | The tank may protect the healer by aggroing and tanking most or all of the spirits. In this strategy, the tank remains on the platform at all times and a DPSer is assigned to pull up the Spirit Warriors. A hunter using misdirect is ideal for this task. |
||
| + | |||
| + | The tank moves about, performing AOE attacks such as Blood Boil or Thunder Clap. When not using these abilities, the tank attacks spirits individually to aggro them. DPS should take care when attacking the Spirit Warrior before the slam, as the tank may be generating less threat. The healer and tank stay near one another. The tank continues to pick up Twisted Spirits even while tanking the Spirit Warrior. |
||
| + | |||
| + | This strategy has the advantage that, with a sufficiently skilled tank, no DPS are needed to control the spirits. Thus, the chains will be destroyed quickly. However, it requires an experienced tank and greater coordination between the Spirit Warrior-puller and the tank. Also, the tank will be vulnerable if slammed, due to being inside the +100% damage zone while under attack by the Spirit Warrior and Twisted Spirits. |
||
| + | |||
| + | '''DPS healer protection''' |
||
| + | |||
| + | At least two DPS will be required to sufficiently control the spirits. Ideally, one plate DPS or feral Druid will stay near the healer to attack Twisted Spirits at close range, while a ranged DPS will assist in killing and slowing/rooting them. These DPSers must judge whether the healer is secure enough for them to spend time attacking the Spirit Warrior or a chain. Their goals will be firstly to keep the healer alive, and secondly to destroy the Spirit Warrior and the chain before the slam zone expires. |
||
| + | |||
| + | ==Quotes== |
||
| + | ;Intro |
||
| + | :{{text|yell|Meddlesome insects! Now you will feel my wrath!}} |
||
| + | |||
| + | ;Aggro |
||
| + | :{{text|yell|Welcome to de great show, friends. Just wait 'til ya see what I got in store for ya.}} |
||
| + | |||
| + | ;Killing a Player |
||
| + | *{{text|yell|No one gonna stop Jin'do!}} |
||
| + | *{{text|yell|You nothing!}} |
||
| + | |||
| + | ;Begin Spirit Phase |
||
| + | :{{text|yell|Jin'do the Godbreaker|Now, have a taste of Jin'do's true powah!}} |
||
| + | :''Jin'do transports everyone into the spirit realm where [[Hakkar the Soulflayer|Hakkar]] is imprisoned.'' |
||
| + | :{{text|yell|Spirit of Hakkar|Your deceit is unforgivable, Jin'do. You spit in the face of a god!}} |
||
| + | |||
| + | ;Defeated |
||
| + | :{{text|yell|Spirit of Hakkar|You overstepped your bounds, Jin'do. You toy with powers that are beyond you. Have you forgotten who I am? Have you forgotten what I can do?}} |
||
| + | :{{text|yell|Jin'do the Godbreaker|No... NOOOO!}} |
||
| + | :''Hakkar destroys Jin'do, leaving behind a battered corpse.'' |
||
| + | :{{text|yell|Spirit of Hakkar|Be freed, insects. I will deal with you another time.}} |
||
| + | :''Hakkar returns the heroes back to the mortal realm.'' |
||
| + | |||
| + | ==Loot== |
||
| + | {{lootbox| |
||
| + | |Jeklik's Smasher |
||
| + | |Jin'do's Verdict |
||
| + | |Legacy of Arlokk |
||
| + | |Mandokir's Tribute |
||
| + | |Shield of the Blood God |
||
| + | |The Hexxer's Mask |
||
| + | |Twinblade of the Hakkari |
||
| + | |Twinblade of the Hakkari (offhand) |
||
| + | |Vestments of the Soulflayer |
||
| + | |Zulian Ward |
||
| + | }} |
||
| + | |||
| + | ==Videos== |
||
| + | <youtube>4ijrJjlMRyM</youtube><!--LoD--> |
||
| + | |||
| + | ==Achievements== |
||
| + | * {{achievement|Spirit Twister}} |
||
| + | |||
| ⚫ | |||
| ⚫ | |||
| + | |||
| ⚫ | |||
<!-- Read http://www.wowpedia.org/Wowpedia:External_links before posting your links here. |
<!-- Read http://www.wowpedia.org/Wowpedia:External_links before posting your links here. |
||
Links that do not conform to the rules will be DELETED. |
Links that do not conform to the rules will be DELETED. |
||
Repeat violations may result in a BAN. |
Repeat violations may result in a BAN. |
||
Have a nice day. :) --> |
Have a nice day. :) --> |
||
| + | {{elinks-NPC|52150|armory=1}} |
||
| − | {{Elinks-item|45487}} |
||
| − | [[Category: |
+ | [[Category:Jungle trolls]] |
| − | [[Category: |
+ | [[Category:Bosses]] |
| − | [[Category: |
+ | [[Category:Zul'Gurub mobs]] |
| − | [[Category:Ulduar items]] |
||
Revision as of 23:19, 31 May 2011
- For lore and information on the old boss encounter, see Jin'do and Jin'do the Hexxer.
 | |||||||||||
| Gender | Male | ||||||||||
| Race | Jungle troll (Humanoid) | ||||||||||
| Reaction | Alliance Horde | ||||||||||
| Location | Zul'Gurub | ||||||||||
| Status | Alive | ||||||||||
| |||||||||||
Jin'do the Godbreaker is the final boss of the reopened level 85 heroic version of Zul'Gurub.
After his defeat in Zul'Gurub, Jin'do's spirit was tormented by his failure to serve Hakkar's wishes. Jin'do recently found a way back into the world and enslaved the Soulflayer. Bristling with the dead god's terrible powers, Jin'do's plans to restore the Gurubashi empire to its former glory. [1]
Abilities
Phase 1
 Deadzone — Creates a field of deadened magic. Units in this field take 90% less magic damage, but hav their casting speed reduced by 90%.
- Shadows of Hakkar — Jin'do charges his weapon, causing his attacks to unleash bursts of shadow energy that chain to additional targets, inflicting Shadow damage. 3 sec cast.
- Shadows of Hakkar — Strikes an enemy with Shadow energy that jumps to another nearby enemy, inflicting 121875 to 128125 Shadow damage. The spell affects up to 10 targets.
Phase 2

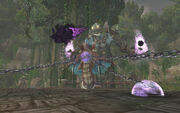
Jin'do "Breaking" Hakkar
Jin'do
- Shadow Spike — Deals 29750 to 40250 Shadow damage to enemies in a small area.
- Summon Spirit — Calls forth a Twisted Spirit.
Hakkar's Chains
- Brittle Barrier — Protected from all attacks and spells. Vulnerable to Body Slams from large, heavy, troll-like objects.
Gurubashi Spirit
- Frenzy — Attack speed increased by 20% for 20 sec. Stacks up to 10.
- Body Slam — Jumps onto a random target's location, dealing 14137 to 15862 damage to all enemies within 5 yards of that location, knocking them back. Also breaks the Brittle Barrier on Hakkar's Chains.
Strategy
Pre-encounter
Before the fight begins, make sure to kill the two Gurubashi Spirit Warriors on either side of Jindo's stairs in order to release their spirits. It will be too late to kill them during the boss fight.
Phase 1
The first phase is relatively straightforward. Jin'do will create Deadzones that reduce magic damage and casting time by 90%; make sure to drag him out of these. However, when he casts Shadows of Hakkar, everyone will need to stand in the deadzone until the buff wears off in order to survive it. Phase 1 ends when Jin'do reaches 70% health.
Tips:
- Try to ensure that Jin'do is outside the bubble as much as possible, including during Shadows of Hakkar.
- When he creates his next bubble, immediately pull Jin'do out of it so he will take full damage.
- Jin'do displays a buff icon that shows his channeling progress for Shadows of Hakkar.
Phase 2
At 70%, Jin'do will pull the entire party into the spirit world, where he is draining the essence of Hakkar the Soulflayer. Jin'do cannot be attacked during this phase. Hakkar is attached to the ground by three chains. The end of each chain can be attacked and destroyed, but they are protected by Brittle Barriers. In order to destroy these barriers, you must pull one of the Gurubashi Spirits that you killed earlier up to the top of the temple. When they target someone with Body Slam, that person must stand on top of one of the barriers, as the Body Slam will shatter it. When the barrier is destroyed, kill the berserker, destroy the chain, and then pull up another berserker and repeat for the other two. The berserkers will respawn in case they are killed before the barriers are broken. The fight ends once all three chains are destroyed.
Besides the damage from the berserker itself, there are other factors to watch out for in this phase. The first is that the Body Slam leaves a zone that increases all damage taken by 100%. Do not stand in this zone if you can avoid it; the tank will likely die very quickly if he does not move out of it, especially since the berserker has a stacking frenzy buff that increases its attack speed. Jin'do also launches Shadow Spikes at random party members that do roughly 40k shadow damage. The impact point for these is clearly telegraphed, so move away from them. Jin'do will also summon Twisted Spirits throughout this phase. Though they are relatively weak, having only 24k health each, they deal moderately high shadow damage. If they are not killed, they can easily overwhelm the group with sheer numbers. The healer tends to generate a lot of healing aggro on the Twisted Spirits, so plan accordingly.
A simple procedure to follow is:
- Pull a Spirit Warrior to the platform.
- Allow it to slam one party member and break a brittle barrier.
- Keep the Spirit Warrior within the slam debuff, and kill it.
- Kill the chain, before the slam debuff zone expires if possible.
- Repeat with the next two chains.
Melee DPS may enter the slam debuff zone if they have no aggro. The tank, healer, and any DPS who are handling Twisted Spirits should stay clear.
This strategy takes full advantage of the slam debuff zones and minimizes danger to the tank from the Spirit Warriors' stacking frenzy buff.
Wait until the the current chain has been destroyed before pulling up the next warrior. The DPS have enough to worry about while attacking a chain, avoiding Shadow Spikes, and keeping Twisted Spirits off the healer.
Healer protection
Keeping the healer alive is one of the challenges of this fight. The healer cannot survive long without assistance, so one or more other party members must neutralize the Twisted Spirits.
Tank healer protection
The tank may protect the healer by aggroing and tanking most or all of the spirits. In this strategy, the tank remains on the platform at all times and a DPSer is assigned to pull up the Spirit Warriors. A hunter using misdirect is ideal for this task.
The tank moves about, performing AOE attacks such as Blood Boil or Thunder Clap. When not using these abilities, the tank attacks spirits individually to aggro them. DPS should take care when attacking the Spirit Warrior before the slam, as the tank may be generating less threat. The healer and tank stay near one another. The tank continues to pick up Twisted Spirits even while tanking the Spirit Warrior.
This strategy has the advantage that, with a sufficiently skilled tank, no DPS are needed to control the spirits. Thus, the chains will be destroyed quickly. However, it requires an experienced tank and greater coordination between the Spirit Warrior-puller and the tank. Also, the tank will be vulnerable if slammed, due to being inside the +100% damage zone while under attack by the Spirit Warrior and Twisted Spirits.
DPS healer protection
At least two DPS will be required to sufficiently control the spirits. Ideally, one plate DPS or feral Druid will stay near the healer to attack Twisted Spirits at close range, while a ranged DPS will assist in killing and slowing/rooting them. These DPSers must judge whether the healer is secure enough for them to spend time attacking the Spirit Warrior or a chain. Their goals will be firstly to keep the healer alive, and secondly to destroy the Spirit Warrior and the chain before the slam zone expires.
Quotes
- Intro
- Meddlesome insects! Now you will feel my wrath!
- Aggro
- Welcome to de great show, friends. Just wait 'til ya see what I got in store for ya.
- Killing a Player
- No one gonna stop Jin'do!
- You nothing!
- Begin Spirit Phase
- Jin'do the Godbreaker yells: Now, have a taste of Jin'do's true powah!
- Jin'do transports everyone into the spirit realm where Hakkar is imprisoned.
- Spirit of Hakkar yells: Your deceit is unforgivable, Jin'do. You spit in the face of a god!
- Defeated
- Spirit of Hakkar yells: You overstepped your bounds, Jin'do. You toy with powers that are beyond you. Have you forgotten who I am? Have you forgotten what I can do?
- Jin'do the Godbreaker yells: No... NOOOO!
- Hakkar destroys Jin'do, leaving behind a battered corpse.
- Spirit of Hakkar yells: Be freed, insects. I will deal with you another time.
- Hakkar returns the heroes back to the mortal realm.
Loot
Videos
Achievements
Patch changes
- Patch 4.1.0 (2011-04-26): Added.