Sports72Xtrm-gpuser (talk | contribs) |
Shenky-gpuser (talk | contribs) No edit summary |
||
| Line 1: | Line 1: | ||
| + | {{for|her character biography|Sintharia}} |
||
{{npcbox |
{{npcbox |
||
| − | | |
+ | |image = Sinestra.jpg |
| + | |name = Sinestra |
||
| − | | titles = King of Gilneas |
||
| + | |title = Consort of Deathwing |
||
| − | | name = Genn Greymane |
||
| − | | |
+ | |gender = Female |
| + | |race = Black wyrm |
||
| − | | races = [[Worgen]] |
||
| + | |creature = Dragonkin |
||
| − | | level = ?? (Boss) |
||
| + | |level = ?? |
||
| − | | health = 51,535,000 |
||
| − | | |
+ | |type = Boss |
| + | |faction = Combat |
||
| − | | creature = Humanoid |
||
| + | |location = [[Twilight Caverns]], [[Bastion of Twilight]] |
||
| − | | character = [[Warrior]] |
||
| + | |aggro = {{aggro|-1|-1}} |
||
| − | | affiliation = [[Alliance]] and [[Gilneas|Kingdom of Gilneas]], formerly the [[Alliance of Lordaeron]] |
||
| + | |health = 42,950,000 (10)<br/>128,838,000 (25) |
||
| − | | faction = Alliance |
||
| + | |mana = |
||
| − | | occupation = King of Gilneas |
||
| + | |instance=Bastion of Twilight |
||
| − | | status = Alive |
||
| − | | location = Throughout [[Gilneas]] (worgen starting quests)<br>[[Stormwind Keep]], [[Stormwind City]] |
||
| − | | relatives = [[King Archibald Greymane|Archibald]] (father),<ref name="lohp">[[Lord of his Pack]]</ref> [[Mia Greymane|Mia]] (wife),<ref>[[Quest:To Greymane Manor]]</ref> [[Liam Greymane|Liam]] (son),<ref>[[Quest:All Hell Breaks Loose]]</ref> [[Tess Greymane|Tess]] (daughter)<ref name="ska">[[Quest:Save Krennan Aranas]]</ref> |
||
}} |
}} |
||
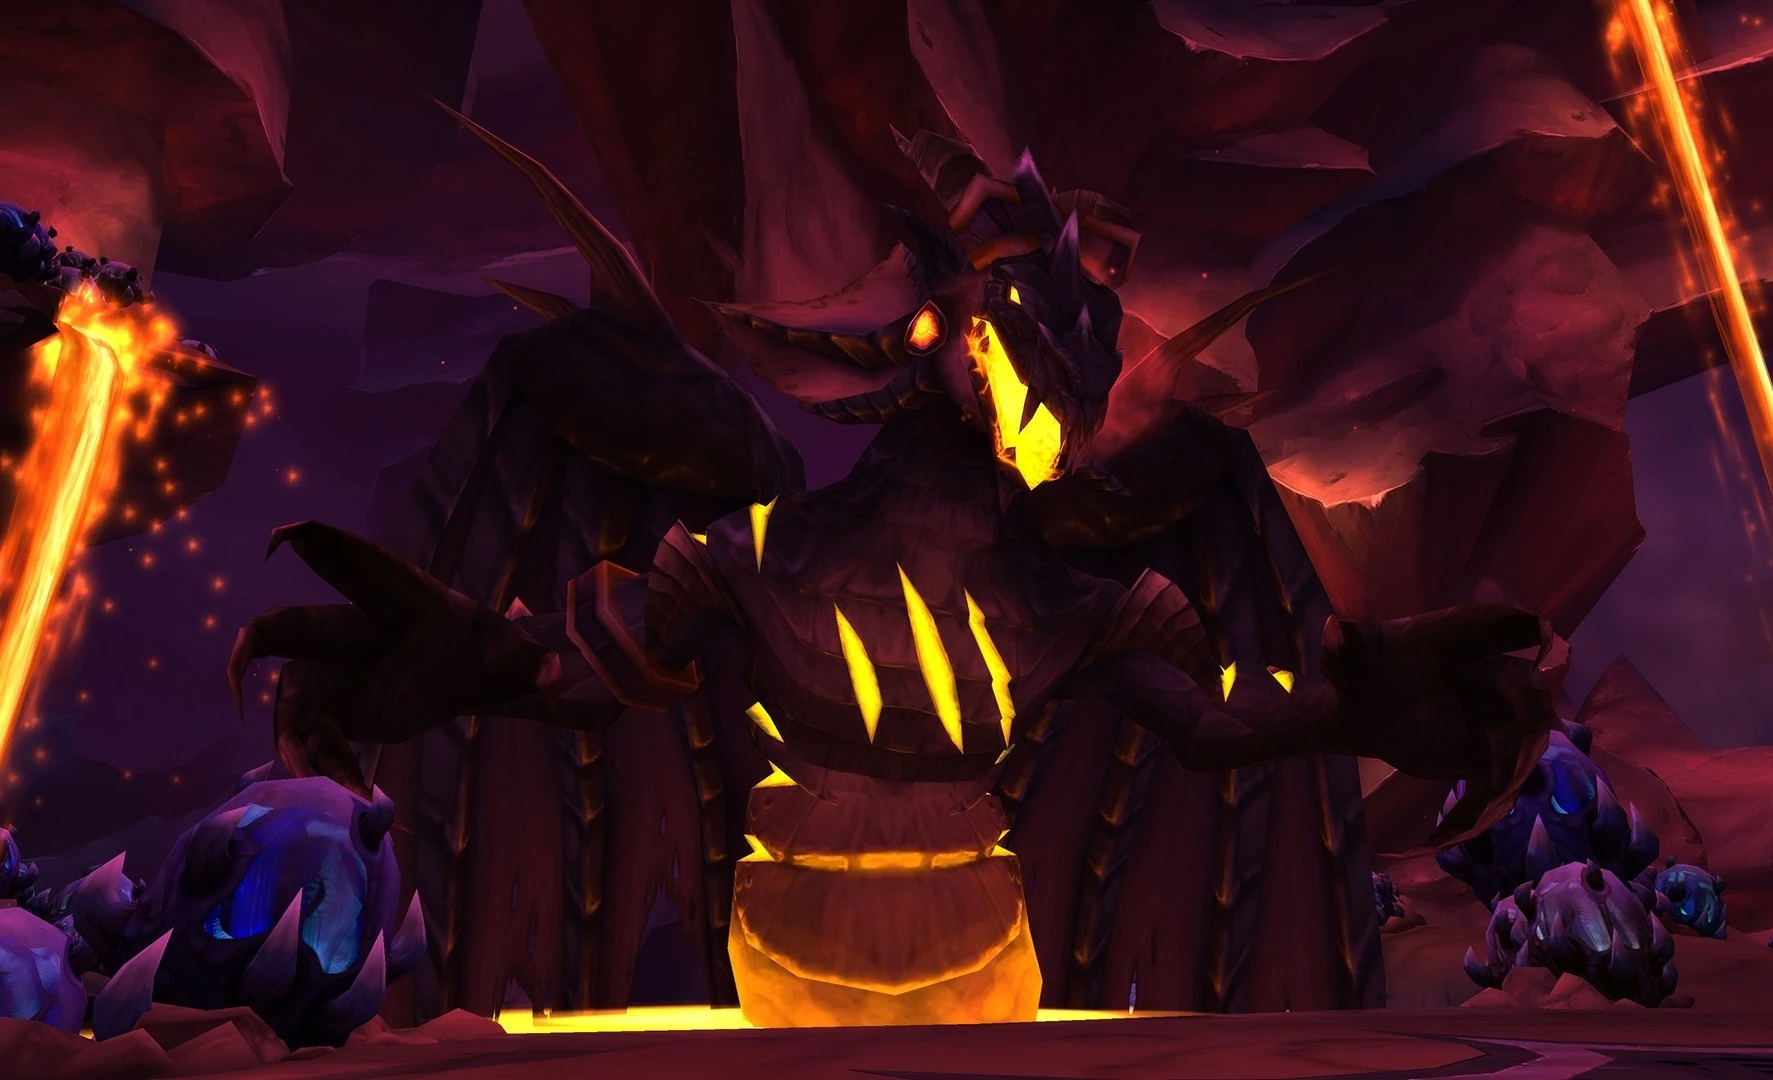
| + | '''Sinestra''' is a heroic-mode only boss in the [[Bastion of Twilight]], described as similar to [[Algalon the Observer]] in [[Ulduar]]. She is only accessible after [[Cho'gall (tactics)|Cho'gall]] is defeated. |
||
| + | Originally Deathwing's Prime Consort, Sinestra created the first twilight dragons, but was later obliterated by one of her terrifying creations. Now a ravaged husk reanimated by insidious magic, Sinestra oversees the creation of new twilight clutches. <ref>[[Encounter Journal]]</ref> |
||
| − | '''Genn Greymane''' (sometimes spelled as "'''Graymane'''"<ref name="ToD 44">''[[Tides of Darkness]]'', 44</ref><ref>''[[Tides of Darkness]]'', 49</ref><ref>''[[Tides of Darkness]]'', 51</ref><ref>''[[Tides of Darkness]]'', 71-74</ref>) is the current King of [[Gilneas]], and one of the original founders of the [[Alliance of Lordaeron]].<ref>''[[Tides of Darkness]]'', 72-73</ref> He is a large bearish man, a brawny warrior with thick features, a heavy beard, and black and gray armor who must be in his seventies or eighties by the time of ''Cataclysm''.<ref name="ToD 44" /> Greymane was also noted for being stubborn,<ref>[[Quest:The King's Observatory]]</ref> proud, strong-willed, cunning, and arrogant. |
||
| + | World first ''heroic'' kill on 25-man achieved 20.1.2011 by '''DREAM Paragon - EU-Lightining's Blade'''. |
||
| − | During the [[Second War]], Greymane met with the other human leaders at [[Capital City]] to hear of [[Stormwind]]'s fall at the hands of the orcish [[Horde]]. Greymane joined the other human leaders in forming the Alliance of Lordaeron to counter the Horde threat, but due to his pride, he offered only token support.<ref name="lohp" /> After the conclusion of the Second War, Greymane chafed at using Gilnean taxes to help pay for the orc internment camps and [[Nethergarde Keep]].<ref name="BtDP 19">''[[Beyond the Dark Portal]]'', 19</ref> Greymane decided that Gilneas could not and would not pay for the wars of other nations, so he withdrew Gilneas from the Alliance, ordered the construction of the [[Greymane Wall]] and isolated Gilneas from the rest of the world.<ref name="lohp" /> |
||
| + | ==Attacks and abilities== |
||
| − | Around the time of the [[Third War]], Greymane instructed [[Archmage Arugal]], a [[Dalaran]] wizard loyal to Gilneas, to summon feral [[worgen]] to protect Gilneas from the [[Scourge]] threat. The plan backfired, and the worgen curse would eventually run rampant among the Gilnean population. In the time between the Third War and the [[War against the Lich King]], the number of those afflicted with the [[Worgen curse]] had grown and were now attacking [[Gilneas City]]. To counter the threat, Greymane helped to defend the city and aided in the evacuation of citizens to [[Duskhaven]]. In the aftermath, Greymane faced the dual threats of the Cataclysm and the Forsaken invasion, culminating in the battle to retake Gilneas City from the Forsaken and witnessing the death of his son and heir, [[Liam Greymane|Liam]].<ref>[[Quest:Slowing the Inevitable]]</ref> |
||
| + | ===Stage One: I Will Deal With You Myself!=== |
||
| + | At the outset of the battle, Sinestra is weakened from past battles and from nurturing the Twilight brood. She begins with only 60% of her maximum health, and her damage dealt is reduced by by 40%. |
||
| + | *{{abilities|Wrack|Sinestra causes a random player to suffer Shadow damage every 2 sec. for 1 min. with the damage taken increasing rapidly. When a player dispels Wrack, it bounces to two nearby allies of the afflicted player. Wrack retains its remaining duration but returns to its original damage values.|type=healer|type2=magic|id=89421|image=ability_creature_cursed_03}} |
||
| − | Humbled by his son's death and the devastation of his kingdom, Greymane accepted the aid of the [[night elves]], who had offered to relocate Gilnean survivors to [[Darnassus]]. In a fit of stubbornness, Greymane was against formally rejoining the Alliance until he had almost lost his wife and daughter during the crossing.<ref name="lohp" /> After a short layover at Darnassus, Greymane decided to travel to Stormwind to speak with [[Varian Wrynn]].<ref>[[Quest:Breaking Waves of Change]]</ref> |
||
| + | *{{abilities|Flame Breath|Sinestra unleashes a torrent of flame that sweeps across her platform, inflicting 95000 to 105000 Fire damage to all enemies.|id=18435|image=spell_fire_fire}} |
||
| + | *{{abilities|Twilight Slicer|Sinestra summons two shadowy orbs, each of which fixates on a player and begins to pursue that player. These spheres are linked together by a cutting beam of pure twilight energy that inflicts 46250 to 53750 Shadow damage per 5 sec. to any player who comes into contact with the beam.Each sphere also pulses twilight energy, inflicting 27000 to 33000 Shadow damage every 0.5 sec in a 5 yard radius. The orbs dissipate after 15 sec.|type=deadly|id=92852|image=spell_shadow_shadowmend}} |
||
| + | *{{abilities|Twilight Blast|When Sinestra cannot reach anyone in melee range, she blasts an enemy for 166250 to 183750 Shadow damage.|id=87947|image=spell_fire_twilightpyroblast}} |
||
| + | *[[Twilight Whelp]]s – Sinestra periodically calls forth a set of five Twilight Whelps to attack intruders. |
||
| + | **{{abilities|Twilight Spit|The Twilight Whelps spit shadowy bile on their target, inflicting 3800 to 4200 Shadow damage and increasing the target's Shadow damage taken by 10%. This effect stacks.|type=tank|id=89299|image=spell_fire_twilightflamebreath}} |
||
| + | **{{abilities|Twilight Essence|When a Twilight Whelp dies, the essence instilled in it by Sinestra leaks out, forming a bubbling puddle beneath its corpse. If this essence touches any other dead Twilight Whelp, that Whelp reanimates. Each pool of Twilight Essence expands over time. The pools inflict 9250 to 10750 Shadow damage every 2 sec.|type=tank|id=88146|image=spell_fire_twilightnova}} |
||
| + | ===Stage Two: I Tire of This!=== |
||
| − | ==Biography== |
||
| + | When Sinestra is brought to 30% health, she draws upon ambient energy to restore her power and erects a shield to protect herself. |
||
| − | ===Early life=== |
||
| − | {{novel-section}} |
||
| − | Genn Greymane is the son of [[Archibald Greymane]], the Gilnean king who lead Gilneas into its industrial age. From a young age, Greymane was taught by his father not to rely on others and that asking for help was a weakness, and this characteristic stuck with him throughout his life. Greymane had grown up with the man who would eventually become [[Baron Ashbury]], and Ashbury's father was a member of Archibald's council of Lords that had helped Archibald build up Gilneas into the industrial nation it would become. Because of the closeness of the two families, Greymane was advised by Archibald to put his trust into the Ashbury family's fidelity to the crown.<ref name="lohp" /> |
||
| + | *'''A Clash of Flame and Twilight''' |
||
| − | After Archibald's death, Greymane took the throne and led Gilneas much like his father had. At some point, Greymane met his wife, [[Mia Greymane|Mia]], at the Royal Aderic Banquet. They had two children: [[Liam Greymane|Liam]], his son and heir, and [[Tess Greymane|Tess]], who would have died in infancy if not for the intervention of the Royal Chemist, [[Krennan Aranas]].<ref name="ska" /> Greymane was gruff with his children, and rarely told them he loved them. |
||
| + | **The red dragon [[Caelen]] comes to the party's aid and engages in a magical duel with Sinestra. The duelist with the most mana gains the upper hand. |
||
| + | **{{abilities|Pyrrhic Focus|Calen burns his own health reserves to restore his mana. His focus also increases healing done to Calen by 500%.|type=healer|id=87323|image=spell_fire_immolation}} |
||
| + | **{{abilities|Mana Barrier|A powerful barrier envelops Sinestra, continually replenishing any lost health at the expense of her mana.|type=dps|id=70842|image=spell_shadow_detectlesserinvisibility}} |
||
| + | *[[Pulsing Twilight Egg]] – Sinestra has stored vast reserves of twilight energy in these massive eggs. |
||
| − | ===Alliance of Lordaeron=== |
||
| + | **{{abilities|Twilight Carapace|The Pulsing Twilight Eggs are normally impervious to all damage. In moments of dire need, Sinestra directly siphons from the eggs and causes their Twilight Carapace to drop temporarily.|type=dps|id=87654|image=spell_fire_twilightfireward}} |
||
| − | {{novel-section}} |
||
| + | *[[Twilight Spitecaller]] – These twilight dragonkin periodically stream into the room during the clash between Calen and Sinestra. |
||
| − | Prior to the Second War, Greymane was among the human leaders summoned to an emergency meeting at [[Capital City]] in [[Lordaeron]] by [[King Terenas Menethil II]]. Accompanied by a group of nobles including Baron Ashbury, [[Lord Vincent Godfrey]], and [[Lord Darius Crowley]], the youngest and newest of the council of Lords, Greymane listened to the plight of [[Anduin Lothar]] regarding the fall of [[Stormwind]] and the threat of the orcish [[Horde]]. Greymane dismissed these concerns, stating with confidence that the Gilnean army could withstand any threat. While most of the other heads of the human nations were in agreement that an alliance against the orcish invaders was needed, Greymane was hesitant about joining, and was difficult about it.<ref>''[[Tides of Darkness]]'', 71</ref><ref>''[[Tides of Darkness]]'', 76</ref> |
||
| + | **{{abilities|Unleash Essence|The Twilight Spitecaller releases a torrent of twilight energy that afflicts all nearby enemies, inflicting damage equal to 10% of each target's maximum health every 1 sec. Conventional interrupts cannot prevent the casting of the spell, but other effects that cause loss of control may be effective.|type=deadly|id=90028|image=spell_fire_twilightnova}} |
||
| + | **{{abilities|EnrageIndomitable|If a Twilight Spitecaller is incapacitated for more than a brief period of time, it regains control through a surge of sheer will. The Spitecaller becomes immune to all bonds and restraints until a player removes this effect, and inflicts 40000 Shadow damage and knocks back players within 8 yards.|type=enrage|id=90045|image=spell_shaman_improvedreincarnation}} |
||
| + | *[[Twilight Drake]] – Twilight Drakes swoop in from the sides of the cavern during the clash between Calen and Sinestra. |
||
| − | After a polite state dinner with his fellow rulers, Greymane retired to his guest chambers for the evening to discuss the situation with his nobles. Crowley was enthusiastic about the prospect of an alliance, stating that sending the whole Gilnean army to aid their sister nations against the orcish threat would strengthen ties and it would help the people of Gilneas in the long run. Greymane felt Crowley was too naive and idealistic in this situation, and dismissed his ideas. Godfrey agreed with Crowley, but suggested that to stay in the good graces of their sister kingdoms for the benefit of trade and tariffs, they should only send a small token force instead of the whole Gilnean army. Baron Ashbury echoed Godfrey's sentiment, and Greymane stated that he would consider it.<ref name="lohp" /> |
||
| + | **{{abilities|Twilight Breath|The Drake's breath inflicts 38400 to 41600 Shadow damage in a 25 yard 60 degree cone in front of it.|id=76817|image=spell_fire_twilightflamebreath}} |
||
| + | **{{abilities|Absorb Essence|If a Twilight Drake comes into contact with a pool of Twilight Essence, it siphons that energy and causes the pool to shrink and eventually vanish entirely. Each charge of Essence absorbed increases the Drake's damage by 10%, and its health by 10%. This effect stacks.|type=tank|id=90107|image=spell_shadow_shadowpower}} |
||
| + | ===Stage Three: Now Die!=== |
||
| − | When the rulers or the human nations met again, Greymane voted to join the [[Alliance of Lordaeron]], but Gilneas offered only token support. Thus, Gilneas was essentially separate from the Alliance of Lordaeron for the entirety of the Second War. |
||
| + | Once the players destroy the [[Pulsing Twilight Eggs]], Sinestra brings her magical duel with Calen to an end and attacks the players with her full fury. Empowered by the twilight eggs from which she reclaims her siphoned energy, Sinestra no longer deals reduced damage. |
||
| + | *{{abilities|Essence of the Red|Calen bestows a blessing of Alexstrasza upon the raid, granting all players 100% melee, ranged, and spell haste, and causing them to regain 5% of their maximum mana per second. Essence of the Red lasts for 3 min.|id=95401|image=spell_fire_lavaspawn}} |
||
| − | After the betrayal of [[Aiden Perenolde]], the ruler or [[Alterac]], was revealed, Greymane had his eye on ruling the now-leaderless kingdom, even though he had no right to it. He supported the claim of Lord Perenolde's nephew, [[Isiden Perenolde|Isiden]], to Alterac's throne.<ref>''[[Day of the Dragon]]'', 7</ref> Over time, due to mind control by the black dragon Deathwing, he grew to support Lord [[Daval Prestor]] (actually [[Deathwing]] in human form), in his bid for the throne. However, after Prestor vanished, Greymane continued to push Isiden's claim. |
||
| + | *{{abilities|Wrack|Sinestra causes a random player to suffer Shadow damage every 2 sec. for 1 min. with the damage taken increasing rapidly. When a player dispels Wrack, it bounces to two nearby allies of the afflicted player. Wrack retains its remaining duration but returns to its original damage values.|type=healer|type2=magic|id=89421|image=ability_creature_cursed_03}} |
||
| + | *{{abilities|Flame Breath|Sinestra unleashes a torrent of flame that sweeps across her platform, dealing 95000 to 105000 Fire damage to all enemies.|id=18435|image=spell_fire_fire}} |
||
| + | *{{abilities|Twilight Slicer|Sinestra summons two shadowy orbs, each of which fixates on a player and begins to pursue that player. These spheres are linked together by a cutting beam of pure twilight energy that inflicts 46250 to 53750 Shadow damage per 5 sec. to any player who comes into contact with the beam.Each sphere also pulses twilight energy, inflicting 27000 to 33000 Shadow damage every 0.5 sec in a 5 yard radius. The orbs dissipate after 15 sec.|type=deadly|id=92852|image=spell_shadow_shadowmend}} |
||
| + | *{{abilities|Twilight Blast|When Sinestra cannot reach anyone in melee range, she blasts an enemy for 166250 to 183750 Shadow damage.|id=87947|image=spell_fire_twilightpyroblast}} |
||
| + | *[[Twilight Whelp]]s – Sinestra periodically calls forth a set of five Twilight Whelps to attack intruders. |
||
| − | ===Seceding from the Alliance=== |
||
| + | **{{abilities|Twilight Spit|The Twilight Whelps spit shadowy bile on their target, inflicting 3800 to 4200 Shadow damage and increasing the target's Shadow damage taken by 10%. This effect stacks.|type=tank|id=89299|image=spell_fire_twilightflamebreath}} |
||
| − | {{novel-section}} |
||
| + | **{{abilities|Twilight Essence|When a Twilight Whelp dies, the essence instilled in it by Sinestra leaks out, forming a bubbling puddle beneath its corpse. If this essence touches any other dead Twilight Whelp, that Whelp reanimates. Each pool of Twilight Essence expands over time. The pools inflict 9250 to 10750 Shadow damage every 2 sec.|type=tank|id=88146|image=spell_fire_twilightnova}} |
||
| − | [[File:CurseWorgen4CoverSample.jpg|thumb|right|Genn in a Curse of the Worgen comic cover.]] |
||
| − | After the war, Greymane chafed at having Gilnean taxes pay for orc interment camps and the construction of [[Nethergarde Keep]]. In a discussion with Godfrey, Greymane questioned the wisdom of listening to the advice of Crowley and Godfrey in joining the Alliance, stating that it had gotten them nothing but dead Gilneans. Greymane stated his plans to withdraw from the Alliance and wall off Gilneas from the rest of the world. Upon looking at the map of Gilneas Greymane had in front of them, Godfrey suggested the wall be built through Crowley's lands, in effect cutting off [[Pyrewood Village]] and [[Ambermill]] from the rest of the kingdom, as Crowley's lands had the mountains as a natural barrier the wall could be built into. Greymane agreed, and was confident that Crowley would understand his reasoning.<ref name="lohp" /> |
||
| + | ==Strategy== |
||
| − | Crowley did not take Greymane seceding from the Alliance and the building of the wall through his lands as well as Greymane hoped he would. Crowley started a rebellion against Greymane and his decision to secede from the Alliance, gathering likeminded Gilneans including his daughter [[Lorna Crowley|Lorna]] and [[Tobias Mistmantle]] in forming the [[Northgate rebellion]]. The resulting civil war weakened the kingdom and split the populace into two groups, "royalist" and "rebel", labels that continued to spark fights years after the event ended. In an act of defiance against Greymane, it was Crowley that sent the group of soldiers known as the [[Gilneas Brigade]] to assist [[Lady Jaina Proudmoore]] during the [[Third War]].<ref name="lohp" /> |
||
| + | ===Phase 1=== |
||
| + | The entire fight is a severe dps check, but phase 1 may be the most important. The boss has a somewhat significant aggro radius and you’ll want to have your whole raid within about 10 or 15 yards of the boss. Have your tank give a 5 second countdown while the raid times their most powerful spells and abilities to hit the boss simultaneously. You’ll need to do all you can to maximize your raid’s dps in this phase. Use raid wide movement increase buffs like Stampeding Roar to help DPSers move in close to the boss faster after the pull. The raid should maintain an even spread in front of the boss without being too stacked up. Do not stand too close to the boss, but try to stay within 10 or 15 yards. You’ll want to assign your healing as follows: |
||
| − | Greymane was hurt that a man he considered his friend started an uprising against him, but did not blame him for it. Greymane's forces eventually captured Crowley and his followers and threw them in jail.<ref name="od">[[Quest:Old Divisions]]</ref> |
||
| + | 1 healer for the main tank as well as a beacon if available. |
||
| − | ===Unleashing the Worgen=== |
||
| − | {{novel-section}} |
||
| − | During the [[Third War]], Greymane had secretly consulted with [[Kirin Tor]] Archmage [[Arugal]], a Gilnean patriot who had discovered a way to summon worgen, feral cratures from [[Emerald Dream|another dimension]], to use a an instrument against the Scourge. Desperate to protect his people, and telling no one of his plan, Greymane ordered Arugal to summon the worgen in an effort to protect his nation. Yet the feral creatures soon spread their [[Worgen curse|curse]] throughout the human population of [[Silverpine Forest]], infecting Gilnean soldiers stationed beyond the Greymane Wall. Before long the affliction had advanced through the legendary barrier and was gradually eating away at Gilneas’ humanity. As reports of strange attacks and disappearances rose, fear took root in the hearts of Greymane’s people. To counter the threat, Greymane and his nobles would secretly hold hunting parties to track down and shoot any feral worgen they came across. During one of these trips, Greymane was bitten and infected with the curse, a fact he concealed from Godfrey and the rest of the nobles. |
||
| + | 1 healer for the offtank as well as a second beacon if available. |
||
| − | ===The Cataclysm=== |
||
| − | [[File:Wow CoW pg8.jpg|thumb|right|King Genn Greymane and a worgen pack]] |
||
| − | [[File:GennLordofHisPack.jpg|thumb|left|Genn in the short story "Lord of His Pack"]] |
||
| − | The Northgate rebellion left Gilneas in a weakened state, and the number of Gilneans infected with the [[Worgen curse]] rose to the point where feral worgen openly attacked [[Gilneas City]]. Greymane, his son [[Liam Greymane|Liam]], and Lord Godfrey led the defense against the infected worgen, and Greymane decided that despite their differences, they needed Crowley to assist them, so Greymane arranged for Crowley's release. Upon his release, Crowley gathered some of his fellow rebels to the cause and let Greymane's forces make use of his hidden artillery stash. |
||
| + | 3 healers with Wrack > Raid > Tanks priority. This means that these healers make sure to top of players with the Wrack debuff first, then other non-tanks, then tanks. |
||
| − | During the chaos, the Royal Chemist, [[Krennan Aranas]], was captured, and once he was secure, the order was given by Greymane to evacuate Gilneas City. Crowley and his men decided to stay behind to create a distraction so that Greymane could evacuate his people to safety in [[Duskhaven]], where they lived in peace for a relative time. During the Cataclysm, the barrier reefs protecting Gilneas shattered and parts of the Greymane Wall were exposed, allowing the [[Forsaken]] to invade Gilneas and take [[Gilneas City]] from the rampaging feral worgen. |
||
| + | You’ll need to train a primary and secondary dispeller for wrack as well. The primary dispeller should be a dps class like a shadow priest. The secondary or backup dispeller can be a healer. The general rule of thumb for wrack is that it should be dispelled after being on its target for 10 seconds. If wrack is on a player for longer than 10 seconds, the player risks being killed by the damage. If it is dispelled long before 10 seconds, the raid may end up with too many wracks out at one time and being overwhelmed. The easiest and best way to gain an advantage on wrack, is to extend the duration or time of the first application of wrack each time it goes out. This means if Sinestra casts wrack on a warrior, at around 10 seconds that warrior should use shield wall to keep the debuff longer. This will result in a much easier time dispelling the wrack when it has split multiple times. This goes for any class with abilities that will lower the damage for wrack. It is additionally helpful to have holy priests guardian spirit the first wrack victim so that they can hold the debuff for even one more tick. Raid healers should make sure to keep players with Wrack topped off as much as possible. The number one ability players need to keep their eyes open for are the Twilight Orbs. When these spawn, it is important that players don’t immediately panic and scatter away from them. A small purple beam will form between the orb and player it is fixated on. Recognizing which player is fixated is key to reacting properly to these orbs. Players who are not targeted by the orb must not only get away from the orb, but also make sure they are not between the two orbs. There is around a 3 second grace period between when the beam forms and when the Orbs begin to pulse and slicer between them forms. The players who are fixated should run away from the raid and kite the orbs to the back of the room. In order to increase dps these players should kite around each other halfway through their path and begin returning to the raid. When done properly the orbs will despawn before coming back into the raid and the players can start dpsing again quickly. The whelps that spawn in this phase should be picked up by the offtank and held in the raid. It is ok to dps these, but do not kill them yet. Healers should stand closer to the offtank so that the whelps are easier to pick up and keep off of the healers. The goal of phase 1 is to bring Sinestra to 30% health and start phase 2 before a third set of whelps and before a second Wrack debuff go out. This may require a bit of practice to achieve, but will soon become easily repeatable. |
||
| − | Since evacuating Gilneas City, Greymane and Krennan Aranas have been working on a partial cure for the worgen curse. Greymane's forces have been capturing feral worgen and using their temporary cure to help the worgen regain their sanity. Godfrey raises objections as to the point of saving feral worgen, saying they are all beasts that should be shot, but Greymane overrides him and saves [[adventurer|one such worgen]] from an executioner's blade by injecting them with a serum that gives them control of their minds, thus allowing them to retain some semblance of their humanity. |
||
| + | ===Phase 2=== |
||
| − | After the loss of [[Gilneas City]], he retreats to [[Greymane Manor]], where he tries to think of a plan to safeguard his people from the invading Forsaken forces. Greymane encountered [[Belrysa]], a night elven priestess, who explained the origin of the worgen curse and offered up a partial cure. She explained to Greymane that the worgen released by Argual were once night elven druids who had fallen victim to a cursed and corrupted druid form around ten thousand years ago during a conflict known as the [[War of the Satyr]]. To contain the threat these druids posed, [[Malfurion Stormrage]] ordered them sealed into an eternal slumber in the Emerald Dream. Belrysa explained that a night elven priestess ritual was a palliative method of letting infected Gilneans keep their minds intact while in their wolven form, but if the Gilnean still held onto guilt of any kind, he or she could not switch back into human form at will. Still keeping his infection hidden from even his family, Greymane let her perform a compact version of this ritual on him. |
||
| + | Phase 2 is an add phase. Start it off by having the raid move to the back of the room. This is where Calen will spawn his Fiery Barrier and the raid must be underneath it to survive Twilight Extinction. The offtank should bring the whelps to the very back of the shield. Once under the bubble, ranged dps should begin to attack Sinestra. She will be invulnerable to damage, but attacking her is necessary to bring down the Twilight Carapace buff on the Pulsing Twilight Eggs. While ranged are doing this, Melee should be AoEing down the Twilight Whelps in one pile. Each time a Twilight Whelp dies, it will turn into a pool of Twilight Essence. If a whelp dies in another whelp’s Twilight Essence, both will respawn. Because of this, all of the whelps that you aoe here will respawn later, but that will not be an issue. The raid will need to split up during this phase and it’s important for each player to know where they need to be. Once twilight extinction has gone out and the whelps are mostly AoE’d down, the tank should move to the middle of the room and prepare to pick up Twilight Drakes. Melee will stay in the back of the room and prepare to dps and stun Twilight Spitecallers. Ranged will split into two groups and move to the walkways to DPS the Pulsing Twilight Eggs. Make sure the split is even so that ranged can hopefully kill each egg in one add wave. Place a healer with each ranged group in case Unleash Essence is cast on the raid. The rest of the healers should be in the back of the room healing melee, the tank, and Calen. If Calen is being healed and Sinestra is being dpsed, the eggs will lose their Twilight Carapace buff for 30 seconds. With very good dps, the ranged groups can kill both eggs in this time. If successful, phase 3 will begin and the raid can move into positions. If unsuccessful in killing both eggs, ranged should begin dpsing Sinestra again while the raid contends with more adds and waits for the Twilight Carapace buff to fall again. During this phase the Twilight Drakes can simply be tanked, but the Spitecallers in the back have an extremely harmful ability called Unleash Essence that must not be allowed to cast. Melee will need to set up a stun rotation to keep these mobs from using this ability. In addition, spitecallers can spawn quite fast making it difficult to keep up with killing them if dps is low. Once both Twilight Eggs have been killed, there will be a 30 second grace period to finish killing any adds left alive before phase 3 starts. Use this time to quickly kill off the remaining Spitecallers and Twilight Drakes. Remember that the whelps will respawn and must be picked up by the offtank again. |
||
| − | When the [[Shattering]] sends [[Duskhaven]] underwater, he decides to move the evacuees further inland and sends the Gilnean survivors towards [[Stormglen]] in stagecoaches. He later journeys to [[Tal'doren]], the home of the Gilnean worgen who underwent the ritual, and reunites with the now worgen Lord Darius Crowley and his army of worgen. Greymane and Godfrey wished for Crowley and his worgen to join forces against the Forsaken. Crowley remained skeptical of joining forces with Greymane, especially alongside Godfrey, who had a noted prejudice against those afflicted to with the worgen curse. Greymane replied that he came to Crowley as an equal, and revealed to Crowley and Godfrey that he too was affected by the curse. Satisfied with the answer, Crowley pledged his help against the Forsaken, and together, the two united Gilneas against the Forsaken invasion. They also secured help from the night elves native to the Gilneas area. |
||
| + | ===Phase 3=== |
||
| − | Having learned of Greymane's worgen affliction, [[Lord Godfrey]] and his supporters [[Lord Walden]] and [[Baron Ashbury]] betray Gilneas by attempting to turn Greymane over to the Forsaken and held him hostage at [[Tempest's Reach]]. Under orders from [[Krennan Aranas]], Walden and Ashbury were killed, Greymane was rescued and Lord Godfrey's machinations were foiled by adventurers . Instead of letting himself be arrested for treason, Godfrey killed himself, stating he'd rather die than have a worgen as his king. During this time, Greymane decided to stop concealing his infection and let his people know that he too was afflicted by the curse, and the Gilnean people accepted him and rallied to him when he called for a united counter attack against the Forsaken.<ref name="CoW5">''[[Curse of the Worgen Issue 5]]</ref> Greymane participated in the [[Quest:The Battle for Gilneas City|Battle of Gilneas City]] in order to reclaim the city from the Forsaken, personally calling out and attacking [[Sylvanas Windrunner]], the leader of the Forsaken. During the ensuing battle, his son Liam Greymane is killed by a poisoned arrow from Sylvanas Windrunner that was intended for Greymane. Greymane, Crowley and Lorna Crowley had a funeral ceremony for Liam at [[Aderic's Repose]] shortly before the Gilneans were forced to leave in a mass exodus of [[Gilneas]], leaving it in the hands of the Forsaken. |
||
| + | Phase 3 is Identical to phase 1, but much longer. The raid will begin this phase by being granted with the Essence of the Red buff, which is important because Sinestra will heal back to 100% health at the start of the phase. This will increase all haste by 100% and give casters infinite mana. The buff is necessary to heal through the damage in this phase and to meet the soft enrage timer. At the start of phase 3, have the raid move back into their phase 1 positions. Wrack, Orbs, and Flame Breath should all be handled just as they were in phase 1. The whelps however, will be treated differently. The offtank will pick these up and tank them in the back of the room. In order to keep the whelps from being killed on top of each other and resurrecting in this phase, they will be pulled off the tank by pre-assigned dpsers and killed off solo in their own areas. Ideally, the whelps should be killed in as compact an area as possible. This is because the void zones that the whelps create upon death will grow indefinitely throughout the fight. Eventually, this can severely limit the safe size of the room and make it quite difficult to move with Twilight Orbs. After three minutes, the Essence of the Red buff will fade and your raid will want to have the boss as low as possible when this happens. The last few percent of the fight without the buff will be extremely brutal. Make sure to use raid cooldowns such as Aura Mastery or Barrier for Flame Breath as healing after it will be difficult. Set up a Tranquility and Hymn rotation to top the raid off after each Flame Breath. It is a good idea to offtank the last two set of whelps in order to maximize dps on the boss. Unless the offtank is a pally, and can bubble off debuffs, they will likely have very high Twilight Spit stacks. Between the third and fourth wave of whelps, the Offtank should taunt Sinestra off of the maintank and allow the maintank to pick up the the rest of the Twilight Whelps. Simply hold these in melee range while the raid focuses on burning down the boss. |
||
| − | ===Aftermath=== |
||
| − | [[File:Genn Greymane worgen art.jpg|thumb|250px|Genn brandishing his sword.]] |
||
| − | Using resources provided to them by their night elven allies, Greymane and several Gilneans boarded ships headed for the night elf capital of [[Darnassus]]. Greymane boarded one ship, and his wife Mia and daughter Tess were aboard a separate ship. Due to the Cataclysm, the crossing was choppy and the waters were hard to navigate. While on his way to Darnassus, Greymane suffered from guilt over the choices he had made, which cost him his country and his son, and chafed when a night elf suggested that Gilneas join the Alliance. When he learned from a night elven crew member that the boat that Mia and Tess were on was in distress, Greymane shifted into worgen form and rescued his wife, who had a broken leg, and his daughter, who had refused to leave her mother. After everyone was safe, Greymane reconsidered his position of joining the Alliance.<ref name="lohp" /> |
||
| + | This fight will not be easy. The damage is high, the coordination is rigid, and the mechanics are very unforgiving. It’s no wonder Sinestra was tough enough to survive Deathwing. It may take your raid quite some time to down this boss, but don’t let frustration get the better of you. It is overall a fun fight that will really test your skills. |
||
| − | For a short time after the fall of Gilneas, Greymane is present at the [[Howling Oak]] in Darnassus, where the surviving Gilneans have resettled. [[Tyrande Whisperwind]] and [[Malfurion Stormrage]], the night elven leaders, welcome Greymane and the Gilnean survivors to Darnassus, and he instructs the survivors to assist the night elves in any way they can as repayment for the help they had given the Gilnean nation. |
||
| − | == |
+ | ==Quotes== |
| + | ;Aggro |
||
| − | {{novel-section}} |
||
| + | *{{text|yell|We were fools to entrust an imbecile like Cho'gall with such a sacred duty. I will deal with you intruders myself!}} |
||
| − | [[File:Hallow's End Genn Greymane.jpg|thumb|left|Genn celebrates [[Hallow's End]].]] |
||
| − | With [[Gilneas]]’ induction into the [[Alliance]] dependent on the approval of the other Alliance representatives, Genn had given his word to Archdruid [[Malfurion Stormrage|Malfurion]] that he would give his best impression to the Alliance dignitaries. When Genn Greymane made his introduction at the welcoming banquet, he admitted to the Alliance representatives that walling off his kingdom was a mistake and that he thanks the Alliance for giving Gilneas a second chance. The Alliance dignitaries generally seem accepting of Greymane’s apology and the banquet started off pleasant. Yet the situation became tense with [[Varian Wrynn]]’s arrival. As Genn was telling the tales of his victories against the Horde during the banquet, Varian Wrynn arrived and mocked Gilneas. Varian insulted Gilneas by implying that they were pathetic cowards and weaklings. Despite the insults to him and his people, Genn held his anger in check and tried to persuade the king of Stormwind that Gilneas has changed, and that they are now ready to be staunch supporters of the Alliance. Varian Wrynn however, was still bitter over Gilneas’ abandonment of the Alliance during their hour of need during the Third War and denounced Gilneas as an ally. Despite the awful first encounter, Genn would later reveal that he noticed [[Goldrinn]]’s presence around Varian when they first met, which is why he still held out hope that Varian would change his mind. |
||
| + | ;Summoning Adds |
||
| − | During the summit, Genn demonstrated Gilneas’ military might and the supernatural strength of the [[worgen]] form to show what it could provide to the Alliance. The Alliance approved of the benefits and many began to support Gilneas’ readmission. Yet Varian Wrynn stood up and made an announcement. Although he acknowledges the benefits Gilneas could bring to the Alliance, he points out that he could never trust nor forgive Gilneas for abandoning them in their hour of need during the [[Third War]]. Varian declared that the Alliance has no need for such fair weather friends and would never consent to allowing such mongrels into the Alliance. This left the summit in an uproar and effectively ruined any chance Gilneas had of joining the Alliance. Genn left the summit angry and disappointed in Varian. |
||
| + | *{{text|yell|Feed, children! Take your fill from their meaty husks!}} |
||
| + | ;Special |
||
| − | Genn later encountered Varian again when Malfurion lured Varian into the worgen’s hunting grounds. An argument was sparked between Varian and Genn about who was the better hunter. Malfurion proposed a hunting challenge to settle the matter. While chasing a boar however, they inadvertently agitated a giant bear. With one of Genn’s subjects in danger, the Gilnean king and the king of Stormwind worked together to kill the giant bear, with Varian landing a killing blow to the bear’s neck with his hunting knife. Genn and his worgen honored Varian for his kill, though he didn’t stay around to accept it as he snuck off to self reflect in the woods. |
||
| + | *{{text|yell|The energy infuse within my clutch is mine to reclaim!}} |
||
| + | *{{text|yell|SUFFER!}} |
||
| + | *{{text|yell|FEEL MY HATRED!}} |
||
| + | ;Phase 2 |
||
| − | After much self reflection, Varian sought Genn out again just as he was about to depart from Darnassus. Varian asked him for his help in how to better control his rage. Genn led him to the [[Howling Oak]] where he showed him a night elf ritual that allowed the worgen to control their bestial fury. Though he did warn him that not all survived the trials the ritual entailed and some had to be put down since they lost themselves to their worgen nature. Varian then drank the waters from the Wells of Tranquility, Balance, and Fury, all at once. |
||
| + | :{{text|yell|Sinestra|I tire of this. Do you see this clutch amidst which you stand? I have nurtured the spark within them, but that life-force is and always will be mine. Behold, power beyond your comprehension!}} |
||
| + | :{{text|yell|Calen|Heroes! You are not alone in this dark place!}} |
||
| + | ;As Calen battles Sintharia |
||
| − | Genn taught Varian to recall the most relevant moments in his life and the choices that led up to it. After Varian underwent the ritual and mastered his rage, Varian heard Goldrinn howling in approval and he awakened, with Genn and the worgen watching in awe as the aura of Goldrinn envelops him. Without a shadow of a doubt, Varian was indeed Goldrinn’s champion. Varian told Genn to gather his worgen, as he was determined to do battle with his enemy, [[Garrosh Hellscream]]. |
||
| + | :{{text|yell|Calen|Sintharia! Your master owes me a great debt... one that I intend to extract from his consort's hide!}} |
||
| + | :{{text|yell|Sinestra|This will be your tomb as well as theirs!}} |
||
| + | ;Recharging |
||
| − | Having gathered the worgen and his forces, Varian led the charge to [[Ashenvale]] and reinforced the Alliance forces battling there with Garrosh Hellscream’s [[Horde]]. Genn and his worgen supported Varian as he led the charge against the Horde. The worgen were instrumental in routing the Horde and killing the massive [[magnataur]]. With the worgen reinforcements and Varian Wrynn’s leadership, the tide of battle turned and the Alliance were able to drive out the invading Horde army. |
||
| + | *{{text|yell|Calen|Flame of life, burn within me and renew my vigor!}} |
||
| + | ;Winning |
||
| − | In the aftermath of the battle Varian was honored as the hero of the battle for Ashenvale and Goldrinn’s favored champion. Varian later called for a second Alliance summit, this time being a proponent for the induction of Gilneas and the worgen into the Alliance. After Gilneas was officially voted into the Alliance, Varian spoke of how many threats have arisen to challenge the Alliance and disrupt the peace that they worked so hard to attain. The Horde has threatened the Alliance and now more than ever, it needs to band together and match their enemies' fury and energy in order to survive in this new [[Azeroth]] that [[Deathwing]] created. With the worgen at their side, Varian assures his allies that the Alliance will prevail.<ref>[[Wolfheart]]</ref> |
||
| + | :{{text|yell|Calen|You are weakening, Sintharia! Accept the inevitable!}} |
||
| + | :{{text|yell|Sinestra|You mistake this for weakness? Fool!}} |
||
| + | ;Losing |
||
| − | ===Cataclysm=== |
||
| + | :{{text|yell|Calen|Heroes! My power wanes....}} |
||
| − | Greymane later journeys to [[Stormwind City]] to aid Varian Wrynn with Alliance military operations and assisting in Gilnean reclamation efforts. Greymane remains at the side of Wrynn and his son [[Anduin Wrynn|Anduin]] in the throne room of [[Stormwind Keep]]. [[Gwen Armstead]], the mayor of Duskhaven, takes Greymane's place in Darnassus. |
||
| + | :{{text|yell|Sinestra|My brood will feast upon your essence!}} |
||
| + | ;Calen dies prematurely |
||
| − | ==In World of Warcraft== |
||
| + | *{{text|yell|Calen|All is lost.... Forgive me, my Queen....}} |
||
| − | [[File:Genn Greymane worgen form.jpg|thumb|250px|Genn in his worgen form]] |
||
| − | {{cata-section}} |
||
| − | ===Quests=== |
||
| − | Genn Greymane appears throughout Gilneas during the Worgen starting experience and is involved in the following quests: |
||
| + | ;Phase 3 |
||
| − | In [[Gilneas City]]: |
||
| + | :{{text|yell|Sinestra|Enough! Drawing upon this source will set us back months. You should feel honored to be worthy of its expenditure. Now... die!}} |
||
| − | *[[Quest:Safety in Numbers]] {{questfinish}} |
||
| + | :{{text|yell|Calen|The fires dim, champions.... Take this, the last of my power. Succeed where I have failed. Avenge me. Avenge the world....}} |
||
| − | *[[Quest:Old Divisions]] {{queststart}} |
||
| − | *[[Quest:Brothers in Arms]] {{questfinish}} |
||
| − | *[[Quest:The Rebel Lord's Arsenal]] {{queststart}} |
||
| − | *[[Quest:Message to Greymane]] {{questfinish}} |
||
| − | *[[Quest:Save Krennan Aranas]] {{queststart}} |
||
| − | *[[Quest:Time to Regroup]] {{questfinish}} |
||
| − | *[[Quest:Vengeance or Survival]] {{questfinish}} |
||
| − | *[[Quest:Slowing the Inevitable]] {{queststartfinish}} |
||
| − | *[[Quest:Knee-Deep]] {{queststart}} |
||
| + | ;Killing a player |
||
| − | [[File:Stormwind Throne Room Cata.jpg|thumb|250px|Genn alongside [[Varian]] in Stormwind]] |
||
| + | *{{text|yell|My brood will feed on your bones!}} |
||
| + | *{{text|yell|Powerless...}} |
||
| + | ;Death |
||
| − | In [[Duskhaven]]: |
||
| + | *{{text|yell|Deathwing! I have fallen.... The brood... is lost.}} |
||
| − | *[[Quest:Last Chance at Humanity]] {{queststartfinish}} |
||
| + | ==Loot== |
||
| − | In [[Greymane Manor]]: |
||
| + | {{lootbox|Heroic |
||
| − | *[[Quest:Alas, Gilneas!]] {{queststartfinish}} |
||
| + | |Belt of the Fallen Brood |
||
| − | *[[Quest:Exodus]] {{queststart}} |
||
| + | |Bindings of Bleak Betrayal |
||
| + | |Boots of Az'galada |
||
| + | |Bracers of the Dark Mother |
||
| + | |Bracers of the Mat'redor |
||
| + | |Caelestrasz's Will |
||
| + | |Crown of the Twilight Queen |
||
| + | |Dargonax's Signet |
||
| + | |Nightmare Rider's Boots |
||
| + | |Shard of Woe |
||
| + | |Shroud of Endless Grief |
||
| + | |Twilight Scale Leggings |
||
| + | |War-Torn Crushers |
||
| + | }} |
||
| + | ==Related Achievements== |
||
| − | In [[Tempest's Reach]]: |
||
| + | *{{achievement|Heroic: Sinestra}} |
||
| − | *[[Quest:Betrayal at Tempest's Reach]] {{questfinish}} |
||
| + | *{{achievement|I Can't Hear You Over the Sound of How Awesome I Am}} |
||
| − | *[[Quest:Flank the Forsaken]] {{queststart}} |
||
| + | *{{achievement|Realm First! Sinestra}} |
||
| + | ==Trivia== |
||
| − | In [[Darnassus]]: |
||
| + | She uses the same animation set as [[Kil'jaeden]]. |
||
| − | *[[Quest:The Howling Oak]] {{questfinish}} |
||
| − | *[[Quest:Breaking Waves of Change]] {{queststart}} |
||
| + | ==Videos== |
||
| − | ===Abilities at Stormwind Keep=== |
||
| − | Genn Greymane fights alongside Varian Wrynn at Stormwind Keep. Only Varian's death is needed for the {{achievement|For the Horde!}} achievement. |
||
| − | *{{abilities|Jump Attack| 5 - 30 yrd range. Jumps at the target, inflicting 120% weapon damage.|id=84815|image=ability_warrior_charge|}} |
||
| − | *{{abilities|Intimidating Roar| 10 yrd range. Roars at an enemy, paralyzing it with terror for 4 sec. and causing all other nearby enemies to flee in fear.|id=51467|image=ability_golemthunderclap|}} |
||
| − | *{{abilities|Horrifying Howl| Melee range. Reduces the attack speed of nearby enemies by 20% for 15 sec. 30 sec cooldown.|id=84813|image=ability_hunter_pet_wolf|}} |
||
| − | *{{abilities|Shattering Throw| 30 yrd range. Throws your weapon at the enemy causing weapon damage and reducing the armor on the target by 20% for 10 sec. 1.5 sec cast. 5 sec cooldown.|id=84817|image=inv_axe_66|}} |
||
| − | *{{abilities|Thunderclap| Melee range. Inflicts 14062 to 15937 Nature damage to nearby enemies, increasing the time between their attacks by 100% and slowing their movement by 60% for 8 sec.|id=84816|image=spell_nature_thunderclap|}} |
||
| − | == |
+ | ===10-man Heroic=== |
| + | {{Youtubelink|gFSCT8QRjdU|desc=[http://www.vagrantcorps.com/ Vagrant Corps] - 1080p}} |
||
| − | *"Damn the [[orc]]s, damn the [[Alliance of Lordaeron|Alliance]], and damn [[Terenas Menethil II|you]]! The last thing Gilneas needs is sponges from other nations drawing from our resources, [[Dalaran]] wizards meddling with our affairs, and someone else's enemies killing our soldiers! Gilneas is its own nation and it always will be. This is the last time I'll ever talk to you, Terenas, so I hope you were listening."<ref>''[[Lands of Conflict]]'', pg. 96</ref> ''(Greymane's last known speech, as recorded by [[Mystrum Runedance]], presumably at one of the Alliance councils)'' |
||
| − | *"Pah, the fountains in Gilneas could grant ten times as many wishes as Dalaran's!" ''([[Genn's Copper Coin]])'' |
||
| − | *"When I told some of you that I wanted to form an '''army''' to retake Gilneas City from these '''light damned''' Forsaken… There were those who said Gilneas City would '''never''' be retaken. That it was '''impossible'''. Well I say to you that we must no longer let our '''fears''' control us! For too long I let my fear control '''me'''… Fear that I had made all the '''wrong decisions'''… Fear that our nation would '''lose''' its '''identity'''… Fear that if all of you knew the '''truth''', the whole truth… You would '''reject''' me as your '''leader'''. Well I '''give in to fear no longer'''. Look upon me '''now''' and see that which I have kept '''hidden'''. Now that you know the '''truth''', I ask each of '''you'''… who will stand '''with me''', who will fight by my '''side'''? Who among you will set '''aside your fear'''?"<ref name="CoW5"/> |
||
| − | *"Then it is time for those Forsaken '''predators''' to become the '''prey'''!!"<ref name="CoW5"/> |
||
| − | === |
+ | ===25-man Heroic=== |
| + | {{Youtubelink|ncOTyhI-H7o|desc=Blood Legion}} |
||
| − | :{{text|say|'''[[Krennan Aranas]] says:''' I'm not giving up on you, <player>. I don't have a cure for the Curse yet... but there are treatments. You'll have control again.}} |
||
| + | {{Youtubelink|ZCjUYMSNq5Y|desc=Vodka}} |
||
| − | :{{text|say|'''[[Lord Godfrey]] says:''' Give it up, Krennan. It's time to put this one down. It's protocol.}} |
||
| + | {{Youtubelink|k41MEXva_gM|desc=EG}} |
||
| − | :{{text|say|'''King Genn Greymane says:''' Tell me, Godfrey. Those that stayed in Gilneas City so that we could live. Were they following protocol?}} |
||
| − | :{{text|say|'''King Genn Greymane says:''' I didn't think so. Now hand me that potion, Krennan... and double the dosage.}} |
||
| − | ===Liam's Funeral=== |
||
| − | :{{text|say|King Genn Greymane|May the Light bless the spirits of our ancestors, for they've chosen to allow my son to rest upon this holy ground.}} |
||
| − | :{{text|say|King Genn Greymane|It is here, surrounded by the heroes and patriots of Gilneas where he belongs.}} |
||
| − | :{{text|say|[[Lorna Crowley]]|You were a true man of the people, Liam. Unlike any Royal I ever met. We'll make them pay for this.}} |
||
| − | :{{text|say|[[Lord Darius Crowley]]|Gilneas will remember your courage forever, Liam.}} |
||
| − | :{{text|say|King Genn Greymane|We'll return, Liam. I swear this to you.}} |
||
| − | == |
+ | == Patch changes == |
| + | *{{Patch 4.1.0|note= |
||
| − | ====Greetings==== |
||
| + | ** Twilight Slicer is now less likely to target two healers at once. |
||
| − | *Gilneas ''will'' rise again! |
||
| + | ** Wrack will avoid jumping to tanks.}} |
||
| − | *For Gilneas! |
||
| + | *{{Patched|date=2011-01-18|bluenote=Many adjustments to the behavior of various mechanics in the Sinesetra encounter have been made.}} |
||
| − | *Gilneas will prevail! |
||
| − | *My people have suffered so long... if only I could shoulder more of their burden. |
||
| − | *The Alliance has done us a great service, for this I am eternally grateful. (Worgen form only) |
||
| − | |||
| − | ====Aggro==== |
||
| − | *FOR GILNEAS! |
||
| − | *I SHALL BURY YOU! |
||
| − | |||
| − | ====Killing a player==== |
||
| − | *Fall before me! |
||
| − | *You have no chance! |
||
| − | |||
| − | ====Death==== |
||
| − | *Gilneas... I... have... failed... you. |
||
| − | |||
| − | ===Hallows End=== |
||
| − | ''Sons and daughters of Gilneas! Friends and allies old and new! Please, come close! As you know, [[Hallows End]] is a celebration of transition...of change. The people of Gilneas understand the gravity of change all too well. For we have endured much...far beyond what any of us could have imagined. However, this is a time of neither mourning nor grief. It is an opportunity to mock the fearsome - to gaze boldly into the grim unknown and laugh! It is a time to celebrate new friends and the future we may forge together. New struggles await us with each dawn, and uncertainty weighs upon us all. As you stand before me, I pray you cast your burdens behind me. Let this wickerman embody any unrest within us. With turmoil as tinder, let it blaze; may it temper us against what tomorrow may bring. Torches ready! Let the flames fly! Hallows End is upon us!'' |
||
| − | |||
| − | ==Personality== |
||
| − | {{RPG-section}} |
||
| − | ''The people of the Alliance remember the king of Gilneas as a proud, strong-willed, cunning, and arrogant man. He and his armies stood by the Alliance during the Second War, but in the aftermath it became clear to Genn Greymane that the Alliance needed Gilneas more than Gilneas needed the Alliance. He ordered that the Greymane Wall be closed to all outsiders, effectively sealing off his kingdom from the outside world and its conflicts. But fate, it seems, was intent on teaching the king a lesson in humility: although the wall succeeded in isolating Gilneas from the rest of the world, it also served to damn the kingdom's people forever. As the worgen curse swept the nation and early attempts at containment failed, Greymane found himself fighting a battle for his people's very humanity.''<ref>[http://www.worldofwarcraft.com/cataclysm/features/lore.html World of Warcraft: Cataclysm - Features - Lore]</ref> |
||
| − | |||
| − | Genn's personality in-game seems drastically different from that shown in the novels, appearing as a kinder, understanding ruler instead of the gruff, impatient king. This could be explained as him being humbled by the terrible consequences his rash decisions have had on his people. |
||
| − | |||
| − | ==Trivia== |
||
| − | *As of Cataclysm, Greymane is one of the three surviving Alliance rulers from the Second War, the others being King Varian and Kurdran Wildhammer; King Terenas of Lordaeron, King Thoras Trollbane of Stromgarde, Admiral Proudmoore of Kul Tiras, Lord Perenolde of Alterac, Antonidas of Dalaran, King Anasterian Sunstrider of Quel'Thalas and King Magni Bronzebeard of Ironforge have all died (all murdered with the exception of Perenolde, died in prison, and Magni, petrified during a ritual) in the interim. |
||
| − | *Genn is also one of the two racial leaders with a still living [[Mia Greymane|spouse]] in World of Warcraft, the other being [[Tyrande Whisperwind]]. |
||
| − | *Genn Greymane makes an appearance at [[Arthas Menethil]]'s induction into the [[Knights of the Silver Hand]] ceremony in [[Stormwind]].<ref name="rotlk">[[Arthas: Rise of the Lich King]], 59</ref> Gilneas had seceded from the Alliance and shut out the rest of the world by this point, so his presence there is a mystery. |
||
| − | |||
| − | ==Gallery== |
||
| − | <gallery widths="160" captionalign="left"> |
||
| − | File:Lord of His Pack 01.jpg|King Genn Greymane and [[Vincent Godfrey]] on horseback in [[Gilneas City]] in ''World of Warcraft''. |
||
| − | File:Genn Greymane.jpg|Genn Greymane during the Second War. |
||
| − | File:Genn Greymane Curse of the Worgen.JPG|Genn Greymane in Curse of the Worgen. |
||
| − | File:King Genn Greymane TCG.jpg|TCG art |
||
| − | </gallery> |
||
| − | |||
| − | ==Patch changes== |
||
*{{Patch 4.0.3a|note=Added.}} |
*{{Patch 4.0.3a|note=Added.}} |
||
| + | == External links == |
||
| − | ==References== |
||
| + | <!-- Read http://www.wowpedia.org/Wowpedia:External_links before posting your links here. |
||
| − | {{reflist}} |
||
| + | Links that do not conform to the rules will be DELETED. |
||
| − | |||
| + | Repeat violations may result in a BAN. |
||
| − | ==External links== |
||
| + | Have a nice day. :) --> |
||
| − | {{Elinks-NPCsearch}} |
||
| + | {{Elinks-NPC|45213}} |
||
| − | |||
| + | {{elink|icon=L2R|site=Learntoraid.com|link=http://www.learntoraid.com/2011/02/22/lady-sinestra-video-strategy-guide-heroic|desc=Lady Sinestra Strategy Guide}} |
||
| − | {{Succession|[[King Archibald Greymane|Archibald Greymane]]|'''[[Gilneas|King of Gilneas]]'''|Incumbent}} |
||
| + | [[Category:Black dragons]] |
||
| − | {{Grand Alliance}} |
||
| + | [[Category:Bosses]] |
||
| − | {{Main characters}} |
||
| + | [[Category:The Bastion of Twilight mobs]] |
||
| − | {{DEFAULTSORT:Greymane, Genn}} |
||
| − | [[Category:Humans]] |
||
| − | [[Category:Worgen]] |
||
| − | [[Category:Gilneas (kingdom)]] |
||
| − | [[Category:Major characters]] |
||
| − | [[Category:Warcraft: Day of the Dragon characters]] |
||
| − | [[Category:World of Warcraft: Tides of Darkness characters]] |
||
| − | [[Category:World of Warcraft: Beyond the Dark Portal characters]] |
||
| − | [[Category:World of Warcraft: Curse of the Worgen characters]] |
||
| − | [[Category:World of Warcraft: Leaders of Azeroth characters]] |
||
| − | [[Category:World of Warcraft: Wolfheart characters]] |
||
| − | [[Category:Gilneas NPCs]] |
||
| − | [[Category:Gilneas City NPCs]] |
||
| − | [[Category:Stormwind City NPCs]] |
||
| − | [[Category:City bosses]] |
||
| − | [[Category:Unique voices]] |
||
| − | |||
| − | [[es:Genn Cringris]] |
||
| − | [[nl:Genn Greymane]] |
||
| − | [[pl:Genn Greymane]] |
||
Revision as of 00:42, 18 December 2011
- For her character biography, see Sintharia.
 | |||||||
| Title | <Consort of Deathwing> | ||||||
| Gender | Female | ||||||
| Race | Black wyrm (Dragonkin) | ||||||
| Level | ?? Boss | ||||||
| Reaction | Alliance Horde | ||||||
| Location | Twilight Caverns, Bastion of Twilight | ||||||
| |||||||
Sinestra is a heroic-mode only boss in the Bastion of Twilight, described as similar to Algalon the Observer in Ulduar. She is only accessible after Cho'gall is defeated.
Originally Deathwing's Prime Consort, Sinestra created the first twilight dragons, but was later obliterated by one of her terrifying creations. Now a ravaged husk reanimated by insidious magic, Sinestra oversees the creation of new twilight clutches. [1]
World first heroic kill on 25-man achieved 20.1.2011 by DREAM Paragon - EU-Lightining's Blade.
Attacks and abilities
Stage One: I Will Deal With You Myself!
At the outset of the battle, Sinestra is weakened from past battles and from nurturing the Twilight brood. She begins with only 60% of her maximum health, and her damage dealt is reduced by by 40%.
 Wrack — Sinestra causes a random player to suffer Shadow damage every 2 sec. for 1 min. with the damage taken increasing rapidly. When a player dispels Wrack, it bounces to two nearby allies of the afflicted player. Wrack retains its remaining duration but returns to its original damage values.
- Flame Breath — Sinestra unleashes a torrent of flame that sweeps across her platform, inflicting 95000 to 105000 Fire damage to all enemies.
- Twilight Slicer — Sinestra summons two shadowy orbs, each of which fixates on a player and begins to pursue that player. These spheres are linked together by a cutting beam of pure twilight energy that inflicts 46250 to 53750 Shadow damage per 5 sec. to any player who comes into contact with the beam.Each sphere also pulses twilight energy, inflicting 27000 to 33000 Shadow damage every 0.5 sec in a 5 yard radius. The orbs dissipate after 15 sec.
- Twilight Blast — When Sinestra cannot reach anyone in melee range, she blasts an enemy for 166250 to 183750 Shadow damage.
- Twilight Whelps – Sinestra periodically calls forth a set of five Twilight Whelps to attack intruders.
- Twilight Spit — The Twilight Whelps spit shadowy bile on their target, inflicting 3800 to 4200 Shadow damage and increasing the target's Shadow damage taken by 10%. This effect stacks.
- Twilight Essence — When a Twilight Whelp dies, the essence instilled in it by Sinestra leaks out, forming a bubbling puddle beneath its corpse. If this essence touches any other dead Twilight Whelp, that Whelp reanimates. Each pool of Twilight Essence expands over time. The pools inflict 9250 to 10750 Shadow damage every 2 sec.
Stage Two: I Tire of This!
When Sinestra is brought to 30% health, she draws upon ambient energy to restore her power and erects a shield to protect herself.
- A Clash of Flame and Twilight
- The red dragon Caelen comes to the party's aid and engages in a magical duel with Sinestra. The duelist with the most mana gains the upper hand.
- Pyrrhic Focus — Calen burns his own health reserves to restore his mana. His focus also increases healing done to Calen by 500%.
- Mana Barrier — A powerful barrier envelops Sinestra, continually replenishing any lost health at the expense of her mana.
- Pulsing Twilight Egg – Sinestra has stored vast reserves of twilight energy in these massive eggs.
- Twilight Carapace — The Pulsing Twilight Eggs are normally impervious to all damage. In moments of dire need, Sinestra directly siphons from the eggs and causes their Twilight Carapace to drop temporarily.
- Twilight Spitecaller – These twilight dragonkin periodically stream into the room during the clash between Calen and Sinestra.
- Unleash Essence — The Twilight Spitecaller releases a torrent of twilight energy that afflicts all nearby enemies, inflicting damage equal to 10% of each target's maximum health every 1 sec. Conventional interrupts cannot prevent the casting of the spell, but other effects that cause loss of control may be effective.
- EnrageIndomitable — If a Twilight Spitecaller is incapacitated for more than a brief period of time, it regains control through a surge of sheer will. The Spitecaller becomes immune to all bonds and restraints until a player removes this effect, and inflicts 40000 Shadow damage and knocks back players within 8 yards.
- Twilight Drake – Twilight Drakes swoop in from the sides of the cavern during the clash between Calen and Sinestra.
- Twilight Breath — The Drake's breath inflicts 38400 to 41600 Shadow damage in a 25 yard 60 degree cone in front of it.
- Absorb Essence — If a Twilight Drake comes into contact with a pool of Twilight Essence, it siphons that energy and causes the pool to shrink and eventually vanish entirely. Each charge of Essence absorbed increases the Drake's damage by 10%, and its health by 10%. This effect stacks.
Stage Three: Now Die!
Once the players destroy the Pulsing Twilight Eggs, Sinestra brings her magical duel with Calen to an end and attacks the players with her full fury. Empowered by the twilight eggs from which she reclaims her siphoned energy, Sinestra no longer deals reduced damage.
- Essence of the Red — Calen bestows a blessing of Alexstrasza upon the raid, granting all players 100% melee, ranged, and spell haste, and causing them to regain 5% of their maximum mana per second. Essence of the Red lasts for 3 min.
- Wrack — Sinestra causes a random player to suffer Shadow damage every 2 sec. for 1 min. with the damage taken increasing rapidly. When a player dispels Wrack, it bounces to two nearby allies of the afflicted player. Wrack retains its remaining duration but returns to its original damage values.
- Flame Breath — Sinestra unleashes a torrent of flame that sweeps across her platform, dealing 95000 to 105000 Fire damage to all enemies.
- Twilight Slicer — Sinestra summons two shadowy orbs, each of which fixates on a player and begins to pursue that player. These spheres are linked together by a cutting beam of pure twilight energy that inflicts 46250 to 53750 Shadow damage per 5 sec. to any player who comes into contact with the beam.Each sphere also pulses twilight energy, inflicting 27000 to 33000 Shadow damage every 0.5 sec in a 5 yard radius. The orbs dissipate after 15 sec.
- Twilight Blast — When Sinestra cannot reach anyone in melee range, she blasts an enemy for 166250 to 183750 Shadow damage.
- Twilight Whelps – Sinestra periodically calls forth a set of five Twilight Whelps to attack intruders.
- Twilight Spit — The Twilight Whelps spit shadowy bile on their target, inflicting 3800 to 4200 Shadow damage and increasing the target's Shadow damage taken by 10%. This effect stacks.
- Twilight Essence — When a Twilight Whelp dies, the essence instilled in it by Sinestra leaks out, forming a bubbling puddle beneath its corpse. If this essence touches any other dead Twilight Whelp, that Whelp reanimates. Each pool of Twilight Essence expands over time. The pools inflict 9250 to 10750 Shadow damage every 2 sec.
Strategy
Phase 1
The entire fight is a severe dps check, but phase 1 may be the most important. The boss has a somewhat significant aggro radius and you’ll want to have your whole raid within about 10 or 15 yards of the boss. Have your tank give a 5 second countdown while the raid times their most powerful spells and abilities to hit the boss simultaneously. You’ll need to do all you can to maximize your raid’s dps in this phase. Use raid wide movement increase buffs like Stampeding Roar to help DPSers move in close to the boss faster after the pull. The raid should maintain an even spread in front of the boss without being too stacked up. Do not stand too close to the boss, but try to stay within 10 or 15 yards. You’ll want to assign your healing as follows:
1 healer for the main tank as well as a beacon if available.
1 healer for the offtank as well as a second beacon if available.
3 healers with Wrack > Raid > Tanks priority. This means that these healers make sure to top of players with the Wrack debuff first, then other non-tanks, then tanks.
You’ll need to train a primary and secondary dispeller for wrack as well. The primary dispeller should be a dps class like a shadow priest. The secondary or backup dispeller can be a healer. The general rule of thumb for wrack is that it should be dispelled after being on its target for 10 seconds. If wrack is on a player for longer than 10 seconds, the player risks being killed by the damage. If it is dispelled long before 10 seconds, the raid may end up with too many wracks out at one time and being overwhelmed. The easiest and best way to gain an advantage on wrack, is to extend the duration or time of the first application of wrack each time it goes out. This means if Sinestra casts wrack on a warrior, at around 10 seconds that warrior should use shield wall to keep the debuff longer. This will result in a much easier time dispelling the wrack when it has split multiple times. This goes for any class with abilities that will lower the damage for wrack. It is additionally helpful to have holy priests guardian spirit the first wrack victim so that they can hold the debuff for even one more tick. Raid healers should make sure to keep players with Wrack topped off as much as possible. The number one ability players need to keep their eyes open for are the Twilight Orbs. When these spawn, it is important that players don’t immediately panic and scatter away from them. A small purple beam will form between the orb and player it is fixated on. Recognizing which player is fixated is key to reacting properly to these orbs. Players who are not targeted by the orb must not only get away from the orb, but also make sure they are not between the two orbs. There is around a 3 second grace period between when the beam forms and when the Orbs begin to pulse and slicer between them forms. The players who are fixated should run away from the raid and kite the orbs to the back of the room. In order to increase dps these players should kite around each other halfway through their path and begin returning to the raid. When done properly the orbs will despawn before coming back into the raid and the players can start dpsing again quickly. The whelps that spawn in this phase should be picked up by the offtank and held in the raid. It is ok to dps these, but do not kill them yet. Healers should stand closer to the offtank so that the whelps are easier to pick up and keep off of the healers. The goal of phase 1 is to bring Sinestra to 30% health and start phase 2 before a third set of whelps and before a second Wrack debuff go out. This may require a bit of practice to achieve, but will soon become easily repeatable.
Phase 2
Phase 2 is an add phase. Start it off by having the raid move to the back of the room. This is where Calen will spawn his Fiery Barrier and the raid must be underneath it to survive Twilight Extinction. The offtank should bring the whelps to the very back of the shield. Once under the bubble, ranged dps should begin to attack Sinestra. She will be invulnerable to damage, but attacking her is necessary to bring down the Twilight Carapace buff on the Pulsing Twilight Eggs. While ranged are doing this, Melee should be AoEing down the Twilight Whelps in one pile. Each time a Twilight Whelp dies, it will turn into a pool of Twilight Essence. If a whelp dies in another whelp’s Twilight Essence, both will respawn. Because of this, all of the whelps that you aoe here will respawn later, but that will not be an issue. The raid will need to split up during this phase and it’s important for each player to know where they need to be. Once twilight extinction has gone out and the whelps are mostly AoE’d down, the tank should move to the middle of the room and prepare to pick up Twilight Drakes. Melee will stay in the back of the room and prepare to dps and stun Twilight Spitecallers. Ranged will split into two groups and move to the walkways to DPS the Pulsing Twilight Eggs. Make sure the split is even so that ranged can hopefully kill each egg in one add wave. Place a healer with each ranged group in case Unleash Essence is cast on the raid. The rest of the healers should be in the back of the room healing melee, the tank, and Calen. If Calen is being healed and Sinestra is being dpsed, the eggs will lose their Twilight Carapace buff for 30 seconds. With very good dps, the ranged groups can kill both eggs in this time. If successful, phase 3 will begin and the raid can move into positions. If unsuccessful in killing both eggs, ranged should begin dpsing Sinestra again while the raid contends with more adds and waits for the Twilight Carapace buff to fall again. During this phase the Twilight Drakes can simply be tanked, but the Spitecallers in the back have an extremely harmful ability called Unleash Essence that must not be allowed to cast. Melee will need to set up a stun rotation to keep these mobs from using this ability. In addition, spitecallers can spawn quite fast making it difficult to keep up with killing them if dps is low. Once both Twilight Eggs have been killed, there will be a 30 second grace period to finish killing any adds left alive before phase 3 starts. Use this time to quickly kill off the remaining Spitecallers and Twilight Drakes. Remember that the whelps will respawn and must be picked up by the offtank again.
Phase 3
Phase 3 is Identical to phase 1, but much longer. The raid will begin this phase by being granted with the Essence of the Red buff, which is important because Sinestra will heal back to 100% health at the start of the phase. This will increase all haste by 100% and give casters infinite mana. The buff is necessary to heal through the damage in this phase and to meet the soft enrage timer. At the start of phase 3, have the raid move back into their phase 1 positions. Wrack, Orbs, and Flame Breath should all be handled just as they were in phase 1. The whelps however, will be treated differently. The offtank will pick these up and tank them in the back of the room. In order to keep the whelps from being killed on top of each other and resurrecting in this phase, they will be pulled off the tank by pre-assigned dpsers and killed off solo in their own areas. Ideally, the whelps should be killed in as compact an area as possible. This is because the void zones that the whelps create upon death will grow indefinitely throughout the fight. Eventually, this can severely limit the safe size of the room and make it quite difficult to move with Twilight Orbs. After three minutes, the Essence of the Red buff will fade and your raid will want to have the boss as low as possible when this happens. The last few percent of the fight without the buff will be extremely brutal. Make sure to use raid cooldowns such as Aura Mastery or Barrier for Flame Breath as healing after it will be difficult. Set up a Tranquility and Hymn rotation to top the raid off after each Flame Breath. It is a good idea to offtank the last two set of whelps in order to maximize dps on the boss. Unless the offtank is a pally, and can bubble off debuffs, they will likely have very high Twilight Spit stacks. Between the third and fourth wave of whelps, the Offtank should taunt Sinestra off of the maintank and allow the maintank to pick up the the rest of the Twilight Whelps. Simply hold these in melee range while the raid focuses on burning down the boss.
This fight will not be easy. The damage is high, the coordination is rigid, and the mechanics are very unforgiving. It’s no wonder Sinestra was tough enough to survive Deathwing. It may take your raid quite some time to down this boss, but don’t let frustration get the better of you. It is overall a fun fight that will really test your skills.
Quotes
- Aggro
- We were fools to entrust an imbecile like Cho'gall with such a sacred duty. I will deal with you intruders myself!
- Summoning Adds
- Feed, children! Take your fill from their meaty husks!
- Special
- The energy infuse within my clutch is mine to reclaim!
- SUFFER!
- FEEL MY HATRED!
- Phase 2
- Sinestra yells: I tire of this. Do you see this clutch amidst which you stand? I have nurtured the spark within them, but that life-force is and always will be mine. Behold, power beyond your comprehension!
- Calen yells: Heroes! You are not alone in this dark place!
- As Calen battles Sintharia
- Calen yells: Sintharia! Your master owes me a great debt... one that I intend to extract from his consort's hide!
- Sinestra yells: This will be your tomb as well as theirs!
- Recharging
- Calen yells: Flame of life, burn within me and renew my vigor!
- Winning
- Calen yells: You are weakening, Sintharia! Accept the inevitable!
- Sinestra yells: You mistake this for weakness? Fool!
- Losing
- Calen yells: Heroes! My power wanes....
- Sinestra yells: My brood will feast upon your essence!
- Calen dies prematurely
- Calen yells: All is lost.... Forgive me, my Queen....
- Phase 3
- Sinestra yells: Enough! Drawing upon this source will set us back months. You should feel honored to be worthy of its expenditure. Now... die!
- Calen yells: The fires dim, champions.... Take this, the last of my power. Succeed where I have failed. Avenge me. Avenge the world....
- Killing a player
- My brood will feed on your bones!
- Powerless...
- Death
- Deathwing! I have fallen.... The brood... is lost.
Loot
Related Achievements
Trivia
She uses the same animation set as Kil'jaeden.
Videos
10-man Heroic
Template:Youtubelink
25-man Heroic
Template:Youtubelink Template:Youtubelink Template:Youtubelink
Patch changes
- Patch 4.1.0 (2011-04-26):
- Twilight Slicer is now less likely to target two healers at once.
- Wrack will avoid jumping to tanks.
- Template:Patched
- Patch 4.0.3a (2010-11-23): Added.