- This article is about the in-game raid boss. For character biography and Warcraft III appearances, see Lady Vashj.
 | |||||||||||||
| Title | <Coilfang Matron> | ||||||||||||
| Race | Naga (Humanoid) | ||||||||||||
| Level | ?? Boss | ||||||||||||
| Location | Serpentshrine Cavern, Coilfang Reservoir | ||||||||||||
| Status | Killable | ||||||||||||
| |||||||||||||
Lady Vashj <Coilfang Matron> is the final boss of Serpentshrine Cavern in Coilfang Reservoir. Phase 2 is a Battle for survival which tests the raids capability to function as a team, while phase 3 is a rather straightforward DPS race.
Abilities
Lady Vashj can be damaged only in phases 1 and 3. During phase 2 lots of adds spawn, and her shield has to be switched off. Sporebat adds appear in phase 3.
Lady Vashj
Lady Vashj can be taunted.
Phase 1 and 3 abilities:
- Basic melee - Normal 3,000, 4,000-6,000 crushing on plate
- Shoot - A ranged ability that hits for 4,000-5,500 damage, used only if nobody is in melee range
- Multi-Shot - A ranged ability that hits a target and 4 surrounding people for 6,500 - 7,500 damage
- Shock Burst - Randomly deals about 9000 nature damage to her current target with a 5 sec stun, drop aggro during the stun
- Entangle - random target within 15 yards, 10 sec immobilize plus 500 damage per tick. Not resistible, not mitigated by armor, but reduced by resilience. Removable by Blessing of Freedom, shapeshifting, and the PVP Trinkets.
- Static Charge - debuff doing about 2000 damage per tick to its target and anyone within 5 yards for 15 sec. No durability loss if killed by this effect.
Phase 2 ability:
- Forked Lightning - Random bolts of lightning that hit for 2,300-2,600 nature damage in a frontal cone. Not resistible.
Enchanted Elemental
Many of these elementals spawn continuously from the water at the foot of the stairs during phase 2.
- 7700 HP
- Immune to frost damage and effects
- Immune to snares and crowd control
- Slowly moves towards Lady Vashj and increases her damage output by 5% if it reaches her
Tainted Elemental
Every 50 seconds, one Tainted Elemental spawns instead of an enchanted elemental.
- 7700 HP
- Poison Spit - random target, 1885-2115 nature damage plus 8 sec poison debuff for 2000 damage per tick
- Immune to frost effects and damage
- Does not move
- Despawns after 15 seconds
- Drops a Tainted Core when killed
Coilfang Elite
Every 45 seconds one Coilfang Elite spawns in the area on top of the stairs.
- 175000 HP
- normal melee ~5k on plate, frontal arc cleave for over 7.5k on plate
- Immune to Fear
- Tauntable
Coilfang Strider
Every 60 seconds one Coilfang Strider spawns on top of the stairs.
- 175000 HP
- Melee - 4500 - 8000 on tanks
- Mind Blast - 3000 shadow damage
- Panic Aura - 8 yard AoE Fear every tick, 5 sec fear duration plus 150% run speed buff
- Tauntable
Spore Bats
During phase 3, these bats spawn. At first they're few, but their number steadily increases.
- Toxic Spores - Poison cloud AoE 1,500 nature damage per second
Preparation
The fight consists of three phases. Phase 1 and 3 are the same, except for the spore bat adds in phase 3. Phase 2 is the real test of a raid's ability to work together - every single raid member is important, and has ample opportunity to cause a wipe.
- Phase 1 a rather simple tank and spank, until she's at 70%.
- Phase 2 lasts from 70% to 50%. She summons many adds and hides behind a shield, which has to be removed by turning off four shield generators (using tainted cores). Each generator switched off drops her health by 5%.
- Phase 3 starts at 50%. It's similar to phase 1, with the addition of Spore Bats.
Raid composition
- 2 Tanks
- 7-8 Healers
- 8-11 ranged DPS
- 4-7 melee DPS
- 1 Kiter
Positioning
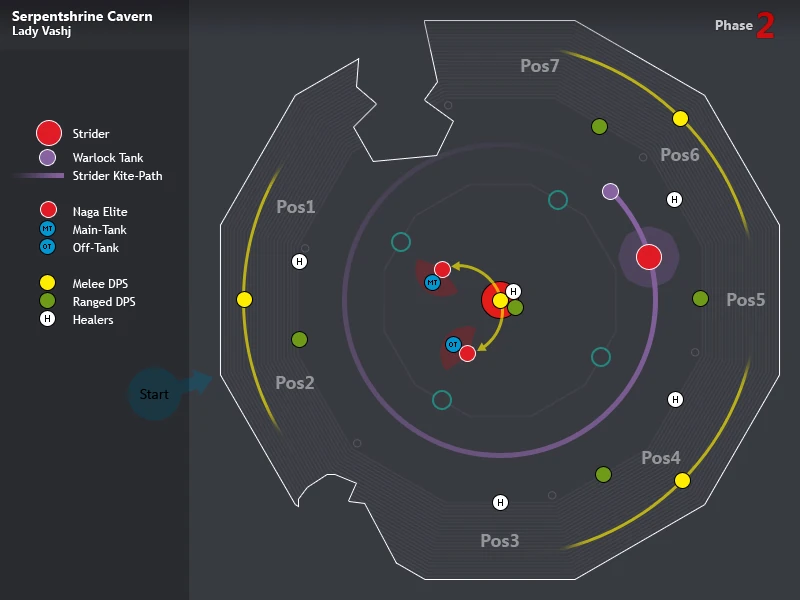

Positioning
Positioning is all-important during phase 2. In phase 1 it's only important that the raid spreads out (to minimize damage from her Static Charge). Thus it's advisable to have everybody set up close to their phase 2 positions. The phase 2 positions are:
- Tanks and melee in the central area on top of the stairs
- Ranged damage dealers in a wide circle atop the stairs, so that each ranged damage dealer has LOS to as much of the stairs as possible, and the top area too
- About half of the healers in the inner circle (inside the shield generators), the other half on top of the stairs
During phase 1, all healers should be in healing range of the MT.
Phase 1
A standard pull does the job (as usual ![]() [Misdirection] helps). She hits rather hard, so the healers should pre-cast. This phase is rather easy, mainly a practice run for phase 3. The main goal is to keep everybody alive. The only problems are caused by her special attacks.
[Misdirection] helps). She hits rather hard, so the healers should pre-cast. This phase is rather easy, mainly a practice run for phase 3. The main goal is to keep everybody alive. The only problems are caused by her special attacks.
- One Shaman should be in the MT group and permanently keep a
 [Grounding Totem] up in order to nullify the Shock Burst
 - Paladins should put a
 [Blessing of Freedom] on the MT if he gets rooted, or on rooted melee dps with Static Charge
 - The off-tank should be ready to taunt her and take over if the MT is stunned or rooted
Static Charge victims must stay away from everybody else, and require some healing. If the MT gets it he moves to the middle and all other melee classes should stay away from him.
Phase 2
At 70% she runs to the middle of her platform and surrounds herself in a shield making her invulnerable. To take down the shield the 4 Shield Generators around her must be deactivated, by using a Tainted Core (from the Tainted Elementals) on each. During the entire phase, four different types of adds spawn, each of which need to be dealt with:
- Coilfang Elites are tanked and killed by the tanks and melee damage dealers
- Coilfang Striders are kited and killed by DoTs. Every class able to cast a DoT should help on this (even healers)
- Killing Enchanted Elementals is the main business of all ranged damage dealers
- Tainted Elementals must be killed, their Tainted Cores looted and used to switch off the shield generators. This task requires teamwork, each raid has to develop a tactic to handle it.
At the start of phase 2, there's a brief lull for about 40 seconds, during which time everybody can make sure they're at the right position. There are 12 stairs, many raids divide them into four sections of 3 stairs each (N, W, S and E), and assign a team of two ranged damage dealers and one healer to each section. The enchanted elementals have rather low HP, and a single damage dealer can kill one easily before it reaches the Lady. Unfortunately they're frost immune, so frost mages have to somewhat deviate from their standard practice.
The Coilfang Elites should be quickly grabbed by the tank (![]() [Misdirection] helps a lot), and moved to the inner circle. The melee group should kill each before the next one spawns.
[Misdirection] helps a lot), and moved to the inner circle. The melee group should kill each before the next one spawns.
Coilfang Striders need to be kited. The usual techniques work fine, particularly with an affliction warlock or an elemental shaman as kiter. The kiting should take place in a wide circle outside the shield generators. It's a good idea to have a lot of DoTs on the strider. Everybody able to cast a dot (even the healers) should all put DoTs on the strider whenever it comes in range. In order to make kiting easier, slow it down as much as possible. All classes should use all means available (mages should spam slow, shamans use frost shock, CoEx from Warlocks, Paladins can Hammer it whenver it gets close). Of course, the kiter must not have Salvation. Tailors should bring Netherweave Nets and liberally use them.
Tainted Elementals
When a Tainted Elemental spawns, it must be killed very quickly (within 15 sec - if more than two spawn, a wipe is highly probable because the extra Elites and Striders are too much).
After the kill, the ![]() [Tainted Core] must be looted. It causes the person carrying it to be paralyzed, but it can be thrown to a friendly target by using it (within LOS, about 60 yard range). The looting player should pass it to somebody up the stairs, and that person passes it to someone close to an active Shield Generators. Voice communication helps a lot in coordinating the handling of the cores.
[Tainted Core] must be looted. It causes the person carrying it to be paralyzed, but it can be thrown to a friendly target by using it (within LOS, about 60 yard range). The looting player should pass it to somebody up the stairs, and that person passes it to someone close to an active Shield Generators. Voice communication helps a lot in coordinating the handling of the cores.
Different ideas to deal with the Tainted Cores include:
- Many raids have the ranged DPS healers stand at the edge of the platform, on top of the stairs. The player looting the core throws it to one of these healers.
- Have one melee damage dealer stay close to an still active generator. The ranged DPS healer passes to that generator guy.
- Place four melee group healers each next to a generator (on the inside to be safe from the Strider fear), and have the ranged DPS healers pass the core to them.
- One melee damage dealer is designated as "Elemental Cleanup", watching out for any normal Elementals that get too close to Vashj. When a Tainted Elemental spawns, the "Elemental Cleanup" announces where it is, runs over to help kill it quickly, and loots the core.
- Assign four melee damage dealers to one section of the stairs each. They kill Coilfang Elites, but about 8 seconds before a Tainted is due, they run to their assigned section to help with the Tainted Elemental. If the Tainted is in the melee's section, have them help kill and loot it. If there is no Tainted in their section, they go back to the elites.
The moment to switch off the last generator should be well controlled, because the Striders and Coilfang Elites should be as low as possible when phase 3 starts. As a rule of thumb, there should be at most a half dead Strider, a full Elite, and a nearly dead Elite left over at the start of phase 3, else it's usually a wipe. It's safe to delay until about 10-12 seconds before the next Strider/Naga spawn. Don't wait longer because the Bigwigs timers can be somewhat inaccurate and the adds are actually "up" some time before they become visible.
Phase 3
This is basically Phase 1 again, with a twist - Spore Bats start to spawn. They come slowly at first, but gradually their number increases to the point where it becomes very hard to avoid the AoE poison. This usually occurs at around four minutes into the Phase.
At first, all remaining phase 2 adds must be killed. During the first few minutes of Phase 3, the spore bats can be controlled by a few hunters or warlocks dedicated to killing them. When they become too many to handle the Spore Bat killers should switch to Vashj. The top of the west stairs is a good position from which to kill the Spore Bats.
In effect, the Spore Bats are sort of an Enrage timer. Knowing how to avoid the poison patches, and having a skilled tank keeping her on the move can make quite a difference to the lethality of this "enrage".
Class Assignments
- Tanks - Stay on Vashj in phase 1 and 3. Take the Coilfang Elites in phase 2 (be quick - they can one-shot clothies).
- Melee DPS - Maul Vashj in phases 1 and 3. In phase 2, kill the Coilfang Elites (and - depending on the chosen strategy - watch a stair section for Tainted Elementals).
- Ranged DPS - In phase 1 and 3, nuke Vashj. In phase 2, nuke elementals and put DoTs on the Striders.
- Healers - There's quite a lot of AoE damage in this fight, so generally all healers should pay attention to everybody in range. In Phases 1 and 3 the main tank needs some extra care (about 5-6 healers), during phase 2 the pressure on the tank is lower, but everybody else takes more damage (and keep an extra eye on the kiter).
Useful Macros
The simplest macro tries to throw the core at the current target, whispers the receiver that he's got it, and also announces the fact in yell and say.
/use Tainted Core
/y <------- TAINTED CORE TO: %t ! ! !
/s <------- TAINTED CORE TO: %t ! ! !
/script SendChatMessage("!!! YOU HAVE THE CORE !!!", "WHISPER", nil, UnitName("target"));
For netting striders and notifying the current target of the strider (also works for the Pally stun, just replace /use with /cast Hammer of Justice):
/use Netherweave Net
/script SendChatMessage(string.format("Netting %s's Strider!",UnitName("targettarget")),"YELL");
/script SendChatMessage("Netting your Strider!", "whisper",nil,UnitName("TargetTarget"));
To facilitate the targeting and killing of Tainted Elementals:
/cleartarget
/focus
/targetexact Tainted Elemental
/focus [exists, nodead]
/cast [target=focus, exists, nodead] Some Spell
/targetlastenemy
This sets the Tainted Elemental as focus target and casts "Some Spell" on it if it is alive. If it is not alive, it keeps the current target if it is an enemy (healers shouldn't use this if they count on targeting to heal, or they can replace the last line with /targetlasttarget). If the elemental is out of range or LoS, it produces an error messages, but at least the Tainted Elemental is now the focus target so it's easier to find.
To facilitate the strider DOTs without targeting them (e.g. healers), any of the following could be used. The first macro assumes that the kiter remains the same through the entire encounter, where KiterName is the name of the kiter. It can also be used to cast a net:
/assist [target=KiterName, nodead]
/cast Some Spell
/targetlasttarget
The following could be used to heal the kiter when it passes without targeting it. The [] treats the spell as a normal spell if the kiter is dead:
/cast [target=KiterName, nodead][] Some Heal spell
The following two macros do the same as those above, except for using focus instead of kiter name. In order to set the kiter as focus, use the macro while pressing <shift>.
DoT the kiter's target:
/clearfocus [modifier:shift]
/clearfocus [target=focus, dead]
/focus [target=focus, dead][target=focus, noexists]
/assist [target=focus, nodead]
/cast Some DoT
/stopmacro [target=focus, dead]
/targetlasttarget
The /stopmacro allows the macro to cast the DoT normally if there's no (or a dead) focus target.
Heal the Kiter:
/clearfocus [modifier:shift]
/clearfocus [target=focus, dead]
/focus [target=focus, dead][target=focus, noexists]
/cast [target=focus, nodead][] Some Heal
The [] allows the heal to cast as normal if the focus is dead.
Loot
|
|
Patch information
Prior to Patch 2.4 Lady Vashj was part of the Battle for Mount Hyjal attunement. Since then, that quest still is the only method to obtain the Band of Eternity rings (along with the title "Hand of A'dal").
First kills
 See also: The Burning Crusade: Guild Progression
Quotes
Intro:
- Water is life. It has become a rare commodity here in Outland. A commodity that we alone shall control. We are the Highborne, and the time has come at last for us to retake our rightful place in the world!
Aggro:
- I'll split you from stem to stern!
- Victory to Lord Illidan!
- I spit on you, surface filth!
- Death to the outsiders!
Phase 1:
- I did not wish to lower myself by engaging your kind, but you leave me little choice!
Phase 2:
- The time is now! Leave none standing!
Phase 3:
- You may want to take cover.
Archery:
- Straight to the heart!
- Seek your mark!
Slaying:
- Your time ends now!
- You have failed!
Death:
- Lord Illidan, I... I am... sorry.