ADBCoughlin (talk | contribs) (→Tips) |
m (→External links: clean up, replaced: wowwiki.com/WoWWiki: → wowpedia.org/Wowpedia:) |
||
| Line 1: | Line 1: | ||
| + | <onlyinclude>{{{{{tpl|tooltip}}} |
||
| − | {{infobox instance |
||
| + | |mode={{{mode|}}} |
||
| − | |name=Mana-Tombs |
||
| + | |arg={{{arg|}}} |
||
| − | |aka=MT, Tombs |
||
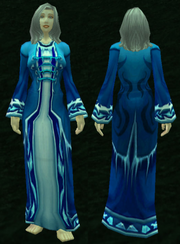
| + | |name=Glacial Robe |
||
| − | |ss=Auchindoun loading screen.jpg |
||
| + | |itemid=43583 |
||
| − | |caption=Mana-Tombs loading graphic |
||
| + | |quality=Epic |
||
| − | |loc=[[Auchindoun]], [[Terokkar Forest]] |
||
| + | |ilvl=213 |
||
| − | |races={{Race|Ethereal }} |
||
| + | |icon=INV_Chest_Cloth_08 |
||
| − | |boss=[[Nexus-Prince Shaffar]] |
||
| + | |slot=Chest |
||
| ⚫ | |||
| − | |level= |
+ | |level=80 |
| + | |durability=100 |
||
| − | |players=5 |
||
| + | |sell={{cost|8|1|90}} |
||
| − | |key=Heroic Mode: {{Loot|common|Auchenai Key}} |
||
| + | |bind=BoE |
||
| − | |bosses={{Mana-Tombs}} |
||
| ⚫ | |||
| − | }} |
||
| + | |armor=308 |
||
| − | {{Auchindoun wings}} |
||
| + | |attrib=+169 Stamina<br />+115 Frost Resistance |
||
| − | [[File:Mana-Tombs bosses.jpg|thumb|250px|Mana-Tombs bosses]] |
||
| + | |sockets={{socket|Red}}<br />{{socket|Yellow}}<br />{{socket|Blue}} |
||
| − | [[Image:Mana Tomb.jpg|thumb|Mana-Tombs entrance]] |
||
| + | |sockbonus=+12 Stamina |
||
| + | }}</onlyinclude> |
||
| + | ==Source== |
||
| − | The '''Mana-Tombs''' are a wing of the [[Auchindoun]] [[instance]]. It is accessed north from the [[Ring of Observance]]. Note that although the instance itself is called Mana-Tombs, the entrance area outside the portal is called '''Mana Tombs''' without the dash. The instance normally takes about 90-120 minutes. |
||
| + | The Glacial Robe requires a [[Tailoring]] skill of 420 to craft. |
||
| + | This pattern can be purchased from a Grand Master Tailoring Trainer for {{cost|14|40|}}. |
||
| − | == History == |
||
| − | [[Auchindoun]] is a former [[draenei]] holy site and Horde fortress in the middle of the Bone Wastes, in Outland's [[Terokkar Forest]]. It was a holy ground for draenei burial until the Shadow Council took over, summoned an extremely powerful demon as old as time itself, and destroyed half of [[Terokkar Forest]] in the process. Different factions now vie for power in this magical spot: Ethereals suck the arcane energy from the Mana-Tombs, the Burning Legion harvests souls inside the Auchenai Crypts, arakkoa zealots work dark magic in the Sethekk Halls, and the Shadow Council plots its domination of Outland from within the Shadow Labyrinth. |
||
| + | ==Materials== |
||
| − | Its inhabitants are mostly [[ethereal]]s opposing the [[Consortium]]. The Mana-Tombs provide reputation for the Consortium until Honored; afterwards, in order to gain rep with the Consortium in Mana-Tombs, it must be run on Heroic (which requires honored with [[Lower City]]). The ethereals of the Consortium cannot enter due to the anti-ethereal wards set by [[Nexus-Prince Shaffar]]; they have attempted to breach the gates with little success, but have still tested whether or not their efforts worked - often resulting in the spotaneous combustion (for lack of a better term) of the ethereal tester sent through the gate. According to the Consortium, the ethereals in the Mana-Tombs are robbing it blind and if you wish to do business with them, you'll have to aid in taking out the competition. |
||
| + | {{Itembox| |
||
| − | |||
| + | |Bolt of Imbued Frostweave|q1=6 |
||
| − | == Walkthrough == |
||
| + | |Eternal Fire|q2=3 |
||
| − | === Group and Level Guidance === |
||
| + | |Eternal Water|q3=3 |
||
| − | It is recommended that you take characters in the 64-66 level range. It is essential to have Crowd Control and/or Anti-caster abilities in group. One primary mage or warlock and a secondary can be helpful (Mage, Warlock, Second Priest, Hunter, Rogue). Tanking is not nearly as important in mana-tombs as it is in other instances so an off tank is not required. Having a back up healer is also helpful on boss fights, but they should be able to add to dps when demanded. A Priest or paladin is also needed for their shadow resistance buffs. |
||
| + | |Eternium Thread|q4=3 |
||
| − | |||
| + | |Frozen Orb|q5=1}} |
||
| − | === Preparation for the Instance === |
||
| − | Having Shadow resist items will make the first boss a lot easier, in fact, shadow resist items will be essential for players at the lower end of spectrum (63-64) that do not have a perfectly well formed party. |
||
| − | |||
| − | In order to summon Yor, at least one player from your party must have the quest {{questlong|neutral|70|Nexus-Prince Shaffar's Personal Chamber}} (Repeatable) or have completed {{questlong|neutral|70|The Eye of Haramad}}. |
||
| − | |||
| − | === Stealth Runs === |
||
| − | This dungeon provides moderate to heavy difficulty for a party made entirely of rogues and druids. No mobs have stealth detection, but there are several 'pinch-points' where 2 saps may not be enough to sneak by. |
||
| − | |||
| − | * Pandemonius is linked to all mobs in his room. Everything inside the room must be cleared. You may safely sneak around this boss. |
||
| − | * Tavarok fights alone, and can be pulled with little to no preparation from the east side. You may safely sneak around this boss. |
||
| − | * Yor fights alone, but the eels around its prison should be cleared at the very least. |
||
| − | * Shaffar is linked to all mobs in his room. Everything past the stairs must be cleared. This fight is especially cruel to melee, and may be impractical for stealth running. |
||
| − | |||
| − | == Dungeon Denizens == |
||
| − | * {{RaceIconExt|Colossus|Small}} [[Colossus]] (one, [[Tavarok]]) |
||
| − | * {{RaceIconExt|Ethereal|Small}} [[Ethereal]]s |
||
| − | * {{RaceIconExt|ArcaneWraith|Small}} [[Arcane wraith]]s |
||
| − | * {{RaceIconExt|Mana|Small}} [[Mana surge]]s |
||
| − | * {{RaceIconExt|ManaWyrm|Small}} [[Mana wyrm]]s |
||
| − | * {{RaceIconExt|Rat|Small}} [[Rat]]s (critters) |
||
| − | * {{RaceIconExt|Roach|Small}} [[Roach]]es (critters) |
||
| − | * {{RaceIconExt|Snake|Small}} [[Snake]]s (critters) |
||
| − | * {{RaceIconExt|Spark|Small}} [[Spark]]s |
||
| − | * {{RaceIconExt|Spider|Small}} [[Spider]]s (critters) |
||
| − | * {{RaceIconExt|VoidLord|Small}} [[Void lord]] (one, [[Pandemonius]]) |
||
| − | * {{RaceIconExt|VoidTerror|Small}} [[Void terror]] (one, [[Yor]]) |
||
| − | * {{RaceIconExt|Voidwraith|Small}} [[Voidwraith]]s |
||
| − | |||
| − | ===Encounters=== |
||
| − | {| class="darktable" |
||
| − | |- |
||
| − | ! Bosses || Monsters |
||
| − | |- valign=top |
||
| − | | |
||
| − | * '''Ravaged Crypt |
||
| − | **{{RaceIconExt|VoidLord|Small}} {{NPC||Pandemonius}} |
||
| − | | |
||
| − | * {{NPC||Arcane Fiend}} |
||
| − | * {{NPC||Ethereal Crypt Raider}} |
||
| − | * {{NPC||Ethereal Scavenger}} |
||
| − | * {{NPC||Ethereal Sorcerer}} |
||
| − | * {{NPC||Shadow Lord Xiraxis}} |
||
| − | |- valign=top class="alt" |
||
| − | | |
||
| − | * '''Crescent Hall |
||
| − | **{{RaceIconExt|Colossus|Small}} {{NPC||Tavarok}} |
||
| − | | |
||
| − | * {{NPC||Arcane Fiend}} |
||
| − | * {{NPC||Ethereal Crypt Raider}} |
||
| − | * {{NPC||Ethereal Priest}} |
||
| − | * {{NPC||Ethereal Sorcerer}} |
||
| − | * {{NPC||Ethereal Darkcaster}} |
||
| − | * {{NPC||Mana Leech}} |
||
| − | * {{NPC||Nexus Terror}} |
||
| − | |- valign=top |
||
| − | | |
||
| − | * '''Hall of Twilight |
||
| − | **{{RaceIconExt|Ethereal|Small}} {{NPC||Nexus-Prince Shaffar}} |
||
| − | **{{RaceIconExt|VoidTerror|Small}} {{NPC||Yor}} (Heroic) |
||
| − | | |
||
| − | * {{NPC||Arcane Fiend}} |
||
| − | * {{NPC||Ethereal Apprentice}} |
||
| − | * {{NPC||Ethereal Beacon}} |
||
| − | * {{NPC||Ethereal Crypt Raider}} |
||
| − | * {{NPC||Ethereal Darkcaster}} |
||
| − | * {{NPC||Ethereal Spellbinder}} |
||
| − | * {{NPC||Ethereal Theurgist}} |
||
| − | * {{NPC||Ethereal Wraith}} |
||
| − | * {{NPC||Mana Leech}} |
||
| − | * {{NPC||Nexus Stalker}} |
||
| − | * {{NPC||Nexus Terror}} |
||
| − | |- valign=top class="alt" |
||
| − | |} |
||
| − | |||
| − | ===Bosses=== |
||
| − | * First Boss: [[Pandemonius]] |
||
| − | * Second Boss: [[Tavarok]] |
||
| − | * Third Boss: [[Nexus-Prince Shaffar]] |
||
| − | * Summoned Boss: [[Yor]] (Heroic Mode only) |
||
| − | |||
| − | ===Trash=== |
||
| − | *All mobs immune to mind control in heroic mode. |
||
| − | {| class="darktable" |
||
| − | |- |
||
| − | ! width=200| Mob !! Special Note !! width=25%| Heroic Mode |
||
| − | |- |
||
| − | | [[Ethereal Crypt Raider]] || Behaves like an arms [[Warrior]], charging the furthest member of the group, interrupting spells, and using melee attacks. Has Mortal Strike ability. Be careful using Mind Control on a target within a group containing a Crypt Raider as they are likely to interrupt it. || Better to have one Raider crowd controlled when there are two of them. |
||
| − | |- class="alt" |
||
| − | | [[Ethereal Scavenger]] || Behaves like a prot [[Warrior]] with Shield bash ability. Can deliberately leave tank and [[Shield Bash]] a nearby healer or spellcaster player locking their currently used magic school for 8 seconds. When doing this, the mob usually must be manually taunted in order to return it to the tank. || |
||
| − | |- |
||
| − | | [[Ethereal Priest]] || Priests can be mind controlled; heal for 3k+ and the shield is comparable to a player's shield. For most groups, a single mind controlled priest is enough to solo heal the group. || |
||
| − | |- class="alt" |
||
| − | | [[Ethereal Sorcerer]] || Mage-like mob with [[Arcane Missiles]]. After short time in combat summons two arcane elementals with [[Arcane Explosion]]. || |
||
| − | |- |
||
| − | | [[Ethereal Darkcaster]] || Shadow-Priest-like mob. Mana burn for up to 3.5k with a 30 yard range. Shadow Word: Pain ticks up to 1k. [[Vampiric Aura]] - melee attacks restore health on successful hit. Best way to deal with these is to mind control them before the pull and let the other mobs kill it. Alternatively, they can be burned down quickly and silenced/stunned when casting Mana Burn. || Vampiric Aura restores up to 20% of the mobs health. ~10k mana drained from mana burn. |
||
| − | |- class="alt" |
||
| − | | [[Ethereal Spellbinder]] || Behaves like a [[Warlock]], putting Immolate [[DoT]] spells on everyone. Summons 2 Mana Wraiths with Shadowbolt volley attack. Also have a 3 second Counterspell ability with a short (5 second) cooldown. || Immolate DoT ticks for 725 damage, initial hit ~2.5k. Two Spellbinders can put double Immolate on every group member in few seconds, and that hurts. |
||
| − | |- |
||
| − | | [[Nexus Stalker]] || Rogue-like mob with gouge and Ghostly Strike [[poison]] used on random target. Will usually gouge the tank, causing all attacking mobs to ignore him/her for several seconds.|| Poison deals 1000-1400 damage each tick |
||
| − | |- class="alt" |
||
| − | | [[Nexus Terror]] || Melee attacks deal pure shadow damage, 600-1500, not mitigated by armor, can crit. AoE fear ([[Psychic Scream]]). Immune to crowd control. || Instead of an AoE fear, casts single target [[Death Coil]] at random party member (excludes first on threat list). Melee Shadow Damage: 2500-3600. |
||
| − | |- |
||
| − | | [[Ethereal Theurgist]] || Have a [[Polymorph]] and a [[Blast Wave]] AoE abilities. || Immune to Mind Control. |
||
| − | |- class="alt" |
||
| − | | [[Mana Leech]] || Non elite mana beast. Come in groups and individually do weak melee damage. Upon death, they explode into an arcane explosion for up to 1400 damage. When more than 1 target in melee range, all leeches begin to do Arcane Explosion. Mana Burn: 2 second cast, 30 yard range, burns 2.8k mana and deals 50% as damage, no cooldown. Recommended to send tank on them and kill safely one by one from distance, or send a suicidal mage that will need good healing. || Arcane Explosion up to 2200 damage. Mana Burn up to 3.6k. |
||
| − | |} |
||
| − | |||
| − | ==Loot== |
||
| − | See [[Mana-Tombs loot]]. |
||
| − | |||
| − | ==Reputation== |
||
| − | Reputation gains go to [[Consortium]]. |
||
| − | * Trash mobs: 7 (heroic: 15) |
||
| − | * [[Nexus Terror]]: 10 (heroic: 23) |
||
| − | * [[Mana Leech]]: 1 (heroic: 3) |
||
| − | |||
| − | A complete clear of Mana-Tombs will give about 1200 reputation with the Consortium until Honored, and 2400 each Heroic clear. |
||
| − | |||
| − | == Maps == |
||
| − | [[Image:Mana Tombs map.jpg]] |
||
| − | |||
| − | '''Sub-areas''' |
||
| − | |||
| − | *[[Ravaged Crypt]] |
||
| − | *[[Crescent Hall]] |
||
| − | *[[Hall of Twilight]] |
||
| − | |||
| − | ==Quests== |
||
| − | Two quests are available at the entrance to the instance: |
||
| − | * {{questlong|neutral|66|Safety Is Job One}} - Kill mobs in the instance, completed at the control panel prior to reaching Shaffar |
||
| − | ** {{questlong|neutral|66|Someone Else's Hard Work Pays Off}} - Escort the head engineer back to entrance. Probably best done after killing Shaffar and clearing the whole instance. (As soon as you finish the quest ''Safety Is Job One'', several friendly NPCs will spawn, one of them will offer you this quest.) |
||
| − | * {{questlong|neutral|66|Undercutting the Competition}} - Kill Nexus-Prince Shaffar |
||
| − | The following are part of a quest chain that begins with {{NPC|neutral|Image of Commander Ameer}} in [[Blade's Edge Mountains]] after completing {{questlong|neutral|70|The Mark of the Nexus-King}}: |
||
| − | * {{questlong|neutral|70|Stasis Chambers of the Mana-Tombs}} |
||
| − | ** {{questlong|neutral|70|Nexus-Prince Shaffar's Personal Chamber}} (Repeatable) |
||
| − | ** {{questlong|neutral|70|The Eye of Haramad}} - Not set inside the Mana-Tombs, but the reward is a permanent key to unlock Nexus-Prince Shaffar's Stasis Chamber |
||
| − | |||
| − | ==Tips== |
||
| − | * This dungeon is often one of the least favorites for tanking classes in its level range due to the number of mobs that interfere with tanking functions, such as the Ethereal Scavengers' habit of leaving the tank to attack casters, or the Ethereal Stalkers' tendency to gouge the tank, causing all attacking mobs to ignore the tank for several seconds. |
||
| − | |||
| − | * It's easy to forget that the Mana Leeches in this dungeon often perform an arcane explosion-like attack when they die. If several are pulled at once, it can quickly wipe out most of your melee DPS, also as a healer it is recommended to stand very far away as possible, at max range, to reduce the chance of being mana burned, as each hit could wipe out up to half of your mana, and when you're pulling groups of them mixed with other mobs your group will die very fast. |
||
==External links== |
==External links== |
||
| + | [[File:Glacial Robe.png|thumb]] |
||
| − | <!-- Read http://www. |
+ | <!-- Read http://www.wowpedia.org/Wowpedia:External_links before posting your links here. |
Links that do not conform to the rules will be DELETED. |
Links that do not conform to the rules will be DELETED. |
||
Repeat violations may result in a BAN. |
Repeat violations may result in a BAN. |
||
Have a nice day. :) --> |
Have a nice day. :) --> |
||
| + | {{Elinks-item|43583}} |
||
| − | {{elinks-zone|3792|al=125|armory=1}} |
||
| − | {{elink|site=Lootables|link=http://www.lootables.com/?guide=ManaTombs|desc=Detailed Guide & Instance Map|icon=lootables}} |
||
| − | {{Elink|link=http://www.wowgroupings.com/index.html?instance=32|site=WowGroupings|desc=Group & Raid Scheduler|}} |
||
| − | <!-- Videos --> |
||
| − | {{elink|link=http://www.youtube.com/watch?v=aozX0HyRKr4|site=farmers-blog.blogspot.com|type=video}} |
||
| − | {{elink|link=http://wow.warcry.com/news/view/68190-Burning-Crusade-Instance-Video-Auchinduon-Mana-Tombs|site=WarCry|icon=video}} |
||
| − | |||
| − | |||
| − | {{Dungeons}} |
||
| − | |||
| + | [[Category:World of Warcraft epic items]] |
||
| − | [[fr:Tombes-mana]] |
||
| − | [[Category: |
+ | [[Category:World of Warcraft cloth chest items]] |
| − | [[Category: |
+ | [[Category:World of Warcraft socketed items]] |
| − | [[Category: |
+ | [[Category:World of Warcraft tailoring crafted items]] |
| − | [[Category:Instances]] |
||
Revision as of 14:46, 1 November 2010
- Glacial Robe
- Binds when equipped
- Cloth
- Chest
- 308 Armor
- +169 Stamina
+115 Frost Resistance  Red Socket
 Yellow Socket Blue Socket
- Socket Bonus: +12 Stamina
- Durability 100 / 100
- Requires Level 80
- Item Level 213
- Sell Price: 8 1 90
Source
The Glacial Robe requires a Tailoring skill of 420 to craft.
This pattern can be purchased from a Grand Master Tailoring Trainer for 14![]() 40
40![]() .
.
Materials
| 6x [Bolt of Imbued Frostweave] | 3x [Eternal Fire] | |||
| 3x [Eternal Water] | 3x [Eternium Thread] | |||
| 1x [Frozen Orb] |
External links
