Wilcuss63167@legacy41582028 (talk | contribs) |
m (→Strategy) Tag: Visual edit |
||
| (56 intermediate revisions by 29 users not shown) | |||
| Line 1: | Line 1: | ||
| − | {{Stub/Mob}} |
||
{{npcbox |
{{npcbox |
||
|name=Faction Champions |
|name=Faction Champions |
||
| + | |image=Faction Champions.jpg |
||
| − | |faction=Combat |
||
| + | |faction=Boss |
||
| + | |aggro={{aggro|-1|-1}} |
||
|status=Defeatable |
|status=Defeatable |
||
|races=[[Blood elf]], [[Draenei]], [[Dwarf]], [[Forsaken]], [[Gnome]], [[Human]], [[Night elf]], [[Orc]], [[Tauren]], [[Troll]] |
|races=[[Blood elf]], [[Draenei]], [[Dwarf]], [[Forsaken]], [[Gnome]], [[Human]], [[Night elf]], [[Orc]], [[Tauren]], [[Troll]] |
||
| Line 11: | Line 12: | ||
}} |
}} |
||
| − | The '''Faction Champions''' is |
+ | The '''Faction Champions''' is the third encounter in the [[Trial of the Crusader]] raid dungeon. Players encounter members of the opposite faction in PvP Arena-styled combat. |
| − | Players will encounter members of the opposite faction in PvP Arena-styled combat. |
||
==Members== |
==Members== |
||
| − | {| class=darktable style="text-align:center" |
+ | {| class=darktable style="text-align:center" |
|- |
|- |
||
| − | ! rowspan=2 |
+ | ! rowspan=2 | Class !! colspan=2 | Champions |
|- |
|- |
||
| − | ! |
+ | ! Alliance !! Horde |
|- |
|- |
||
! Death knight |
! Death knight |
||
| − | | |
+ | | {{NPC||Tyrius Duskblade}} || {{NPC||Gorgrim Shadowcleave}} |
|-class=alt |
|-class=alt |
||
! Druid (Caster) |
! Druid (Caster) |
||
| − | | |
+ | | {{NPC||Kavina Grovesong}} || {{NPC||Birana Stormhoof}} |
|- |
|- |
||
! Druid (Heal) |
! Druid (Heal) |
||
| − | | |
+ | | {{NPC||Melador Valestrider}} || {{NPC||Erin Misthoof}} |
|-class=alt |
|-class=alt |
||
! Hunter |
! Hunter |
||
| − | | |
+ | | {{NPC||Alyssia Moonstalker}}<br />and her lioness || {{NPC||Ruj'kah}}<br />and her lioness |
|- |
|- |
||
! Mage |
! Mage |
||
| − | | |
+ | | {{NPC||Noozle Whizzlestick}} || {{NPC||Ginselle Blightslinger}} |
|-class=alt |
|-class=alt |
||
! Paladin (Heal) |
! Paladin (Heal) |
||
| − | | |
+ | | {{NPC||Velanaa}} || {{NPC||Liandra Suncaller}} |
|- |
|- |
||
! Paladin (Retribution) |
! Paladin (Retribution) |
||
| − | | |
+ | | {{NPC||Baelnor Lightbearer}} || {{NPC||Malithas Brightblade}} |
|-class=alt |
|-class=alt |
||
| − | ! Priest ( |
+ | ! Priest (Discipline) |
| − | | |
+ | | {{NPC||Anthar Forgemender}} || {{NPC||Caiphus the Stern}} |
|- |
|- |
||
! Priest (Shadow) |
! Priest (Shadow) |
||
| − | | |
+ | | {{NPC||Brienna Nightfell}} || {{NPC||Vivienne Blackwhisper}} |
|-class=alt |
|-class=alt |
||
! Rogue |
! Rogue |
||
| − | | |
+ | | {{NPC||Irieth Shadowstep}} || {{NPC||Maz'dinah}} |
|- |
|- |
||
! Shaman (Heal/Caster) |
! Shaman (Heal/Caster) |
||
| − | | |
+ | | {{NPC||Saamul}} || {{NPC||Thrakgar}} |
|-class=alt |
|-class=alt |
||
! Shaman (Melee) |
! Shaman (Melee) |
||
| − | | |
+ | | {{NPC||Shaabad}} || {{NPC||Broln Stouthorn}} |
|- |
|- |
||
! Warlock |
! Warlock |
||
| − | | |
+ | | {{NPC||Serissa Grimdabbler}}<br />and her felhunter {{NPC||Zhaagrym}} || {{NPC||Harkzog}}<br />and his felhunter {{NPC||Zhaagrym}} |
|-class=alt |
|-class=alt |
||
! Warrior |
! Warrior |
||
| − | | |
+ | | {{NPC||Shocuul}} || {{NPC||Narrhok Steelbreaker}} |
|} |
|} |
||
| Line 67: | Line 67: | ||
===Heroic Mode=== |
===Heroic Mode=== |
||
| − | On the heroic version of Faction Champions, |
+ | On the heroic version of Faction Champions, they have 2.6M or 3.2M health each. Every champion also hits for more damage, is untauntable, and has a PvP trinket at their disposal (with a cooldown of 5 minutes). Crowd control and being alert about being targeted is very crucial to survival. |
| + | |||
| + | ===The Opponents=== |
||
| + | This encounter is much like an arena match vs. 10 (or 6 at 10-man) quasi-player NPCs. The opponents act very much like a good arena team, and some (but not all) PvP mechanics are applied to the NPCs. For example: |
||
| + | * The NPC healers switch to spam healing DPS target(s). |
||
| + | * The NPC damage dealers gang up on a single raid member, especially raid members with low health. |
||
| + | * All NPCs, including healers, use crowd control abilities like Polymorph, Fear, Hex, and even Banish. |
||
| + | * Crowd control behaves as if fighting other players (eg. Sap only lasts ten seconds instead of one minute), and are subject to Diminishing Returns. After 3 casts, the NPC becomes immune to that Crowd Control effect for 15 seconds. Because of this, you cannot rely on crowd control abilities to win this fight. |
||
| + | * However, they are still considered non-player characters for resilience, meaning resilience does not reduce damage taken. Resilience is still effective against critical attacks. |
||
| + | * Faction champions do more damage than typical players, have drastically more health (2.4 million on 25 man), and cast enormous heals, e.g. the druids rejuvenation ticks for over 50,000 |
||
| + | * The NPCs are immune to mind control. All other forms of crowd control work. |
||
| + | * The NPC's AI uses Proximity, Health and Damage to decide who to attack. Try to never be in the center of a group of NPCs or they are likely to all turn and one-shot you (Rogues beware!). If you AoE, be prepared to get aggro. If something is attacking you or even heading your way, run. |
||
==Strategy== |
==Strategy== |
||
| + | Prior to the encounter, everybody should switch to PvP mode. Everyone should plan on taking hits, so stamina/resilience gear helps. As always, it is a balancing act between how much pvp and pve gear you should use. |
||
| − | This encounter is much like an arena match between you and 10 (6 at 10-man) quasi-player NPCs. Before even attempting this encounter, your raid will need to assume a PvP mindset. The enemies you will face in this encounter act very much like a good arena team does and some (but not all) PvP mechanics are applied to these NPCs. For example: |
||
| − | * The NPC healers will switch to spam healing your DPS target(s) and should be Crowd Controlled when possible, or stun-locked by a Rogue(s). |
||
| − | * The NPC damage dealers will gang up on a single raid member and focus fire him dead |
||
| − | * All NPCs, including healers, will use player crowd control abilities like Polymorph, Fear, Hex, and even Banish - Tremor Totem and the like are very useful here. |
||
| − | * NPCs in this counter are affected by the same diminishing return rules for player-cast crowd controls as other players are |
||
| − | * Resilience does not reduce damage taken by the NPC enemies |
||
| − | * Faction champions do more damage than typical players, have drastically more health (2.4 million on 25 man), and cast enormous heals - the druid champion's rejuvenation, for example, heals for more than 50,000 per tick |
||
| − | * The NPCs cannot be mind controlled, and Repentance doesn't work either. All other forms of crowd control seem to work, but are subject to Diminishing Returns - after 3 casts, the NPC will be immune to that Crowd Control effect for 15 seconds. |
||
| − | As with any arena match, picking a damage target and focusing it down is critical. While one target is picked to be killed, all other enemy combatants should be controlled by whatever mechanics are available, including |
+ | As with any arena match, picking a damage target and focusing it down is critical. While one target is picked to be killed, all other enemy combatants should be controlled by whatever mechanics are available, including CC and focused distractions (e.g., keeping a warrior on the rogue NPC to disarm, hamstring, intercept, stun etc.). The NPCs reset their aggro tables every 9 seconds. This frequently leads to the damage dealers ganging up on a single raid member; fortunately, healers do not get disproportionately frequently targeted. The NPCs are generally very difficult to tank. |
| − | + | The resulting very chaotic nature of this fight (especially early on when all 10 NPCs are alive), requires fast and smart decision by every single raid member. When one or more of the melee champions targets a soft target, that target needs to run, fear, snare, escape, anything to stay alive. To facilitate these maneuvers, it is best not to clump together. Every second that a champion is traveling to its target is a second that it is not doing damage. |
|
| + | PvP trinkets are recommended in case you are targeted with blind or have to eat an entire fear. A few seconds of not dispelling/interrupting is all it takes to undo a minute's worth of dps. Tremor totem and fear ward are a must. Hunters should use frost trap to slow the NPCs. Hunter pets should attack the enemy pets - The NPC healers treat pets and summoned pets (Treants and the like) as players, so do not kill those. Merely keep attacking them and the healers will waste heals on them. If you are fortunate enough to have several NPC's pets to attack, the fight will be much easier. |
||
| − | Another aspect of this encounter at odds with an arena match is that all of your opponents and their classes are known ahead of time, so it is possible to create a variety of control macros that target specific roles by name. This is strongly recommended. It is often very difficult to pick your control target from within the crowd while also performing your other role. Every class with a control ability should be using it as often as possible, including healers. Because of diminishing returns, as the fight goes on, your crowd control target will become actually or effectively immune to your ability, so don't be afraid to use control on any active target that is not the current focus fire target. |
||
| + | Another aspect of this encounter at odds with an arena match is that all opponents and their classes are known ahead of time, so it is possible to create a variety of control macros that target specific roles by name. This is strongly recommended. It is often very difficult to pick a control target from within the crowd while at the same time healing or dealing damage, and evading. Every class with a control ability should be using it as often as possible, including healers. Because of diminishing returns, it's a good idea to regularly switch the control target. |
||
| − | The fight becomes exponentially easier as each champion is killed, so getting the first one down as soon as possible greatly increases your odds of winning. All cooldowns, including Bloodlust/Heroism, should be used immediately to facilitate a speedy kill on the first target. The target you pick will be dependent upon your raid makeup, but for the majority of groups the most effective strategy is unsurprisingly to kill the healers first. |
||
| + | The fight becomes exponentially easier as each champion is killed, so getting the first one down quickly greatly increases the odds of winning. All cooldowns, including Bloodlust/Heroism, should be used immediately. The priority of targets is dependent on raid makeup, but usually the most effective strategy is to kill the healers first. The healers and their abilities are: |
||
| − | The four healers are a restoration druid, a restoration shaman, a holy paladin, and a holy priest. |
||
| − | * |
+ | *Restoration druid: Rejuvenation, Lifebloom, Nourish, and Regrowth. Two can be interrupted, three must be dispelled. |
| − | * |
+ | *Restoration shaman: Healing Wave, Lesser Healing Wave, Earth Shield, and Chain Heal. Three can be interrupted, one must be dispelled. |
| − | * |
+ | *Holy paladin: Flash of Light, Holy Light, Hand of Freedom, Divine Shield, and Hand of Protection. Divine Shield is cast at around 25% health and should be broken swiftly (by [[Shattering Throw]] or [[Mass Dispel]]) so the Holy Light which she immediately starts casting afterwards can be interrupted. Similarily she casts Hand of Protection (which can be broken by Shaman Purge) on other low-health NPCs, often the first dps target. |
| − | * |
+ | *Discipline priest: Greater Heal, Flash Heal, Renew, and Power Word: Shield. Two can be interrupted, two must be dispelled. |
| + | The most effective healer is the restoration druid, mainly because most of his casts are instant and not interruptable. A common strategy is to put interrupters on the other healers and burn the druid down first. If there are competent warlocks dispellers in the raid which can keep the druid banished, and dispel the Hots on the kill target, you can something else first (usually the rogue or warrior). Remember that the banishes are subject to diminishing returns, so this approach should only be chosen if the other focus target dies before the druid becomes immune to banish. |
||
| + | After the restoration druid is dead, one of the other healers is usually chosen next. The shaman uses a powerful earth shield which makes him slightly more dangerous than the priest; in addition, he casts Hex and powerful totems. Fortunately, he has no self-ressurrection. |
||
| − | The most effective healer is the restoration druid. As with arena combat, they are very difficult to kill by themselves. In this encounter, in addition to the restoration druid healing himself, the other two healers will also focus heal while your raid focuses damage; this is true regardless of the target you pick. However, because the druid casts three very powerful healing-over-time effects that must be dispelled (as opposed to one from the shaman and two from the priest), if you leave the restoration druid up, a small interruption in chain dispelling from another champion's control abilities, such as a fear bomb, can quickly undo a great deal of damage progress. While focussing the restoration druid from the start, use as many stuns and interrupts as possible, use your longest-duration crowd controls on the other two healers, and burn him. |
||
| + | After all the healers are dead or locked down by rogues/warriors, the next highest priority should be the melee DPS. The rogue is the most dangerous followed by the warrior, the retribution paladin, and the death knight. |
||
| − | If you have competent warlocks and can keep the druid banished, you may have better luck burning one of the others first. Remember that your banishes will be subject to PvP limits and diminishing returns, so unless you can kill one of the healers before the druid becomes immune to banishes, you may find yourself chewing through druid heal buffs on your kill target, which may greatly slow your kill time. |
||
| + | *The rogue can shadowstep anywhere in the arena and kill someone almost instantly. Fan of knives hits everyone for huge damage. He also has evasion and vanish, making him difficult to kill. Until you decide to kill the rogue, he should be locked down by a tank who can charge when he shadowsteps and disarm when he is attacking someone. If you can kill the rogue within twenty seconds, it is worth killing him first and use your CC on the NPC healers. |
||
| − | After the restoration druid is dead, choose either the shaman, the paladin, or the priest. The shaman will use a powerful earth shield which makes him slightly more dangerous than the priest; in addition, he casts Hex on your raid. The shaman cannot resurrect himself like a player shaman can. The paladin will use Divine Shield at low health which should be broken swiftly so her Holy Light can be interrupted, and will use Hand of Freedom to break her allies out of Crowd Control effects and Hand of Protection to prevent her allies from being killed. |
||
| + | *The warrior also hits very hard and casts bladestorm. The death knight will pull people to him and chain others. Your tanks are a good choice to kite these two for the fight. |
||
| + | *The warlock is deadly only because of Hellfire. Merely have an interrupter keep him on focus and interrupt him as soon as he casts Hellfire. |
||
| + | *The Enhancement shaman is dangerous only through his totems, such as earthbind and windfury. A ranged class should be in charge of killing totems when they appear. |
||
| + | *The hunter is also capable of doing some huge burst damage with explosive shot and aimed shot, but your healers should be able to heal through it. |
||
| + | *The shadow priest, mage, and balance druid are usually only annoyances due to their CC (fear, freeze, cyclone). |
||
| + | Once the first couple are dead the fight becomes several orders of magnitude simpler and boils down to a burn phase. Keep the DPS champions chasing and the raid healers alive. Players assigned to distraction on various enemies should continue distracting until their target is picked for the kill. Distraction players must watch their target's target and call out who they're pursuing. |
||
| − | After the healers are dead, the next highest priority should be the melee DPS. The rogue is probably the most dangerous followed by the warrior, the retribution paladin, and the death knight; the rogue is also a softer target than the plate wearers and will consequently die sooner. The enhancement shaman is the weakest of the melee champions and is weaker than most of the ranged. It is safe to kill him last. |
||
| + | Two of the most important abilities in this encounter are offensive dispelling and spell interrupts. All of the champions are susceptible to spell interrupts, and offensive dispel is critical to cut through the healers' effects. Another strong ability to remember is mass dispel, which can remove Divine Shields and Ice Blocks, both of which are used by enemy champions. [[Mortal Strike]] and [[Wound Poison]] also help a lot. The death knight and rogue use disease and poison effects so [[Cleansing Totem (shaman ability)|Cleansing Totem]]s should be down. |
||
| − | Once the three healers are dead the fight becomes several orders of magnitude simpler and boils down to a burn phase. Keep the DPS champions chasing and your healers alive. Players assigned to distraction on various enemies should continue distracting until their target is picked for the kill. One of the primary jobs for distraction players will be to watch their target's target and call out who they're pursuing. |
||
| + | ===Class roles=== |
||
| − | Two of the most important abilities in this encounter are offensive dispelling and spell interrupts. All of the champions are susceptible to spell interrupts, and offensive dispel is critical to cut through the healers' effects. Another strong ability to remember is mass dispel, which can cut through Divine Shields and Ice Blocks, both of which will be used by enemy champions. Mortal Strike and Wound Poison will also greatly aid you in taking out the healers early on. The death knight and rogue will use disease and poison effects so Cleansing Totems should be down. |
||
| + | *Tanking classes can use taunt, but it only lasts until the NPC's drop aggro (which is all the time), and is susceptible to diminishing returns. Fixate taunts like Hunter's [[Distracting Shot]] do not work. It is better to use your tanks as kiters/interrupters. |
||
| + | *Death Knights are very good at pinning down melee with [[Chains of Ice]], [[Dark Command]], and [[Death Grip]]. |
||
| + | *Warriors can spam [[Hamstring]], [[Shockwave]], and [[Charge]] stun the warrior and the rogue to prevent them from moving. |
||
| + | *Rogues are able to keep casters, healers especially, locked down with constant stuns and interrupts. A cycle of Kick, Kidney shot and Gouge, along with mind-numbing poison should guarantee nothing gets cast. [[Vanish]], [[Cloak of Shadows]], [[Improved Sprint (Classic)]], and [[Killing Spree]] dispel [[Shattered Barrier]] and [[Frost Nova]]. |
||
| + | *A combination of warlock and balance druid is able to chain [[Cyclone]] and [[Banish]] on the restoration druid, switching whenever the CC chain cannot continue due to DR. |
||
| + | *Use a Fear bomb if enough champions reach their target. |
||
| + | *A Death Knight with [[Hungering Cold]] is able to use theirs right at the start to control anyone who is not currently taken care of. Doing this at the beginning of the heroic encounter is very useful for burning all the champion's PvP trinkets early. |
||
| + | *Priests and any dispellers must keep all buffs and Hots off of the kill target at all times. |
||
| + | If a raid finds that they're having trouble surviving, it might be best to save all forms of crowd control for self defense. The first two minutes or so of the encounter are usually the most critical. Once the first healer is down (usually the Resto Druid) the fight becomes significantly easier. |
||
| − | Your PvP trinkets will come in handy in this encounter as well, as you will be constantly controlled throughout the fight. For all but the most elite raid groups, you can expect this fight to last close to 10 minutes, so you will use your trinket several times throughout the battle. |
||
| + | ==Loot== |
||
| − | To avoid healers being overwhelmed with switching targets to try to heal those being focused, reserve anyone who can crowd control melee and casters to remain on that target until they are dead. |
||
| + | {{main|Champions' Cache}} |
||
| − | *Any tanking class will be able to taunt their target to fixate it away. Taunts are still subject to DR. Fixate taunts like Hunter's [[Distraction Shot]] do not work on bosses. |
||
| + | {{:Champions' Cache}} |
||
| − | *Death Knights are perfect for pinning down melee (warrior, retribution paladin, rogue, death knight) with [[Chains of Ice]], [[Dark Command]], and [[Death Grip]]. |
||
| − | *Warriors can spam [[Hamstring]], [[Shockwave]], and [[Charge]] stun the warrior and the rogue to prevent them from moving. |
||
| − | *Rogues are able to keep casters (mage, shadow priest, holy priest) on lockdown with constant stuns and interrupts. If you are on the mage, he ''will'' blink when stunned so unless you have [[Throwing Specialization]] try not to do it while rooted. [[Vanish]], [[Cloak of Shadows]], [[Improved Sprint]], and [[Killing Spree]] will dispel the [[Shattered Barrier]] and [[Frost Nova]]. |
||
| − | *A combination of warlock and balance druid is able to chain [[Cyclone]] and [[Banish]] on the restoration druid, switching off every time the CC chain cannot continue due to DR. |
||
| − | *Fear bomb if enough champions reach their target. |
||
| − | *A Death Knight with [[Hungering Cold]] will be able to use theirs right at the start to control anyone who is not currently taken care of. Doing this at the beginning of the heroic encounter is very useful for burning every champion's PvP trinket early. |
||
| − | == |
+ | ==Related achievements== |
| + | * [[Call of the Crusade (10 player)]]/[[Call of the Crusade (25 player)]] |
||
| − | Intro (As Alliance): |
||
| + | * [[Call of the Grand Crusade (10 player)]]/[[Call of the Grand Crusade (25 player)]] |
||
| − | *{{text|yell|'''Highlord Tirion Fordring:''' The next battle will be against the Argent Crusade's most powerful knights! Only by defeating them will you be deemed worthy...}} |
||
| + | * [[Resilience Will Fix It (10 player)]]/[[Resilience Will Fix It (25 player)]] |
||
| − | :{{text|yell|'''Garrosh Hellscream:''' The Horde demands justice! We challenge the Alliance. Allow us to battle in place of your knights, paladin. We will show these dogs what it means to insult the Horde!}} |
||
| − | :{{text|yell|'''Highlord Tirion Fordring:''' Very well, I will allow it. Fight with honor!}} |
||
| − | :{{text|yell|'''Garrosh Hellscream:''' Show them no mercy, Horde champions! LOK'TAR OGAR!}} |
||
| + | ==Quotes== |
||
| − | Intro (As Horde): |
||
| + | ;[[Barrett Ramsey]] |
||
| − | *{{text|yell|'''Highlord Tirion Fordring:''' The next battle will be against the Argent Crusade's most powerful knights! Only by defeating them will you be deemed worthy...}} |
||
| + | : That warlock certainly didn't summon a [[Doomguard]]! Your next challenge will find you fighting knights of the Argent Crusade. Think you're up for the next challenge? |
||
| − | :{{text|yell|'''King Varian Wrynn:''' Our honor has been besmirched! They make wild claims and false accusations against us. I demand justice! Allow my champions to fight in place of your knights, Tirion. We challenge the Horde!}} |
||
| − | :{{text|yell|'''Highlord Tirion Fordring:''' Very well, I will allow it. Fight with honor!}} |
||
| − | :{{text|yell|'''King Varian Wrynn:''' Fight for the glory of the Alliance, heroes! Honor your king and your people!}} |
||
| + | ''{{gossip|Of course!}}'' |
||
| − | Killing a player (As Alliance): |
||
| − | *{{text|yell|'''Garrosh Hellscream:''' Weakling!}} |
||
| − | *{{text|yell|'''Garrosh Hellscream:''' Pathetic!}} |
||
| − | *{{text|yell|'''Garrosh Hellscream:''' Overpowered.}} |
||
| − | *{{text|yell|'''Garrosh Hellscream:''' Lok'tar!}} |
||
| + | : Well then, I'll give the signal to Tirion when you are ready to go. |
||
| − | Killing a player (As Horde): |
||
| − | *{{text|yell|'''King Varian Wrynn:''' HAH!}} |
||
| − | *{{text|yell|'''King Varian Wrynn:''' Hardly a challenge!}} |
||
| − | *{{text|yell|'''King Varian Wrynn:''' Worthless scrub.}} |
||
| − | *{{text|yell|'''King Varian Wrynn:''' Is this the best the Horde has to offer?}} |
||
| + | ''{{gossip|Give the signal! We're ready to go!}}'' |
||
| − | Victory (As Alliance): |
||
| − | *{{text|yell|'''King Varian Wrynn:''' Glory to the Alliance!}} |
||
| + | ;Intro as Alliance |
||
| − | Victory (As Horde): |
||
| + | :{{text|yell|Highlord Tirion Fordring|The next battle will be against the Argent Crusade's most powerful knights! Only by defeating them will you be deemed worthy...}} |
||
| − | *{{text|yell|'''Garrosh Hellscream:''' That was just a taste of what the future brings. FOR THE HORDE!}} |
||
| + | :{{text|yell|Garrosh Hellscream|The Horde demands justice! We challenge the Alliance! Allow us to battle in place of your knights, paladin. We will show these dogs what it means to insult the Horde.}} |
||
| + | :{{text|yell|Highlord Tirion Fordring|Very well. I will allow it. Fight with honor!}} |
||
| + | :{{text|yell|Garrosh Hellscream|Show them no mercy, Horde champions! LOK'TAR OGAR!}} |
||
| + | ;Intro as Horde |
||
| − | Outro: |
||
| + | :{{text|yell|Highlord Tirion Fordring|The next battle will be against the Argent Crusade's most powerful knights! Only by defeating them will you be deemed worthy...}} |
||
| − | *{{text|yell|'''Highlord Tirion Fordring:''' A shallow and tragic victory. We are weaker as a whole from the losses suffered today. Who but the Lich King could benefit from such foolishness? Great warriors have lost their lives. And for what? The true threat looms ahead - the Lich King awaits us all in death.}} |
||
| + | :{{text|yell|King Varian Wrynn|Our honor has been besmirched! They make wild claims and false accusations against us. I demand justice! Allow my champions to fight in place of your knights, Tirion. We challenge the Horde!}} |
||
| + | :{{text|yell|Highlord Tirion Fordring|Very well. I will allow it. Fight with honor!}} |
||
| + | :{{text|yell|King Varian Wrynn|Fight for the glory of the Alliance, heroes! Honor your king and your people!}} |
||
| + | ;Killing an Alliance player |
||
| − | == Loot == |
||
| + | *{{text|yell|Garrosh Hellscream|Weakling!}} |
||
| − | As with the other bosses in the instances, there are separate versions of each item for [[Alliance]] raids and for [[Horde]] raids. |
||
| + | *{{text|yell|Garrosh Hellscream|Pathetic!}} |
||
| + | *{{text|yell|Garrosh Hellscream|Overpowered.}} |
||
| + | *{{text|yell|Garrosh Hellscream|Lok'tar!}} |
||
| + | ;Killing a Horde player |
||
| − | === 10-man === |
||
| + | *{{text|yell|King Varian Wrynn|HAH!}} |
||
| − | {| class = darktable |
||
| + | *{{text|yell|King Varian Wrynn|Hardly a challenge!}} |
||
| − | ! {{factionIcon|Alliance|small}} Alliance !! {{factionIcon|Horde|small}} Horde !! Description !! {{factionIcon|Alliance|small}} Alliance Heroic !! {{factionIcon|Horde|small}} Horde Heroic |
||
| + | *{{text|yell|King Varian Wrynn|Worthless scrub.}} |
||
| − | |- |
||
| + | *{{text|yell|King Varian Wrynn|Is this the best the Horde has to offer?}} |
||
| − | | {{item|icon=|Blade of the Silver Disciple }} || {{item|icon=|Sunreaver Disciple's Blade }} || Dagger || {{item|icon=|Blade of the Silver Disciple (heroic)}} || {{item|icon=|Sunreaver Disciple's Blade (heroic)}} |
||
| + | |||
| − | |- |
||
| + | ;Victory as Alliance |
||
| − | | {{item|icon=|Faceplate of the Silver Champion }} || {{item|icon=|Sunreaver Champion's Faceplate }} || Plate helm || {{item|icon=|Faceplate of the Silver Champion (heroic)}} || {{item|icon=|Sunreaver Champion's Faceplate (heroic)}} |
||
| + | :{{text|yell|King Varian Wrynn|GLORY TO THE ALLIANCE!}} |
||
| − | |- |
||
| + | |||
| − | | {{item|icon=|Pauldrons of the Silver Defender }} || {{item|icon=|Sunreaver Defender's Pauldrons }} || Plate shoulders || {{item|icon=|Pauldrons of the Silver Defender (heroic)}} || {{item|icon=|Sunreaver Defender's Pauldrons (heroic)}} |
||
| + | ;Victory as Horde |
||
| − | |- |
||
| + | :{{text|yell|Garrosh Hellscream|That was just a taste of what the future brings. FOR THE HORDE!}} |
||
| − | | {{item|icon=|Helm of the Silver Ranger }} || {{item|icon=|Sunreaver Ranger's Helm }} || Mail helm || {{item|icon=|Helm of the Silver Ranger (heroic)}} || {{item|icon=|Sunreaver Ranger's Helm (heroic)}} |
||
| − | |- |
||
| − | | {{item|icon=|Gloves of the Silver Assassin }} || {{item|icon=|Sunreaver Assassin's Gloves }} || Leather gloves || {{item|icon=|Gloves of the Silver Assassin (heroic)}} || {{item|icon=|Sunreaver Assassin's Gloves (heroic)}} |
||
| − | |- |
||
| − | | {{item|icon=|Sandals of the Silver Magus }} || {{item|icon=|Sunreaver Magus' Sandals }} || cloth boots || {{item|icon=|Sandals of the Silver Magus (heroic)}} || {{item|icon=|Sunreaver Magus' Sandals (heroic)}} |
||
| − | |- |
||
| − | | {{item|icon=|Binding Light }} || {{item|icon=|Binding Stone }} || Trinket || {{item|icon=|Binding Light (heroic)}} || {{item|icon=|Binding Stone (heroic)}} |
||
| − | |- |
||
| − | | {{item|icon=|Victor's Call }} || {{item|icon=|Vengeance of the Forsaken }} || Trinket || {{item|icon=|Victor's Call (heroic)}} || {{item|icon=|Vengeance of the Forsaken (heroic)}} |
||
| − | |- |
||
| − | | {{item|icon=|Talisman of Volatile Power }} || {{item|icon=|Fetish of Volatile Power }} || Trinket || {{item|icon=|Talisman of Volatile Power (heroic)}} || {{item|icon=|Fetish of Volatile Power (heroic)}} |
||
| − | |- |
||
| − | | {{item|icon=|Fervor of the Frostborn }} || {{item|icon=|Eitrigg's Oath }} || Trinket || {{item|icon=|Fervor of the Frostborn (heroic)}} || {{item|icon=|Eitrigg's Oath (heroic)}} |
||
| − | |- |
||
| − | | {{item|icon=|Emblem of Triumph }} || {{item|icon=|Emblem of Triumph }} || || {{item|icon=|Emblem of Triumph }} || {{item|icon=|Emblem of Triumph }} |
||
| − | |} |
||
| + | ;Outro |
||
| − | === 25-man === |
||
| + | :{{text|yell|Highlord Tirion Fordring|A shallow and tragic victory. We are weaker as a whole from the losses suffered today. Who but the Lich King could benefit from such foolishness? Great warriors have lost their lives. And for what? The true threat looms ahead - the Lich King awaits us all in death.}} |
||
| − | {| class = darktable |
||
| + | |||
| − | ! {{factionIcon|Alliance|small}} Alliance !! {{factionIcon|Horde|small}} Horde !! Description !! {{factionIcon|Alliance|small}} Alliance Heroic !! {{factionIcon|Horde|small}} Horde Heroic |
||
| + | ==Videos== |
||
| + | <vplayer/> |
||
| + | ===10-man encounter=== |
||
| + | *{{#vlink:-uX2NM-mneE|Tremor vs. The Faction Champions}} |
||
| + | *{{#vlink:LayqEYV7pGw|Faction Champions Guide - TOC - love2playwow.com}} |
||
| + | |||
| + | ===10-man Heroic encounter=== |
||
| + | *{{#vlink:5bhCC-0A784|Tremor vs. Heroic Faction Champions 10-man}} |
||
| + | |||
| + | ===25-man encounter=== |
||
| + | *{{#vlink:4Umi-C0R-SM|Trial of the Crusader: Faction Champions - Beginner's Guide}} |
||
| + | *{{#vlink:E9qcMHoeg3Q|Argent Coliseum: Faction Champions (High Definition) (incl. Commentary)}} |
||
| + | |||
| + | ===25-man Heroic encounter=== |
||
| + | *{{#vlink:ksgF4Qm4f_g|GAG FactionChamps}} |
||
| + | |||
| + | ==Patch changes== |
||
| + | * {{Patch 3.2.2a|comment=Tooltips were updated to reflect the hotfix.}} |
||
| + | {| class="darktable zebra" |
||
| + | ! Class || Spell || % Reduction || Reduced damage || Old damage |
||
|- |
|- |
||
| + | ! {{text|hunter|Hunter}} |
||
| − | | {{item|icon=|Justicebringer }} || {{item|icon=|Dual-blade Butcher }} || Two-handed axe || {{item|icon=|Justicebringer (heroic)}} || {{item|icon=|Dual-blade Butcher (heroic)}} |
||
| + | | [http://db.mmo-champion.com/s/65866/ Explosive Shot] || 43% || 1813-2187 Fire damage || ''3173-3827 Fire damage'' |
||
|- |
|- |
||
| + | ! {{text|hunter|Hunter}} |
||
| − | | {{item|icon=|Bastion of Purity }} || {{item|icon=|Bastion of Resolve }} || Shield || {{item|icon=|Bastion of Purity (heroic)}} || {{item|icon=|Bastion of Resolve (heroic)}} |
||
| + | | [http://db.mmo-champion.com/s/65883/ Aimed Shot] || 42% || Increases ranged damage by 1750 || ''Increases ranged damage by 3000'' |
||
|- |
|- |
||
| + | ! {{text|mage|Mage}} |
||
| − | | {{item|icon=|Chestplate of the Frostborn Hero }} || {{item|icon=|Chestplate of the Frostwolf Hero }} || Plate chest || {{item|icon=|Chestplate of the Frostborn Hero (heroic)}} || {{item|icon=|Chestplate of the Frostwolf Hero (heroic)}} |
||
| + | | [http://db.mmo-champion.com/s/65791/ Arcane Blast] || 25% || 6013-6987 Arcane damage || ''7863-9137 Arcane damage'' |
||
|- |
|- |
||
| + | ! {{text|mage|Mage}} |
||
| − | | {{item|icon=|Vambraces of the Broken Bond }} || {{item|icon=|Bracers of the Broken Bond }} || Plate bracers || {{item|icon=|Vambraces of the Broken Bond (heroic)}} || {{item|icon=|Bracers of the Broken Bond (heroic)}} |
||
| + | | [http://db.mmo-champion.com/s/65799/ Arcane Barrage] || 16% || 11565 damage over 15 sec, 20817-24183 damage if dispelled || ''13875 damage over 15 sec, 24975-29025 damage if dispelled'' |
||
|- |
|- |
||
| + | ! {{text|paladin|Paladin}} |
||
| − | | {{item|icon=|Girdle of Bloodied Scars }} || {{item|icon=|Belt of Bloodied Scars }} || Plate legs || {{item|icon=|Girdle of Bloodied Scars (heroic)}} || {{item|icon=|Belt of Bloodied Scars (heroic)}} |
||
| + | | [http://db.mmo-champion.com/s/66005/ Judgement of Command] || 30% || 3325-3675 Holy damage || ''4750-5250 Holy damage'' |
||
|- |
|- |
||
| + | ! {{text|priest|Priest}} |
||
| − | | {{item|icon=|Bracers of the Untold Massacre }} || {{item|icon=|Bracers of the Silent Massacre }} || Mail bracers || {{item|icon=|Bracers of the Untold Massacre (heroic)}} || {{item|icon=|Bracers of the Silent Massacre (heroic)}} |
||
| + | | [http://db.mmo-champion.com/s/65490/ Vampiric Touch] || 40% || 12375 Shadow damage over 15 sec || ''20250 Shadow damage over 15 sec'' |
||
|- |
|- |
||
| + | ! {{text|rogue|Rogue}} |
||
| − | | {{item|icon=|Legguards of Concealed Hatred }} || {{item|icon=|Leggings of Concealed Hatred }} || Mail legs || {{item|icon=|Legguards of Concealed Hatred (heroic)}} || {{item|icon=|Leggings of Concealed Hatred (heroic)}} |
||
| + | | [http://db.mmo-champion.com/s/65957/ Eviscerate] || 23% || 4375-5625 Physical damage || ''5688-7312 Physical damage'' |
||
|- |
|- |
||
| + | ! {{text|warlock|Warlock}} |
||
| − | | {{item|icon=|Boots of Tremoring Earth }} || {{item|icon=|Sabatons of Tremoring Earth }} || Mail boots || {{item|icon=|Boots of Tremoring Earth (heroic)}} || {{item|icon=|Sabatons of Tremoring Earth (heroic)}} |
||
| + | | [http://db.mmo-champion.com/s/65816/ Hellfire] || 55% || 2500 fire damage to all nerby enemies every 1 sec || ''5500 fire damage to all nerby enemies every 1 sec'' |
||
| − | |- |
||
| − | | {{item|icon=|Treads of the Icewalker }} || {{item|icon=|Icewalker Treads }} || Leather boots || {{item|icon=|Treads of the Icewalker (heroic)}} || {{item|icon=|Icewalker Treads (heroic)}} |
||
| − | |- |
||
| − | | {{item|icon=|Vestments of the Shattered Fellowship }} || {{item|icon=|Robes of the Shattered Fellowship }} || Leather chest || {{item|icon=|Vestments of the Shattered Fellowship (heroic)}} || {{item|icon=|Robes of the Shattered Fellowship (heroic)}} |
||
| − | |- |
||
| − | | {{item|icon=|Cord of Biting Cold }} || {{item|icon=|Belt of Biting Cold }} || Cloth belt || {{item|icon=|Cord of Biting Cold (heroic)}} || {{item|icon=|Belt of Biting Cold (heroic)}} |
||
| − | |- |
||
| − | | {{item|icon=|Boots of the Mourning Widow }} || {{item|icon=|Sandals of the Mourning Widow }} || Cloth boots || {{item|icon=|Boots of the Mourning Widow (heroic)}} || {{item|icon=|Sandals of the Mourning Widow (heroic)}} |
||
| − | |- |
||
| − | | {{item|icon=|Cloak of Displacement }} || {{item|icon=|Shroud of Displacement }} || Cloak || {{item|icon=|Cloak of Displacement (heroic)}} || {{item|icon=|Shroud of Displacement (heroic)}} |
||
| − | |- |
||
| − | | {{item|icon=|Ring of Callous Aggression }} || {{item|icon=|Band of Callous Aggression }} || Ring || {{item|icon=|Ring of Callous Aggression (heroic)}} || {{item|icon=|Band of Callous Aggression (heroic)}} |
||
| − | |- |
||
| − | | {{item|icon=|Satrina's Impeding Scarab }} || {{item|icon=|Juggernaut's Vitality }} || Trinket || {{item|icon=|Satrina's Impeding Scarab (heroic)}} || {{item|icon=|Juggernaut's Vitality (heroic)}} |
||
| − | |- |
||
| − | | {{item|icon=|Trophy of the Crusade }} || {{item|icon=|Trophy of the Crusade }} || || {{item|icon=|Trophy of the Crusade }} || {{item|icon=|Trophy of the Crusade }} |
||
| − | |- |
||
| − | | {{item|icon=|Crusader Orb }} || {{item|icon=|Crusader Orb }} || || {{item|icon=|Crusader Orb }} || {{item|icon=|Crusader Orb }} |
||
| − | |- |
||
| − | | {{item|icon=|Emblem of Triumph }} || {{item|icon=|Emblem of Triumph }} || || {{item|icon=|Emblem of Triumph }} || {{item|icon=|Emblem of Triumph }} |
||
|} |
|} |
||
| + | * {{Hotfix|date=2009-09-22|bluenote=The Faction Champions encounter in the normal 10-player and normal 25-player [[Trial of the Crusader]] instances have had a number of spells and abilities altered which should result in less overall damage.|link=http://blue.mmo-champion.com/23/19820412001-recent-ingame-fixes--september-2009--98.html}} |
||
| + | * {{Patch 3.2.0|note=Added.}} |
||
| − | ==Related achievements== |
||
| − | * {{achievement|Call of the Crusade (10 player)}} |
||
| − | * {{achievement|Call of the Crusade (25 player)}} |
||
| − | * {{achievement|Call of the Grand Crusade (10 player)}} |
||
| − | * {{achievement|Call of the Grand Crusade (25 player)}} |
||
| − | * {{achievement|Resilience Will Fix It (10 player)}} |
||
| − | * {{achievement|Resilience Will Fix It (25 player)}} |
||
| − | |||
| − | ==Patches and hotfixes== |
||
| − | {{patched|patch=3.2.0|note=Added}} |
||
| − | |||
| − | ==Videos== |
||
| − | ===10-man encounter=== |
||
| − | <youtube>-uX2NM-mneE</youtube> |
||
| − | <youtube>LayqEYV7pGw</youtube> |
||
| − | |||
| − | ===25-man encounter=== |
||
| − | <youtube>mMD3cUtv6vw</youtube> |
||
| − | <youtube>E9qcMHoeg3Q</youtube><br> |
||
| − | <youtube>JcAUB9YzZWQ&feature=channel_page</youtube> |
||
| − | <youtube>4Umi-C0R-SM&feature=PlayList&p=6EB75EA4BC64F434&index=2</youtube> |
||
| − | <br>Faction Champions fight by <Reckoning> Anachronos EU |
||
[[Category:Bosses]] |
[[Category:Bosses]] |
||
[[Category:Trial of the Crusader mobs]] |
[[Category:Trial of the Crusader mobs]] |
||
| − | [[Category:Trial of the Grand Crusader mobs]] |
||
Latest revision as of 21:23, 23 June 2023
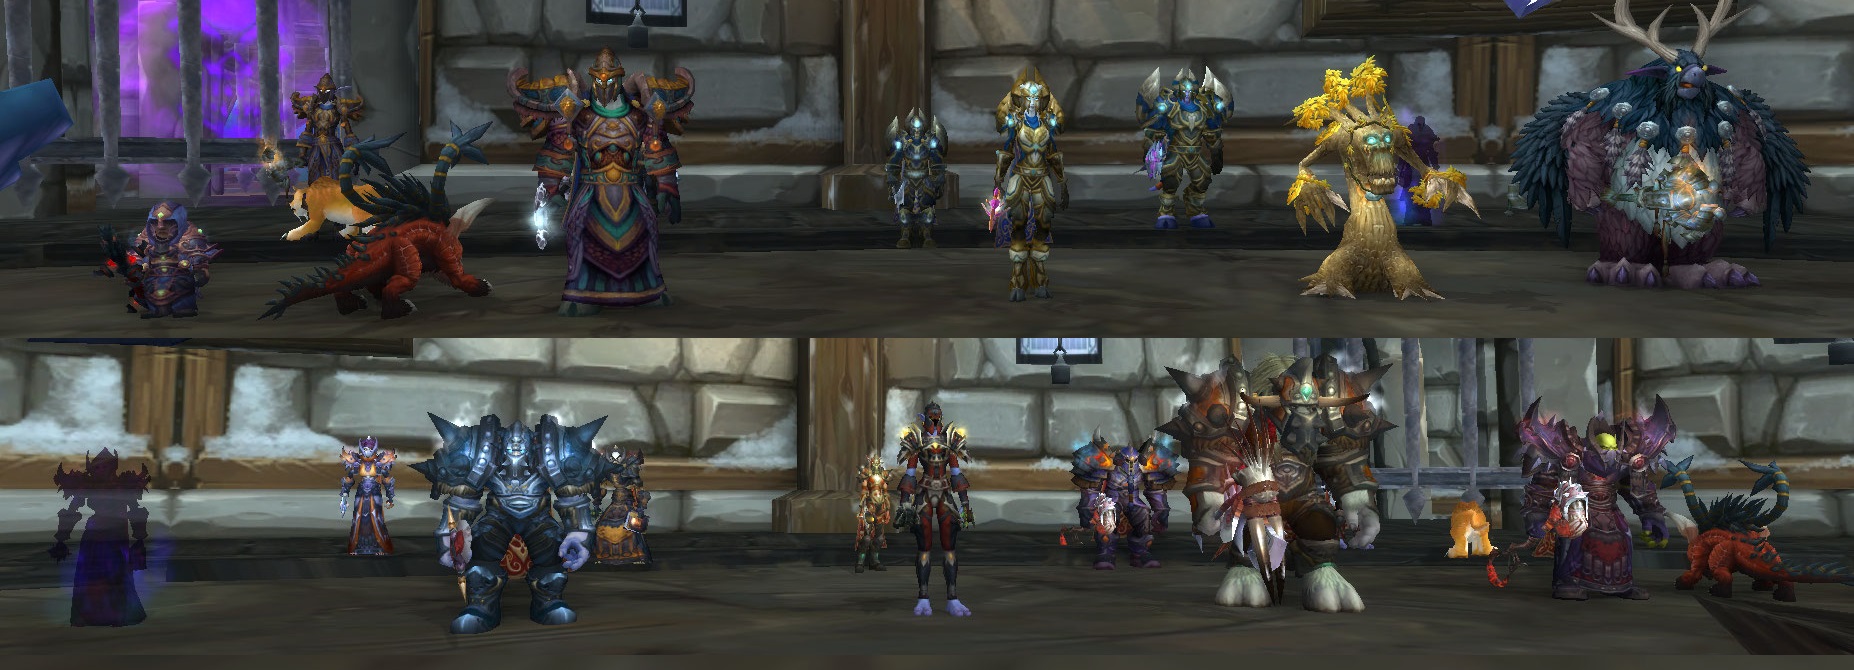 | ||||||||
| Race(s) | Blood elf, Draenei, Dwarf, Forsaken, Gnome, Human, Night elf, Orc, Tauren, Troll | |||||||
| Level | ?? Boss | |||||||
| Reaction | Alliance Horde | |||||||
| Location | Trial of the Crusader, Crusaders' Coliseum | |||||||
| Status | Defeatable | |||||||
| ||||||||
The Faction Champions is the third encounter in the Trial of the Crusader raid dungeon. Players encounter members of the opposite faction in PvP Arena-styled combat.
Members
| Class | Champions | |
|---|---|---|
| Alliance | Horde | |
| Death knight | Tyrius Duskblade | Gorgrim Shadowcleave |
| Druid (Caster) | Kavina Grovesong | Birana Stormhoof |
| Druid (Heal) | Melador Valestrider | Erin Misthoof |
| Hunter | Alyssia Moonstalker and her lioness |
Ruj'kah and her lioness |
| Mage | Noozle Whizzlestick | Ginselle Blightslinger |
| Paladin (Heal) | Velanaa | Liandra Suncaller |
| Paladin (Retribution) | Baelnor Lightbearer | Malithas Brightblade |
| Priest (Discipline) | Anthar Forgemender | Caiphus the Stern |
| Priest (Shadow) | Brienna Nightfell | Vivienne Blackwhisper |
| Rogue | Irieth Shadowstep | Maz'dinah |
| Shaman (Heal/Caster) | Saamul | Thrakgar |
| Shaman (Melee) | Shaabad | Broln Stouthorn |
| Warlock | Serissa Grimdabbler and her felhunter Zhaagrym |
Harkzog and his felhunter Zhaagrym |
| Warrior | Shocuul | Narrhok Steelbreaker |
Most of the champions have 2,400,000 health in the 25-man version; some have only 1,900,000. In the 10-man version most have 403,200 health and some have 322,600.
Heroic Mode
On the heroic version of Faction Champions, they have 2.6M or 3.2M health each. Every champion also hits for more damage, is untauntable, and has a PvP trinket at their disposal (with a cooldown of 5 minutes). Crowd control and being alert about being targeted is very crucial to survival.
The Opponents
This encounter is much like an arena match vs. 10 (or 6 at 10-man) quasi-player NPCs. The opponents act very much like a good arena team, and some (but not all) PvP mechanics are applied to the NPCs. For example:
- The NPC healers switch to spam healing DPS target(s).
- The NPC damage dealers gang up on a single raid member, especially raid members with low health.
- All NPCs, including healers, use crowd control abilities like Polymorph, Fear, Hex, and even Banish.
- Crowd control behaves as if fighting other players (eg. Sap only lasts ten seconds instead of one minute), and are subject to Diminishing Returns. After 3 casts, the NPC becomes immune to that Crowd Control effect for 15 seconds. Because of this, you cannot rely on crowd control abilities to win this fight.
- However, they are still considered non-player characters for resilience, meaning resilience does not reduce damage taken. Resilience is still effective against critical attacks.
- Faction champions do more damage than typical players, have drastically more health (2.4 million on 25 man), and cast enormous heals, e.g. the druids rejuvenation ticks for over 50,000
- The NPCs are immune to mind control. All other forms of crowd control work.
- The NPC's AI uses Proximity, Health and Damage to decide who to attack. Try to never be in the center of a group of NPCs or they are likely to all turn and one-shot you (Rogues beware!). If you AoE, be prepared to get aggro. If something is attacking you or even heading your way, run.
Strategy
Prior to the encounter, everybody should switch to PvP mode. Everyone should plan on taking hits, so stamina/resilience gear helps. As always, it is a balancing act between how much pvp and pve gear you should use.
As with any arena match, picking a damage target and focusing it down is critical. While one target is picked to be killed, all other enemy combatants should be controlled by whatever mechanics are available, including CC and focused distractions (e.g., keeping a warrior on the rogue NPC to disarm, hamstring, intercept, stun etc.). The NPCs reset their aggro tables every 9 seconds. This frequently leads to the damage dealers ganging up on a single raid member; fortunately, healers do not get disproportionately frequently targeted. The NPCs are generally very difficult to tank.
The resulting very chaotic nature of this fight (especially early on when all 10 NPCs are alive), requires fast and smart decision by every single raid member. When one or more of the melee champions targets a soft target, that target needs to run, fear, snare, escape, anything to stay alive. To facilitate these maneuvers, it is best not to clump together. Every second that a champion is traveling to its target is a second that it is not doing damage.
PvP trinkets are recommended in case you are targeted with blind or have to eat an entire fear. A few seconds of not dispelling/interrupting is all it takes to undo a minute's worth of dps. Tremor totem and fear ward are a must. Hunters should use frost trap to slow the NPCs. Hunter pets should attack the enemy pets - The NPC healers treat pets and summoned pets (Treants and the like) as players, so do not kill those. Merely keep attacking them and the healers will waste heals on them. If you are fortunate enough to have several NPC's pets to attack, the fight will be much easier.
Another aspect of this encounter at odds with an arena match is that all opponents and their classes are known ahead of time, so it is possible to create a variety of control macros that target specific roles by name. This is strongly recommended. It is often very difficult to pick a control target from within the crowd while at the same time healing or dealing damage, and evading. Every class with a control ability should be using it as often as possible, including healers. Because of diminishing returns, it's a good idea to regularly switch the control target.
The fight becomes exponentially easier as each champion is killed, so getting the first one down quickly greatly increases the odds of winning. All cooldowns, including Bloodlust/Heroism, should be used immediately. The priority of targets is dependent on raid makeup, but usually the most effective strategy is to kill the healers first. The healers and their abilities are:
- Restoration druid: Rejuvenation, Lifebloom, Nourish, and Regrowth. Two can be interrupted, three must be dispelled.
- Restoration shaman: Healing Wave, Lesser Healing Wave, Earth Shield, and Chain Heal. Three can be interrupted, one must be dispelled.
- Holy paladin: Flash of Light, Holy Light, Hand of Freedom, Divine Shield, and Hand of Protection. Divine Shield is cast at around 25% health and should be broken swiftly (by
 [Shattering Throw] or
  [Mass Dispel]) so the Holy Light which she immediately starts casting afterwards can be interrupted. Similarily she casts Hand of Protection (which can be broken by Shaman Purge) on other low-health NPCs, often the first dps target.
 - Discipline priest: Greater Heal, Flash Heal, Renew, and Power Word: Shield. Two can be interrupted, two must be dispelled.
The most effective healer is the restoration druid, mainly because most of his casts are instant and not interruptable. A common strategy is to put interrupters on the other healers and burn the druid down first. If there are competent warlocks dispellers in the raid which can keep the druid banished, and dispel the Hots on the kill target, you can something else first (usually the rogue or warrior). Remember that the banishes are subject to diminishing returns, so this approach should only be chosen if the other focus target dies before the druid becomes immune to banish.
After the restoration druid is dead, one of the other healers is usually chosen next. The shaman uses a powerful earth shield which makes him slightly more dangerous than the priest; in addition, he casts Hex and powerful totems. Fortunately, he has no self-ressurrection.
After all the healers are dead or locked down by rogues/warriors, the next highest priority should be the melee DPS. The rogue is the most dangerous followed by the warrior, the retribution paladin, and the death knight.
- The rogue can shadowstep anywhere in the arena and kill someone almost instantly. Fan of knives hits everyone for huge damage. He also has evasion and vanish, making him difficult to kill. Until you decide to kill the rogue, he should be locked down by a tank who can charge when he shadowsteps and disarm when he is attacking someone. If you can kill the rogue within twenty seconds, it is worth killing him first and use your CC on the NPC healers.
- The warrior also hits very hard and casts bladestorm. The death knight will pull people to him and chain others. Your tanks are a good choice to kite these two for the fight.
- The warlock is deadly only because of Hellfire. Merely have an interrupter keep him on focus and interrupt him as soon as he casts Hellfire.
- The Enhancement shaman is dangerous only through his totems, such as earthbind and windfury. A ranged class should be in charge of killing totems when they appear.
- The hunter is also capable of doing some huge burst damage with explosive shot and aimed shot, but your healers should be able to heal through it.
- The shadow priest, mage, and balance druid are usually only annoyances due to their CC (fear, freeze, cyclone).
Once the first couple are dead the fight becomes several orders of magnitude simpler and boils down to a burn phase. Keep the DPS champions chasing and the raid healers alive. Players assigned to distraction on various enemies should continue distracting until their target is picked for the kill. Distraction players must watch their target's target and call out who they're pursuing.
Two of the most important abilities in this encounter are offensive dispelling and spell interrupts. All of the champions are susceptible to spell interrupts, and offensive dispel is critical to cut through the healers' effects. Another strong ability to remember is mass dispel, which can remove Divine Shields and Ice Blocks, both of which are used by enemy champions. ![]() [Mortal Strike] and
[Mortal Strike] and ![]() [Wound Poison] also help a lot. The death knight and rogue use disease and poison effects so Cleansing Totems should be down.
[Wound Poison] also help a lot. The death knight and rogue use disease and poison effects so Cleansing Totems should be down.
Class roles
- Tanking classes can use taunt, but it only lasts until the NPC's drop aggro (which is all the time), and is susceptible to diminishing returns. Fixate taunts like Hunter's
 [Distracting Shot] do not work. It is better to use your tanks as kiters/interrupters.
 - Death Knights are very good at pinning down melee with [Chains of Ice], [Dark Command], and [Death Grip].
- Warriors can spam [Hamstring], [Shockwave], and [Charge] stun the warrior and the rogue to prevent them from moving.
- Rogues are able to keep casters, healers especially, locked down with constant stuns and interrupts. A cycle of Kick, Kidney shot and Gouge, along with mind-numbing poison should guarantee nothing gets cast. [Vanish], [Cloak of Shadows], [Improved Sprint], and [Killing Spree] dispel [Shattered Barrier] and [Frost Nova].
- A combination of warlock and balance druid is able to chain [Cyclone] and [Banish] on the restoration druid, switching whenever the CC chain cannot continue due to DR.
- Use a Fear bomb if enough champions reach their target.
- A Death Knight with [Hungering Cold] is able to use theirs right at the start to control anyone who is not currently taken care of. Doing this at the beginning of the heroic encounter is very useful for burning all the champion's PvP trinkets early.
- Priests and any dispellers must keep all buffs and Hots off of the kill target at all times.
If a raid finds that they're having trouble surviving, it might be best to save all forms of crowd control for self defense. The first two minutes or so of the encounter are usually the most critical. Once the first healer is down (usually the Resto Druid) the fight becomes significantly easier.
Loot
- Main article: Champions' Cache
As with the other bosses in the instances, there are separate versions of each item for Alliance raids and for Horde raids.
10-man
25-man
Related achievements
- [Call of the Crusade (10 player)]/ [Call of the Crusade (25 player)]
- [Call of the Grand Crusade (10 player)]/ [Call of the Grand Crusade (25 player)]
- [Resilience Will Fix It (10 player)]/ [Resilience Will Fix It (25 player)]
Quotes
- Barrett Ramsey
- That warlock certainly didn't summon a Doomguard! Your next challenge will find you fighting knights of the Argent Crusade. Think you're up for the next challenge?
![]() Of course!
Of course!
- Well then, I'll give the signal to Tirion when you are ready to go.
![]() Give the signal! We're ready to go!
Give the signal! We're ready to go!
- Intro as Alliance
- Highlord Tirion Fordring yells: The next battle will be against the Argent Crusade's most powerful knights! Only by defeating them will you be deemed worthy...
- Garrosh Hellscream yells: The Horde demands justice! We challenge the Alliance! Allow us to battle in place of your knights, paladin. We will show these dogs what it means to insult the Horde.
- Highlord Tirion Fordring yells: Very well. I will allow it. Fight with honor!
- Garrosh Hellscream yells: Show them no mercy, Horde champions! LOK'TAR OGAR!
- Intro as Horde
- Highlord Tirion Fordring yells: The next battle will be against the Argent Crusade's most powerful knights! Only by defeating them will you be deemed worthy...
- King Varian Wrynn yells: Our honor has been besmirched! They make wild claims and false accusations against us. I demand justice! Allow my champions to fight in place of your knights, Tirion. We challenge the Horde!
- Highlord Tirion Fordring yells: Very well. I will allow it. Fight with honor!
- King Varian Wrynn yells: Fight for the glory of the Alliance, heroes! Honor your king and your people!
- Killing an Alliance player
- Garrosh Hellscream yells: Weakling!
- Garrosh Hellscream yells: Pathetic!
- Garrosh Hellscream yells: Overpowered.
- Garrosh Hellscream yells: Lok'tar!
- Killing a Horde player
- King Varian Wrynn yells: HAH!
- King Varian Wrynn yells: Hardly a challenge!
- King Varian Wrynn yells: Worthless scrub.
- King Varian Wrynn yells: Is this the best the Horde has to offer?
- Victory as Alliance
- King Varian Wrynn yells: GLORY TO THE ALLIANCE!
- Victory as Horde
- Garrosh Hellscream yells: That was just a taste of what the future brings. FOR THE HORDE!
- Outro
- Highlord Tirion Fordring yells: A shallow and tragic victory. We are weaker as a whole from the losses suffered today. Who but the Lich King could benefit from such foolishness? Great warriors have lost their lives. And for what? The true threat looms ahead - the Lich King awaits us all in death.
Videos
10-man encounter
10-man Heroic encounter
25-man encounter
- Trial of the Crusader: Faction Champions - Beginner's Guide
- Argent Coliseum: Faction Champions (High Definition) (incl. Commentary)
25-man Heroic encounter
Patch changes
- Patch 3.2.2a (2009-09-25): Tooltips were updated to reflect the hotfix.
| Class | Spell | % Reduction | Reduced damage | Old damage |
|---|---|---|---|---|
| Hunter | Explosive Shot | 43% | 1813-2187 Fire damage | 3173-3827 Fire damage |
| Hunter | Aimed Shot | 42% | Increases ranged damage by 1750 | Increases ranged damage by 3000 |
| Mage | Arcane Blast | 25% | 6013-6987 Arcane damage | 7863-9137 Arcane damage |
| Mage | Arcane Barrage | 16% | 11565 damage over 15 sec, 20817-24183 damage if dispelled | 13875 damage over 15 sec, 24975-29025 damage if dispelled |
| Paladin | Judgement of Command | 30% | 3325-3675 Holy damage | 4750-5250 Holy damage |
| Priest | Vampiric Touch | 40% | 12375 Shadow damage over 15 sec | 20250 Shadow damage over 15 sec |
| Rogue | Eviscerate | 23% | 4375-5625 Physical damage | 5688-7312 Physical damage |
| Warlock | Hellfire | 55% | 2500 fire damage to all nerby enemies every 1 sec | 5500 fire damage to all nerby enemies every 1 sec |
- Hotfix (2009-09-22): The Faction Champions encounter in the normal 10-player and normal 25-player Trial of the Crusader instances have had a number of spells and abilities altered which should result in less overall damage.
- Patch 3.2.0 (2009-08-04): Added.