Reeina47420@legacy41566959 (talk | contribs) No edit summary |
Reeina47420@legacy41566959 (talk | contribs) No edit summary |
||
| Line 6: | Line 6: | ||
[[Image:Icon-warning-22x22.png|Note]] '''Note''': The questing guides are not meant for power-leveling purposes. Rather, they are meant to show players the most efficient way to complete all quests available for a particular zone. If you know of a better order or method to accomplish this, your input is welcome (in fact, greatly desired). For major changes, feel free to edit, but make a note in the '''[[Talk:Eversong Woods questing guide|talk page]]''' as to your reasoning. |
[[Image:Icon-warning-22x22.png|Note]] '''Note''': The questing guides are not meant for power-leveling purposes. Rather, they are meant to show players the most efficient way to complete all quests available for a particular zone. If you know of a better order or method to accomplish this, your input is welcome (in fact, greatly desired). For major changes, feel free to edit, but make a note in the '''[[Talk:Eversong Woods questing guide|talk page]]''' as to your reasoning. |
||
| − | == {{Horde_Icon}} Sunstrider Isle (Level 1 - 5)== |
+ | == {{Horde_Icon}} Sunstrider Isle (Level 1 - 5) == |
| − | :''See Also: [[Powerlevel Sunstrider Isle]] |
+ | :''See Also: [[Powerlevel Sunstrider Isle]]'' |
[[Sunstrider Isle]] is the starting zone for new [[blood elves]], and is located north west of [[Eversong Woods]]. The quests in this area are not available to players of other races. If you are new to the game, check out the [[Newbie Guide]] to get started, or just dive in - the game has in-game hints and the opening quests are very straight-forward, just relax and have fun! |
[[Sunstrider Isle]] is the starting zone for new [[blood elves]], and is located north west of [[Eversong Woods]]. The quests in this area are not available to players of other races. If you are new to the game, check out the [[Newbie Guide]] to get started, or just dive in - the game has in-game hints and the opening quests are very straight-forward, just relax and have fun! |
||
| Line 56: | Line 56: | ||
|- |
|- |
||
| {{questlong|Horde|2|Well Watcher Solanian|race=Blood Elf}} |
| {{questlong|Horde|2|Well Watcher Solanian|race=Blood Elf}} |
||
| − | | {{Race Icon Blood Elf Male Small}} |
+ | | {{Race Icon Blood Elf Male Small}}{{Race Icon Blood Elf Female Small}}{{Horde Icon Small}}[[Class Trainer]] |
| [[The Sunspire]] |
| [[The Sunspire]] |
||
|} |
|} |
||
| Line 97: | Line 97: | ||
| [[Sunstrider Isle]] |
| [[Sunstrider Isle]] |
||
|} |
|} |
||
| − | |||
*Head to the Burning Crystal to the south, kill [[Mana Wyrm]]s, [[Springpaw Cub]]s, and [[Springpaw Lynx]]es that you encounter and loot {{item|Lynx Collar|Lynx Collars}} and {{item|Arcane Sliver|Arcane Slivers}}. Try to alternate between springpaws and mana wyrms, so your [[Mana Tap]] is not on [[Cooldown]] when you engage a mana wyrm. |
*Head to the Burning Crystal to the south, kill [[Mana Wyrm]]s, [[Springpaw Cub]]s, and [[Springpaw Lynx]]es that you encounter and loot {{item|Lynx Collar|Lynx Collars}} and {{item|Arcane Sliver|Arcane Slivers}}. Try to alternate between springpaws and mana wyrms, so your [[Mana Tap]] is not on [[Cooldown]] when you engage a mana wyrm. |
||
| Line 105: | Line 104: | ||
*Report to [[Lanthan Perilon]] to the west and accept {{questlong|Horde|4|Aggression}}. |
*Report to [[Lanthan Perilon]] to the west and accept {{questlong|Horde|4|Aggression}}. |
||
| − | === To the |
+ | === To the South === |
{| class="darktable" width="80%" |
{| class="darktable" width="80%" |
||
| Line 133: | Line 132: | ||
*Turn in {{quest|Aggression}} and accept {{questlong|Horde|5|Felendren the Banished}}. |
*Turn in {{quest|Aggression}} and accept {{questlong|Horde|5|Felendren the Banished}}. |
||
*Head back to the Sunspire to turn in {{quest|The Shrine of Dath'Remar}} and {{quest|Solanian's Belongings}}. Learn new class abilities if you haven't already. |
*Head back to the Sunspire to turn in {{quest|The Shrine of Dath'Remar}} and {{quest|Solanian's Belongings}}. Learn new class abilities if you haven't already. |
||
| − | |||
=== Falthrien Academy === |
=== Falthrien Academy === |
||
| Line 166: | Line 164: | ||
== {{Horde Icon}} Eversong Woods (Level 5 - 10) == |
== {{Horde Icon}} Eversong Woods (Level 5 - 10) == |
||
| − | [[Eversong Woods]] is the main zone for beginning |
+ | [[Eversong Woods]] is the main zone for beginning blood elves, once they graduate from [[Sunstrider Isle]]. To get here, head over the bridge on the south-east corner of Sunstrider Isle. |
Other zone options for this level include [[Durotar]], [[Mulgore]] and [[Tirisfal Glades]]. |
Other zone options for this level include [[Durotar]], [[Mulgore]] and [[Tirisfal Glades]]. |
||
| Line 328: | Line 326: | ||
|} |
|} |
||
| − | *Head back to the [[North Sanctum]]. Loot {{ |
+ | *Head back to the [[North Sanctum]]. Loot {{item|Prospector Anvilward's Head}} after killing him. |
*On the way to [[Fairbreeze Village]], speak with [[Apprentice Ralen]] and start {{questlong|Horde|6|Roadside Ambush}}. |
*On the way to [[Fairbreeze Village]], speak with [[Apprentice Ralen]] and start {{questlong|Horde|6|Roadside Ambush}}. |
||
*Follow the road south and speak to [[Apprentice Meledor]], completing the quest you just got in exchange for {{questlong|Horde|6|Soaked Pages}}. |
*Follow the road south and speak to [[Apprentice Meledor]], completing the quest you just got in exchange for {{questlong|Horde|6|Soaked Pages}}. |
||
| Line 370: | Line 368: | ||
**[[Tailoring]] from {{npc|Horde|Sempstress Ambershine}} |
**[[Tailoring]] from {{npc|Horde|Sempstress Ambershine}} |
||
| − | === Sunsail Anchorage and the |
+ | === Sunsail Anchorage and the Grimscale Murlocs === |
{| class="darktable" width="80%" |
{| class="darktable" width="80%" |
||
| Line 408: | Line 406: | ||
|} |
|} |
||
| − | *Follow the road west and kill any [[Springpaw Stalker]]s as you see them, looting their {{ |
+ | *Follow the road west and kill any [[Springpaw Stalker]]s as you see them, looting their {{item|Springpaw Pelt|Springpaw Pelts}}. |
*Before you reach the harbor, you will see a fortified camp to your right. Go there and start {{questlong|Horde|8|Grimscale Pirates!}} and {{questlong|Horde|7|Lost Armaments}}. |
*Before you reach the harbor, you will see a fortified camp to your right. Go there and start {{questlong|Horde|8|Grimscale Pirates!}} and {{questlong|Horde|7|Lost Armaments}}. |
||
*Down the road to the [[Sunsail Anchorage]], collect {{item|Sin'dorei Armaments}} from the crates scattered around the area. |
*Down the road to the [[Sunsail Anchorage]], collect {{item|Sin'dorei Armaments}} from the crates scattered around the area. |
||
| Line 414: | Line 412: | ||
*Return to the fortified camp and turn in the armaments to get the next quest, {{questlong|Horde|8|Wretched Ringleader}}. |
*Return to the fortified camp and turn in the armaments to get the next quest, {{questlong|Horde|8|Wretched Ringleader}}. |
||
*Climb to the top of the anchorage tower and defeat {{npc|combat|Aldaron the Reckless}}. Don't forget to loot his head. |
*Climb to the top of the anchorage tower and defeat {{npc|combat|Aldaron the Reckless}}. Don't forget to loot his head. |
||
| − | *Cross the river to the north and head west along it until you encounter some murlocs. Start grinding them, collecting [[ |
+ | *Cross the river to the north and head west along it until you encounter some murlocs. Start grinding them, collecting [[Grimscale Murloc Head]]s for {{quest|Fish Heads, Fish Heads...}} and [[item name]] for {{quest|Grimscale Pirates!}}. |
*Once you have enough heads, return to [[Hathvelion Sungaze]] to the east and turn in the quest, then pick up the follow up {{questlong|Horde|9|The Ring of Mmmrrrggglll}}. |
*Once you have enough heads, return to [[Hathvelion Sungaze]] to the east and turn in the quest, then pick up the follow up {{questlong|Horde|9|The Ring of Mmmrrrggglll}}. |
||
*Cross the river to the south and kill [[Mmmrrrggglll]], return to [[Hathvelion Sungaze]] to turn the quest in. |
*Cross the river to the south and kill [[Mmmrrrggglll]], return to [[Hathvelion Sungaze]] to turn the quest in. |
||
| Line 467: | Line 465: | ||
*Go to [[Silvermoon City]], buy {{item|Suntouched Special Reserve}} from [[Vinemaster Suntouched]] at [[Silvermoon Inn]]. Hunters, Rogues and Warlocks might want to rebind their hearthstone here, all others leave it at Fairbreeze Village for now. |
*Go to [[Silvermoon City]], buy {{item|Suntouched Special Reserve}} from [[Vinemaster Suntouched]] at [[Silvermoon Inn]]. Hunters, Rogues and Warlocks might want to rebind their hearthstone here, all others leave it at Fairbreeze Village for now. |
||
*You can learn any professions in Silvermoon City you had not yet a chance to learn. |
*You can learn any professions in Silvermoon City you had not yet a chance to learn. |
||
| − | **[[Blacksmithing]] from |
+ | **[[Blacksmithing]] from {{npc|Horde|fill-in-name}} |
| − | **[[Engineering]] from |
+ | **[[Engineering]] from {{npc|Horde|fill-in-name}} |
| − | **[[Fishing]] from |
+ | **[[Fishing]] from {{npc|Horde|fill-in-name}} |
| − | **[[Mining]] from |
+ | **[[Mining]] from {{npc|Horde|fill-in-name}} |
*Pick up class specific quests |
*Pick up class specific quests |
||
**{{Class Icon Hunter Small}} '''Hunters''' get {{questlong|Horde|10|Seek the Farstriders}} from [[Oninath]] |
**{{Class Icon Hunter Small}} '''Hunters''' get {{questlong|Horde|10|Seek the Farstriders}} from [[Oninath]] |
||
| Line 541: | Line 539: | ||
|} |
|} |
||
| − | *Continue to Farstrider Retreat and finish the quest of the same name and |
+ | *Continue to Farstrider Retreat and finish the quest of the same name and buy {{item|Springpaw Appetizers]] from [[fill-in-name]]. |
*Accept {{questlong|Horde|10|The Magister's Apprentice}}, {{questlong|Horde|10|Amani Encroachment}} and {{questlong|Horde|11|The Spearcrafter's Hammer}}. |
*Accept {{questlong|Horde|10|The Magister's Apprentice}}, {{questlong|Horde|10|Amani Encroachment}} and {{questlong|Horde|11|The Spearcrafter's Hammer}}. |
||
| − | **{{Class Icon Hunter Small}} '''Hunters''' |
+ | **{{Class Icon Hunter Small}} '''Hunters''' speak to [[Lieutenant Dawnrunner]] to receive and complete the quests of the Beast Taming chain. |
| + | ***{{quest|Taming the Beast (Blood Elf 1)|Taming the Beast (1)}} to tame a [[Dragonhawk]], which are found in the vicinity. |
||
| + | ***{{quest|Taming the Beast (Blood Elf 2)|Taming the Beast (2)}} to tame a [[Lynx]], which are found in the vicinity. |
||
| + | ***{{quest|Taming the Beast (Blood Elf 3)|Taming the Beast (3)}} to tame a [[Mistbat]], this requires travel to the Ghostlands. |
||
**{{Class Icon Hunter Small}} '''Hunters''', {{Class Icon Rogue Small}} '''Rogues''' and {{Class Icon Warlock Small}} '''Warlocks''' make and excursion to the [[Ghostlands]] to complete their class quests and finish {{quest|Missing in the Ghostlands}} and {{questlong|Horde|10|The Fallen Courier}} along the way. |
**{{Class Icon Hunter Small}} '''Hunters''', {{Class Icon Rogue Small}} '''Rogues''' and {{Class Icon Warlock Small}} '''Warlocks''' make and excursion to the [[Ghostlands]] to complete their class quests and finish {{quest|Missing in the Ghostlands}} and {{questlong|Horde|10|The Fallen Courier}} along the way. |
||
| + | **From the Ghostlands hearth to Silvermoon City, speak to your class trainer there, then hike to the [[East Sanctum]]. |
||
| + | **{{Class Icon Hunter Small}} '''Hunters''' should tame their new pets (Dragonhawk or Lynx for now) on the way. Tame the one you don't want to keep first, let it fight mobs until you learn it's special ability then disband it and tame the other one. |
||
=== The East Sanctum === |
=== The East Sanctum === |
||
| Line 742: | Line 745: | ||
| {{npcrace|Blood Elf Male|Horde|Knight-Lord Bloodvalor}} |
| {{npcrace|Blood Elf Male|Horde|Knight-Lord Bloodvalor}} |
||
| [[Silvermoon City]] |
| [[Silvermoon City]] |
||
| + | |||
| + | |- |
||
| + | | {{questclass|Horde|Paladin|12|A Study in Power}} |
||
| + | | {{npcrace|Blood Elf Male|Horde|abc}} |
||
| + | | [[Silvermoon City?]] |
||
| + | |||
| + | |- |
||
| + | | {{questclass|Horde|Paladin|12|Claiming the Light}} |
||
| + | | {{npcrace|Blood Elf Male|Horde|dce}} |
||
| + | | [[Silvermoon City?]] |
||
| + | |||
| + | |- |
||
| + | | {{questclass|Horde|Paladin|12|Redeeming the Dead}} |
||
| + | | {{npcrace|Blood Elf Male|Horde|fgh}} |
||
| + | | [[Silvermoon City?]] |
||
|} |
|} |
||
| Line 750: | Line 768: | ||
=== Into the Ghostlands === |
=== Into the Ghostlands === |
||
| − | {| class="darktable" width=" |
+ | {| class="darktable" width="60%" |
| − | !width=" |
+ | !width="50%"| Quest Name |
| − | !width=" |
+ | !width="50%"| Quest Giver |
| − | ! Subzone |
||
|- |
|- |
||
| − | | {{questlong|Horde|10|The Fallen Courier}} |
+ | | {{questlong|Horde|10|The Fallen Courier}}} |
| − | | {{npcrace|Undead Female|Horde|Apothecary Thedra}} |
+ | | {{npcrace|Undead Female|Horde|Apothecary Thedra}}{{coords|49|89|Eversong Woods}} |
| − | | [[Eversong Woods]] |
||
|- |
|- |
||
| {{questlong|Horde|10|Delivery to Tranquillien}} |
| {{questlong|Horde|10|Delivery to Tranquillien}} |
||
| − | | {{npcrace|Blood Elf Male|Horde|Courier Dawnstrider}} |
+ | | {{npcrace|Blood Elf Male|Horde|Courier Dawnstrider}}{{coords|49|89|Eversong Woods}} |
| + | |||
| − | | [[Eversong Woods]] |
||
| + | |- |
||
| + | | {{questlong|Horde|10|Goods from Silvermoon City|race=Blood Elf}} |
||
| + | | {{npcrace|Blood Elf Male|Horde|Quartermaster Lymel}}{{coords|47|29|Ghostlands}} |
||
| + | |||
| + | |- |
||
| + | | {{questlong|Horde|10|Fly to Silvermoon City|race=Blood Elf}} |
||
| + | | {{npcrace|Blood Elf Male|Horde|Skymaster Sunwing}}{{coords|45|30|Ghostlands}} |
||
| + | |||
| + | |- |
||
| + | | {{questlong|Horde|10|Skymistress Gloaming |race=Blood Elf}} |
||
| + | | {{npcrace|Blood Elf Male|Horde|Sathren Azuredawn}}{{coords|54|71|Silvermoon City}} |
||
| + | |||
| + | |- |
||
| + | | {{questlong|Horde|10|Return to Quartermaster Lymel|race=Blood Elf}} |
||
| + | | {{npcrace|Blood Elf Female|Horde|Skymistress Gloaming}}{{coords|54|51|Eversong Woods}} |
||
|} |
|} |
||
| Line 816: | Line 847: | ||
|} |
|} |
||
| − | *{{Class Icon Paladin Small}} |
+ | *{{Class Icon Paladin Small}} '''Paladins''' will find this quest chain described in the [[Silvermoon City questing guide]] |
| + | |||
| + | TODO: |
||
| + | *[[mob]]s for {{quest|Defending Fairbreeze Village}} |
||
| + | *Continue to Farstrider Retreat and ... buy {{item|Springpaw Appetizers]] from [[fill-in-name]]. |
||
| + | *[[item name]] for {{quest|Grimscale Pirates!}} |
||
| + | *[[Blacksmithing]] from {{npc|Horde|fill-in-name}} |
||
| + | *[[Engineering]] from {{npc|Horde|fill-in-name}} |
||
| + | *[[Fishing]] from {{npc|Horde|fill-in-name}} |
||
| + | *[[Mining]] from {{npc|Horde|fill-in-name}} |
||
| + | *icons for professions |
||
| + | *might turn in {{quest|Swift Discipline}} later, from a pure questing/levelling perspective, the bag can wait (just mention it?) |
||
| + | *trolls before Scorched Grove and Runestones? => Yes, just double check that this does not skip optional lead-in quests |
||
| + | *Details for Amani Trolls, [[Zul'Marosh]] |
||
| + | *{{quest|The First Trial}} quest chain and details |
||
| + | *Details on Hunter, Rogue and Warlock quests |
||
| + | |||
| + | QUESTIONS: |
||
| + | *Cover {{quest|Goods from Silvermoon City}} or leave the details to [[Ghostlands questing guide]]? |
||
| + | *Cover {{quest|The Second Trial}} or leave the details to [[Silvermoon City questing guide]]? |
||
| + | *Cover (hunter) pet abilities in the questing guide? (only in starter zones?) |
||
| + | *Cover profession trainers and recipes? (At all/only first apperance in starter zones?) ((could end up noting resources, rare spawns etc. as well and loose focus)) |
||
[[Category:Guides]] |
[[Category:Guides]] |
||
[[Category:Questing guides]] |
[[Category:Questing guides]] |
||
| − | [[Category:Quests:Eversong Woods| Eversong Woods |
+ | [[Category:Quests:Eversong Woods| Eversong Woods questing guide]] |
| − | [[Category:Quests:Sunstrider Isle| Eversong Woods |
+ | [[Category:Quests:Sunstrider Isle| Eversong Woods questing guide]] |
Revision as of 19:49, 9 March 2008
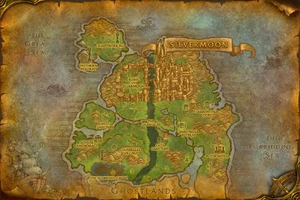
This questing guide for the zone of Eversong Woods details an efficient method to obtain and complete the quests in Eversong Woods.
For a list of all Eversong Woods quests in a sortable table, see Eversong Woods quests.
![]() Note: The questing guides are not meant for power-leveling purposes. Rather, they are meant to show players the most efficient way to complete all quests available for a particular zone. If you know of a better order or method to accomplish this, your input is welcome (in fact, greatly desired). For major changes, feel free to edit, but make a note in the talk page as to your reasoning.
Note: The questing guides are not meant for power-leveling purposes. Rather, they are meant to show players the most efficient way to complete all quests available for a particular zone. If you know of a better order or method to accomplish this, your input is welcome (in fact, greatly desired). For major changes, feel free to edit, but make a note in the talk page as to your reasoning.
 Sunstrider Isle (Level 1 - 5)
- See Also: Powerlevel Sunstrider Isle
Sunstrider Isle is the starting zone for new blood elves, and is located north west of Eversong Woods. The quests in this area are not available to players of other races. If you are new to the game, check out the Newbie Guide to get started, or just dive in - the game has in-game hints and the opening quests are very straight-forward, just relax and have fun!
First Steps
| Quest Name | Quest Giver | Subzone |
|---|---|---|
| Template:Npcrace | Sunstrider Isle | |
| Template:Questclass | Template:Npcrace | Sunstrider Isle |
| Template:Questclass | Template:Npcrace | Sunstrider Isle |
| Template:Questclass | Template:Npcrace | Sunstrider Isle |
| Template:Questclass | Template:Npcrace | Sunstrider Isle |
| Template:Questclass | Template:Npcrace | Sunstrider Isle |
| Template:Questclass | Template:Npcrace | Sunstrider Isle |
| Template:Race Icon Blood Elf Male SmallTemplate:Race Icon Blood Elf Female Small |
The Sunspire |
- Begin by talking to the first blood elf you see, Magistrix Erona, to get the quest [2] Reclaiming Sunstrider Isle.
- Head east or west to a Burning Crystal and kill 8 Mana Wyrms.
- Return to Magistrix Erona and turn in the quest. Then get [3] Unfortunate Measures and your Class Training quest.
- Head to the Sunspire to sell your loot, repair your equipment and locate your class trainer. At your class trainer complete your class quest, receive your first training and start [2] Well Watcher Solanian.
- Template:Class Icon Warlock Small Warlocks also pick up Template:Questclass
- Go to Well Watcher Solanian at the upper level of the spire to turn in the quest of the same name and start [4] Solanian's Belongings and [4] The Shrine of Dath'Remar.
- Pick up two more quests from quest givers around the Sunspire:
- [3] A Fistful of Slivers from Template:Npcrace
- [4] Thirst Unending from Template:Npcrace
Creatures turned wild
| Quest Name | Quest Giver | Subzone |
|---|---|---|
| Template:Npcrace | Sunstrider Isle | |
| Template:Npcrace | Sunstrider Isle | |
| Template:Npcrace | Sunstrider Isle | |
| Template:Npcrace | Sunstrider Isle |
- Head to the Burning Crystal to the south, kill Mana Wyrms, Springpaw Cubs, and Springpaw Lynxes that you encounter and loot [Lynx Collars] and [Arcane Slivers]. Try to alternate between springpaws and mana wyrms, so your
 [Mana Tap] is not on Cooldown when you engage a mana wyrm.
 - At the Burning Crystal, inspect the glowing book sitting near the crystal's base and loot [Solanian's Journal].
- Go back to Magistrix Erona, on the way continue to grind springpaws and mana wyrms until you have 8 collars and 6 slivers.
- Turn in Unfortunate Measures. Accept [3] Report to Lanthan Perilon. Complete Thirst Unending and A Fistful of Slivers.
- Report to Lanthan Perilon to the west and accept [4] Aggression.
To the South
| Quest Name | Quest Giver | Subzone |
|---|---|---|
| Template:Npcrace | Sunstrider Isle | |
| Template:Npcrace | The Sunspire | |
| Template:Npcrace | The Sunspire |
- Head further west towards the shore until you reach the Shrine of Dath'Remar, killing Tenders and Feral Tenders you come across. Read the plague on the shrine.
- Head southeast to the fountain and inspect the glowing scroll on the ground, looting [Scroll of Scourge Magic].
- Afterwards, follow the road east until you reach a pool of water with a platform. On the platform is [Solanian's Scrying Orb]. Loot it and head back to Lanthan Perilon. Here you have the chance to grind more Tenders and Feral Tenders, if you have not already slain 7 of each.
- Turn in Aggression and accept [5] Felendren the Banished.
- Head back to the Sunspire to turn in The Shrine of Dath'Remar and Solanian's Belongings. Learn new class abilities if you haven't already.
Falthrien Academy
| Quest Name | Quest Giver | Subzone |
|---|---|---|
| Template:Npcrace | Sunstrider Isle | |
| [Tainted Arcane Sliver] | Falthrien Academy | |
| Template:Questclass | Template:Npcrace | The Sunspire |
- Head southwest to Falthrien Academy. Kill Arcane Wraiths and Tainted Arcane Wraiths as you ascend to the top of the academy.
- On the top platform kill Felendren the Banished and loot [Felendren's Head].
- The Tainted Arcane Wraiths drop a [Tainted Arcane Sliver]. Inspect it and start [4] Tainted Arcane Sliver.
- Template:Class Icon Warlock Small Warlocks be sure to loot 4 [Wraith Essence] and 1 [Tainted Wraith Essence].
- Template:Class Icon Warlock Small Warlocks be sure to loot 4
- Turn in all quests and get [5] Aiding the Outrunners from Lanthan Perilon.
Eversong Woods (Level 5 - 10)
Eversong Woods is the main zone for beginning blood elves, once they graduate from Sunstrider Isle. To get here, head over the bridge on the south-east corner of Sunstrider Isle.
Other zone options for this level include Durotar, Mulgore and Tirisfal Glades.
The Outrunners
| Quest Name | Quest Giver | Subzone |
|---|---|---|
| Template:Npcrace | Sunstrider Isle | |
| Template:Npcrace | Dawning Lane | |
| Template:Npcrace | Dawning Lane | |
| Template:Npcrace | Dawning Lane |
- Speak with Outrunner Alarion and accept [5] Slain by the Wretched.
- Continue down the road until you find the Slain Outrunner, finish the quest and start [5] Package Recovery.
- Bring [Erona's Package] to Alarion and get the follow-up [5] Completing the Delivery
- Follow Dawning Lane all the way through the Ruins of Silvermoon until you reach Falconwing Square.
- Complete Completing the Delivery with Innkeeper Delaniel and rebind your
 [Hearthstone]. In the inn you can also learn:
- Cooking from Quarelestra
- First Aid from Kanaria
- Jewelcrafting Aleinia
- Template:Class Icon Priest Small Priests should speak to Ponaris in the same building and pick up Template:Questclass.
- Cooking from
- Head to the other building. Read the wanted poster and accept [6] Wanted: Thaelis the Hungerer.
- Left of the sign is Aeldon Sunbrand. Talk to him and start [5] Unstable Mana Crystals.
- Inside the building you can receive weapon training from Duelist Larenis.
- Speak with Magister Jaronis and pick up [5] Major Malfunction.
- If you're close to leveling, explore the roads to the north and east, Skulking Row and Feth's Way. The experience from discovery should set you over the edge, opening up more abilites for you to learn before heading out.
Ruins of Silvermoon
| Quest Name | Quest Giver | Subzone |
|---|---|---|
| Template:Npcrace | Falconwing Square | |
| Template:Npcrace | Falconwing Square | |
| Wanted Poster - Thaelis the Hungerer | Falconwing Square |
- Head out into the Ruins of Silvermoon, looting [Unstable Mana Crystals] as you find them (these appear as barrels of shiny rocks).
- Kill Arcane Patrollers for their [Arcane Cores].
- As you make your way through the ruins, head for the Commons Hall on the north-eastern side of the ruins, where you can find Thaelis the Hungerer. If you approach his camp from the east or west, you can pull one Wretched and him away from the rest of the group guarding the hall.
- Once you have everything you need, return to Falconwing Square and turn in all three quests.
- Accept [6] Darnassian Intrusions from Aeldon Sunbrand and [6] Delivery to the North Sanctum from Magister Jaronis.
West Sanctum
| Quest Name | Quest Giver | Zone-Subzone |
|---|---|---|
| Template:Questclass | Template:Npcrace | Falconwing Square |
| Template:Npcrace | Falconwing Square | |
| Template:Npcrace | Falconwing Square | |
| Template:Npcrace | Falconwing Square | |
| Template:Npcrace | West Sanctum | |
| [Incriminating Documents] drop from Darnassian Scout | West Sanctum |
- Template:Class Icon Priest Small Priests head south-east to the Dead Scar and bless the rangers, then return to Ponaris to finish Cleansing the Scar and receive a decent robe for that level.
NOTE: Is this quest race-restricted?
- Visit Ley-Keeper Caidanis at the North Sanctum, south of Falconwing Square. Turn in Delivery to the North Sanctum and accept [5] Malfunction at the West Sanctum.
- Head to the West Sanctum and talk to Ley-Keeper Velania to turn in Malfunction at the West Sanctum and get [6] Arcane Instability.
- Kill Manawraiths and Mana Stalkers as you see them, keeping an eye out for any Darnassian Scouts. [Incriminating Documents] should drop from the first one you kill. Start [6] Incriminating Documents from it.
- Turn in Arcane Instability and Darnassian Intrusions
- Head over the ridge to the west and speak to Hathvelion Sungaze to accept [7] Fish Heads, Fish Heads.... Wait to work on this quest until you get more murloc quests at Sunsail Anchorage.
- Use your hearth stone to return to Falconwing Square, turn in Incriminating Documents and learn new class abilties.
- Pick up [7] The Dwarven Spy from Aeldon Sunbrand.
The Road to Fairbreeze Village
| Quest Name | Quest Giver | Subzone |
|---|---|---|
| Template:Npcrace | Eversong Woods | |
| Template:Npcrace | Eversong Woods | |
| Template:Npcrace | Eversong Woods | |
| Template:Npcrace | The Dead Scar | |
| Template:Npcrace | Stillwhisper Pond | |
| Template:Npcrace | Falconwing Square |
- Head back to the North Sanctum. Loot [Prospector Anvilward's Head] after killing him.
- On the way to Fairbreeze Village, speak with Apprentice Ralen and start [6] Roadside Ambush.
- Follow the road south and speak to Apprentice Meledor, completing the quest you just got in exchange for [6] Soaked Pages.
- Dive into the river and fetch the pages from the "Soaked Tome" and return them to Meledor and accept [6] Taking the Fall.
- Head north, then east to the The Dead Scar and speak with Ranger Jaela to start [6] The Dead Scar.
- Kill Plaguebone Pillagers until you have completed the quest, then return to Ranger Jaela and turn it in.
- Continue east to Stillwhisper Pond to speak with Instructor Antheol and complete Taking the Fall and accept [6] Swift Discipline. Use [Antheol's Disciplinary Rod] on the two apprentices and report back for a bag.
- You can leave the road to the north to learn:
- Leatherworking from Sathein
- Skinning from Mathreyn
- Leatherworking from
- Visit Falconwing Square once more and turn in The Dwarven Spy, accept the follow up [7] Fairbreeze Village.
Fairbreeze Village and Saltheril's Haven
| Quest Name | Quest Giver | Subzone |
|---|---|---|
| Template:Npcrace | Falconwing Square | |
| Template:Npcrace | Fairbreeze Village |
- Once at Fairbreeze Village, pick up the following quests (you will need to be level 8 for most of them):
- Speak with Velan Brightoak and pick up [7] Pelt Collection.
- At the largest building, start [9] Saltheril's Haven and [9] The Wayward Apprentice from Magistrix Landra Dawnstrider.
- Downstairs, rebind your Hearthstone with Marniel Amberlight, starting [9] Ranger Sareyn, and start [10] The Scorched Grove from Ardeyn Riverwind.
- Upstairs, complete Fairbreeze Village with Ranger Degolien, following up with [7] Situation at Sunsail Anchorage.
- Speak with Velan Brightoak and pick up
- Head west to Saltheril's Haven and complete Saltheril's Haven. Accept the follow up quest [9] The Party Never Ends.
- The following professions are available at Saltheril's Haven:
Sunsail Anchorage and the Grimscale Murlocs
| Quest Name | Quest Giver | Subzone |
|---|---|---|
| Template:Npcrace | [[Sunsail Anchorage] | |
| Template:Npcrace | Tranquil Shore | |
| Template:Npcrace | Tranquil Shore | |
| Template:Npcrace | Sunsail Anchorage | |
| Template:Npcrace | Sunsail Anchorage | |
| [Captain Kelisendra's Lost Rutters] | Sunsail Anchorage |
- Follow the road west and kill any Springpaw Stalkers as you see them, looting their [Springpaw Pelts].
- Before you reach the harbor, you will see a fortified camp to your right. Go there and start [8] Grimscale Pirates! and [7] Lost Armaments.
- Down the road to the Sunsail Anchorage, collect [Sin'dorei Armaments] from the crates scattered around the area.
- Once you have enough armaments, kill any remaining wretched needed for Situation at Sunsail Anchorage.
- Return to the fortified camp and turn in the armaments to get the next quest, [8] Wretched Ringleader.
- Climb to the top of the anchorage tower and defeat Aldaron the Reckless. Don't forget to loot his head.
- Cross the river to the north and head west along it until you encounter some murlocs. Start grinding them, collecting Grimscale Murloc Heads for Fish Heads, Fish Heads... and item name for Grimscale Pirates!.
- Once you have enough heads, return to Hathvelion Sungaze to the east and turn in the quest, then pick up the follow up [9] The Ring of Mmmrrrggglll.
- Cross the river to the south and kill Mmmrrrggglll, return to Hathvelion Sungaze to turn the quest in.
- If the murlocs did not drop [Captain Kelisendra's Lost Rutters] by now, to start a quest of the same name, keep killing then until they do
- Turn in [8] Wretched Ringleader, Captain Kelisendra's Lost Rutters and [8] Grimscale Pirates! at the fortified camp.
Silvermoon City and Mage quests
| Quest Name | Quest Giver | Subzone |
|---|---|---|
| Template:Npcrace | Fairbreeze Village | |
| Template:Npcrace | Fairbreeze Village | |
| Template:Questclass | Template:Npcrace | Stillwhisper Pond |
| Template:Npcrace | Fairbreeze Village | |
| Template:Questclass | Template:Npcrace | Stillwhisper Pond |
| Template:Questclass | Template:Npcrace | Stillwhisper Pond |
| Template:Questclass | Template:Npcrace | Stillwhisper Pond |
- Head back to Fairbreeze Village when you're done, turning in Pelt Collection and Situation at Sunsail Anchorage, accepting [10] Farstrider Retreat and picking up a [Bundle of Fireworks] from Halis Dawnstrider.
- Head up the road and talk to Ranger Sareyn and start [9] Defending Fairbreeze Village.
- Go to Silvermoon City, buy Suntouched Special Reserve from Vinemaster Suntouched at Silvermoon Inn. Hunters, Rogues and Warlocks might want to rebind their hearthstone here, all others leave it at Fairbreeze Village for now.
- You can learn any professions in Silvermoon City you had not yet a chance to learn.
- Blacksmithing from fill-in-name
- Engineering from fill-in-name
- Fishing from fill-in-name
- Mining from fill-in-name
- Blacksmithing from
- Pick up class specific quests
- Template:Class Icon Hunter Small Hunters get [10] Seek the Farstriders from Oninath
- Template:Class Icon Rogue Small Rogues get [10] Find Keltus Darkleaf from Zelanis
- Template:Class Icon Warlock Small Warlocks get [10] The Stone from Talionia
- Template:Class Icon Hunter Small Hunters get
- Leave Silvermoon City and head south-west to the Farstrider Retreat.
- Template:Class Icon Mage Small Mages make a detour to Stillwhisper Pond to accept a series of three quests from Instructor Antheol. Complete [10] Fetch!, [10] The Purest Water and [10] Recently Living as you receive them for [item].
- Template:Class Icon Mage Small Mages make a detour to Stillwhisper Pond to accept a series of three quests from Instructor Antheol. Complete
Farstrider Retreat and class quests
| Quest Name | Quest Giver | Subzone |
|---|---|---|
| Template:Npcrace | Fairbreeze Village | |
| Template:Questclass | Template:Npcrace | Silvermoon City |
| Template:Questclass | Template:Npcrace | Farstrider Retreat |
| Template:Questclass | Template:Npcrace | Farstrider Retreat |
| Template:Questclass | Template:Npcrace | Farstrider Retreat |
| Template:Questclass | Template:Npcrace | Farstrider Retreat |
| Template:Questclass | Template:Npcrace | Silvermoon City |
| Template:Questclass | Template:Npcrace | Ghostlands |
| Template:Questclass | Template:Npcrace | Ghostlands |
| Template:Questclass | Blood Elf Female|Horde|Talionia} | Silvermoon City |
| Template:Questclass | Voidstone | Ghostlands |
- Continue to Farstrider Retreat and finish the quest of the same name and buy {{item|Springpaw Appetizers]] from fill-in-name.
- Accept [10] The Magister's Apprentice, [10] Amani Encroachment and [11] The Spearcrafter's Hammer.
- Template:Class Icon Hunter Small Hunters speak to Lieutenant Dawnrunner to receive and complete the quests of the Beast Taming chain.
- Taming the Beast (1) to tame a Dragonhawk, which are found in the vicinity.
- Taming the Beast (2) to tame a Lynx, which are found in the vicinity.
- Taming the Beast (3) to tame a Mistbat, this requires travel to the Ghostlands.
- Template:Class Icon Hunter Small Hunters, Template:Class Icon Rogue Small Rogues and Template:Class Icon Warlock Small Warlocks make and excursion to the Ghostlands to complete their class quests and finish Missing in the Ghostlands and [10] The Fallen Courier along the way.
- From the Ghostlands hearth to Silvermoon City, speak to your class trainer there, then hike to the East Sanctum.
- Template:Class Icon Hunter Small Hunters should tame their new pets (Dragonhawk or Lynx for now) on the way. Tame the one you don't want to keep first, let it fight mobs until you learn it's special ability then disband it and tame the other one.
- Template:Class Icon Hunter Small Hunters speak to Lieutenant Dawnrunner to receive and complete the quests of the Beast Taming chain.
The East Sanctum
| Quest Name | Quest Giver | Subzone |
|---|---|---|
| Template:Npcrace | Fairbreeze Village | |
| Template:Npcrace | East Sanctum | |
| Template:Npcrace | East Sanctum | |
| Template:Npcrace | East Sanctum | |
| Template:Npcrace | East Sanctum |
- Complete The Wayward Apprentice and accept [9] Corrupted Soil.
- Collect soil samples in the Dead Scar and start to grind mobs for Defending Fairbreeze Village.
- Finish Corrupted Soil and start [9] Unexpected Results.
- Accept [9] Research Notes, head southward along the Dead Scar to kill Darkwraiths for Defending Fairbreeze Village
- Return to Fairbreeze Village and then turn them both in. Rebind your hearthstone if you set it to Silvermoon City, as you will return here once more.
Scorched Grove and Runestones
| Quest Name | Quest Giver | Subzone |
|---|---|---|
| Template:Npcrace | Saltheril's Haven | |
| Template:Npcrace | Fairbreeze Village | |
| Template:Npcrace | Goldenbough Pass | |
| [Old Whitebark's Pendant] | The Scorched Grove | |
| Template:Npcrace | Goldenbough Pass | |
| Template:Npcrace | Fairbreeze Village | |
| Template:Npcrace | Fairbreeze Village | |
| Template:Npcrace | Runestone Falithas |
- Head on to Saltheril's Haven to turn in The Party Never Ends.
- Head south the Goldenbough Pass, speak to name to complete The Scorched Groveand accept the follow up [9] A Somber Task.
- While grinding tenders, you will see the named mob Old Whitebark, kill him to start [10] Old Whitebark's Pendant from the item of the same name.
- Return to name to finish A Somber Task and Old Whitebark's Pendant and accept [10] Whitebark's Memory.
- Use the pendant near the runestone in the Scorched Grove to summon Whitebark's Spirit, during the following fight it will turn friendly and allow you to complete Whitebark's Memory
- Head east to the next runestone and talk to Runewarden Deryan to complete the quest of that name and start [10] Powering our Defenses.
- While continuing east complete Missing in the Ghostlands, and accept [10] The Fallen Courier.
- Further east, at the third runestone, finish Powering our Defenses.
Duskwither Spire
| Quest Name | Quest Giver | Subzone |
|---|---|---|
| Template:Npcrace | Farstrider Retreat | |
| Template:Npcrace | Duskwither Spire | |
| Template:Npcrace | Duskwither Grounds | |
| Template:Npcrace | Duskwither Spire | |
| Template:Npcrace | Duskwither Spire | |
| Duskwither Spire |
- Complete The Magister's Apprentice and accept [10] Deactivating the Spire and [10] Where's Wyllithen? from Apprentice Loralthalis.
- First find Wyllithen up north the path and then start and complete [10] Cleaning up the Grounds.
- Enter the Duskwither Spire using the orb of translocation, deactivate the three crystals and pick up [10] Abandoned Investigations from the journal there. Use the orb of translocation on the top level to leave.
- Head back to Apprentice Loralthalis to finish Deactivating the Spire.
- Return to Farstrider Retreat to turn in Word from the Spire and Abandoned Investigations.
The Amani Threat
| Quest Name | Quest Giver | Subzone |
|---|---|---|
| Template:Npcrace | Tor'Watha | |
| Template:Npcrace | Farstrider Retreat | |
| Template:Npcrace | Farstrider Retreat | |
| [Amani Invasion Plans] | Zeb'Watha | |
| Template:Npcrace | Farstrider Retreat |
- Travel south-east to do [10] Amani Encroachment, [11] The Spearcrafter's Hammer.
- Speak to Ven'jashi to pick up [11] Zul'Marosh
- Swim west to kill Zul'Marosh. Start [11] Amani Invasion from the [Amani Invasion Plans] he drops.
- Turn in Zul'Marosh.
- Return to Farstrider Retreat and finish Amani Encroachment, The Spearcrafter's Hammer and Amani Invasion. Accept [11] Warning Fairbreeze Village.
- Hearth back to Fairbreeze Village to turn in the quest.
The First Trial
| Quest Name | Quest Giver | Subzone |
|---|---|---|
| Template:Questclass | Template:Npcrace | Falconwing Square |
| Template:Questclass | Template:Npcrace | Silvermoon City |
| Template:Questclass | Template:Npcrace | Silvermoon City? |
| Template:Questclass | Template:Npcrace | Silvermoon City? |
| Template:Questclass | Template:Npcrace | Silvermoon City? |
- Template:Class Icon Paladin Small Paladins do the [12] The First Trial quest chain.
- Visit Noellene in Falconwing Square to get the lead-in quest Template:Questclass.
- Go to Knight-Lord Bloodvalor in Silvermoon City to finish this quest and accept Template:Questclass.
Into the Ghostlands
| Quest Name | Quest Giver |
|---|---|
| Template:Npcrace[49, 89] | |
| Template:Npcrace[49, 89] | |
| Template:Npcrace[47, 29] | |
| Template:Npcrace[45, 30] | |
| Template:Npcrace[54, 71] | |
| Template:Npcrace[54, 51] |
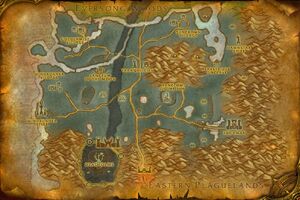
- Complete The Fallen Courier and start [10] Delivery to Tranquillien from Courier Dawnstrider.
- Head to Tranquillien and complete Delivery to Tranquillien.
- Template:Race Icon BloodElf Male SmallBlood Elves will pass through Eversong Woods again, while doing the [10] Goods from Silvermoon City quest chain, which is described in detail in the Ghostlands questing guide.
- Template:Race Icon BloodElf Male SmallBlood Elves will pass through Eversong Woods again, while doing the
Where to go from here
The next step for most blood elves is to head south to the Ghostlands. See the Ghostlands questing guide for details on preparation and questing in that area.
Other zone options for this level include Silverpine Forest and The Barrens.
Higher level quests
The Second Trial
| Quest Name | Quest Giver | Subzone |
|---|---|---|
| Template:Questclass | Template:Npcrace | Silvermoon City |
| Template:Questclass | Template:Npcrace | Eversong Woods |
| Template:Questclass | Template:Npcrace | Eversong Woods |
| Template:Questclass | Template:Npcrace | Silvermoon City |
| Template:Questclass | Template:Npcrace | Silvermoon City |
| Template:Questclass | Template:Npcrace | Silvermoon City |
- Template:Class Icon Paladin Small Paladins will find this quest chain described in the Silvermoon City questing guide
TODO:
- mobs for Defending Fairbreeze Village
- Continue to Farstrider Retreat and ... buy {{item|Springpaw Appetizers]] from fill-in-name.
- item name for Grimscale Pirates!
- Blacksmithing from fill-in-name
- Engineering from fill-in-name
- Fishing from fill-in-name
- Mining from fill-in-name
- icons for professions
- might turn in Swift Discipline later, from a pure questing/levelling perspective, the bag can wait (just mention it?)
- trolls before Scorched Grove and Runestones? => Yes, just double check that this does not skip optional lead-in quests
- Details for Amani Trolls, Zul'Marosh
- The First Trial quest chain and details
- Details on Hunter, Rogue and Warlock quests
QUESTIONS:
- Cover Goods from Silvermoon City or leave the details to Ghostlands questing guide?
- Cover The Second Trial or leave the details to Silvermoon City questing guide?
- Cover (hunter) pet abilities in the questing guide? (only in starter zones?)
- Cover profession trainers and recipes? (At all/only first apperance in starter zones?) ((could end up noting resources, rare spawns etc. as well and loose focus))