Skulkerart@legacy41572124 (talk | contribs) No edit summary |
@DeletedUser40286799 (talk | contribs) (Created page with "{{npcbox | image = Hour_of_Twilight_-_Tentacles_2.jpg | name = Shu'ma | races = Forgotten one (presumed) | affiliation = Old Gods | status = Active | title = Maw of Ruin...") |
||
| Line 1: | Line 1: | ||
| + | {{npcbox |
||
| − | <onlyinclude>{{{{{tpl|tooltip}}} |
||
| + | | image = Hour_of_Twilight_-_Tentacles_2.jpg |
||
| − | |mode={{{mode|}}} |
||
| + | | name = Shu'ma |
||
| − | |arg={{{arg|}}} |
||
| + | | races = [[Forgotten one]] (presumed) |
||
| − | |skill=Riding (150) |
||
| + | | affiliation = [[Old Gods]] |
||
| − | |unique= |
||
| + | | status = Active |
||
| − | |icon=Ability_Mount_Undeadhorse |
||
| + | | title = Maw of Ruin |
||
| − | |quality=Epic |
||
| + | | location = [[Dragonblight]]}} |
||
| − | |effect=Use: Teaches you how to summon Baron Rivendare's steed. This is a very fast mount. |
||
| − | |name=Deathcharger's Reins |
||
| − | |bind=BoP |
||
| − | |level=40 |
||
| − | |sell={{cost|2|50|}} |
||
| − | |ilvl=40 |
||
| − | |type=Mount |
||
| − | }}</onlyinclude> |
||
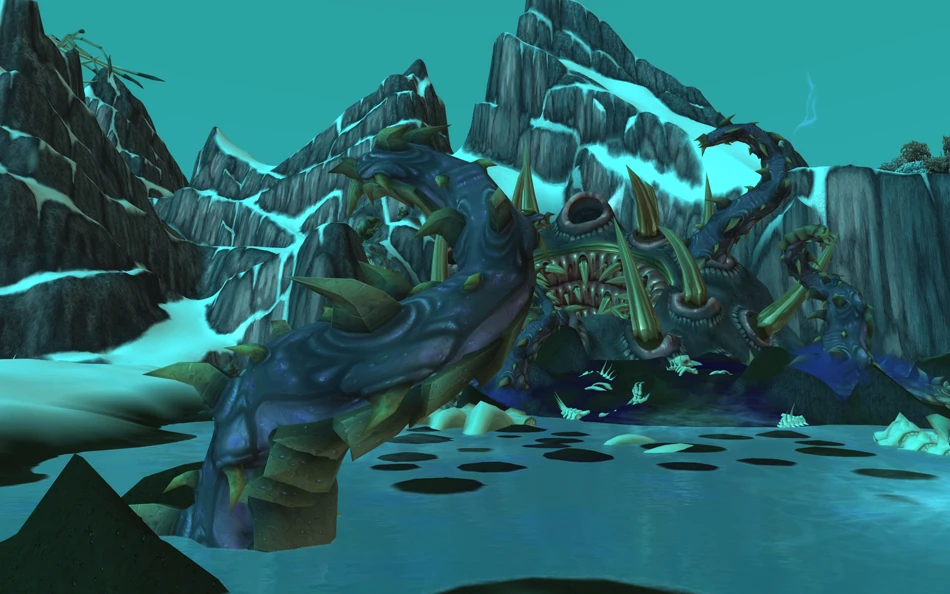
| + | '''Shu'ma''' is a servant of the Old Gods, living in a [[Maw of Ruin]]. The faceless one [[Yor'sahj]] binds the blood of Shu'ma to his will, granting him power. |
||
| − | [[Image:deathcharger small.jpg|right|thumb|A gnome with Rivendare's Deathcharger.]] |
||
| − | [[Image:Artimus-brillcemetery.jpg|thumb|right|A human with Rivendare's Deathcharger.]] |
||
| + | ==References== |
||
| − | '''Deathcharger's Reins''' summon Baron Rivendare's steed, '''Rivendare's Deathcharger''', a mount that adds 100% to movement [[speed]]. Prior to [[Patch 3.0.2]] it was extremely rare, even more so than the epic two-handed sword [[Runeblade of Baron Rivendare]]. Deathcharger shares the same design as the [[Forsaken]] epic racial mount, the [[skeletal horse|skeletal warhorse]] with a blue color scheme. Its use is not restricted by race or faction. |
||
| + | {{Reflist}} |
||
| + | {{Old Gods}} |
||
| − | Deathcharger is the name of Baron Rivendare's skeletal horse. The undead steed is his most prized possession.{{cite|MG|157,182}} |
||
| ⚫ | |||
| − | ==Source== |
||
| − | Deathcharger's Reins drop off [[Baron Rivendare]] in [[Stratholme]]. |
||
| − | |||
| − | ==Notes== |
||
| − | *The drop chance for the mount is approximately 1% [http://forums.worldofwarcraft.com/thread.html?topicId=11675537865&pageNo=5&sid=1#81] |
||
| − | *Prior to patch 3.0.2, the drop chance was reported to be 1 in 5000 (or 0.02%). |
||
| − | *150 riding skill is required to use this mount. |
||
| − | |||
| − | ==Guide to getting the Deathcharger at level 70/80== |
||
| − | |||
| − | [ Removed in 3.2.0 ] There was a shortcut to [[Slaughter Square]] merely by opening the [[Supply Crate (Stratholme)|Supply Crates]] on either side of the gate, added sometime after 3.0 but removed in 3.2. You would need to open two empty and/or corrupted crates in a row (one crate for each gate, empty/corrupted crates are easily identified by standing near them). Once in [[Slaughter Square]], you could open the two gates of [[The Slaughter House]] by opening two more empty/corrupted crates around the square (again, two in a row appears to be necessary). This technique allowed skipping the entire slaughter square scripted encounter, and allowed for very fast speed runs since you will only need to engage the Baron (and a few rats and maggots). |
||
| − | |||
| − | There was formerly a bug in this dungeon. If you started killing the abominations too soon, the door to Ramstein would NOT open. The time to start killing them seemed to be about when the baron timer reached 29 minutes. If the door didn't open for you, you would be trapped inside and needed to hearth or teleport to get out. If you were willing to wait a GM could have opened the door for you. This bug may still exist, however it has not been seen recently. |
||
| − | |||
| − | |||
| − | |||
| − | This is a guide on how to solo UD Stratholme at level 70 to farm the mount. If you want to farm for this like mad, pick up enchanting, it will help you get large profits as you disenchant the rare loot from bosses. Another thing is to have lots of bag space, at least 40 spaces. |
||
| − | |||
| − | ''Enemies you have to deal with'' |
||
| − | (Note: Every undead *trash* mob in "Undead" Stratholme can be shackled or pally feared. Obviously Thuzadin Necromancers and/or Shadowcasters cannot be as they are humanoid.) |
||
| − | *Ghouls: 2 types, both melee, similar abilities. They hit very fast and very hard and are encountered in groups of two, three or four. Chance on hit to apply a disease. |
||
| − | *Rockwing Screechers: These gargoyles are casters and have the ability to fear and silence you. While resistible, it is about 75% chance. |
||
| − | *Rockwing Gargolyes: These gargoyles deal melee damage only. |
||
| − | *Wailing Banshee: Melee, encountered alone. Will periodically cast "Magic Shield" making it immune to all types of magic. |
||
| − | *Shrieking Banshee: Caster, encountered alone. |
||
| − | *Crypt Fiends: Caster, these undead have a tendency to snare you in a net and use ranged attacks on you. Cannot be dispelled but PVP trinket or human racial works. |
||
| − | *Crypt Crawler: Melee, has a net that snares and silences for approximately 8 seconds. Cannot be dispelled but PVP trinket or human racial works. |
||
| − | *Thuzadin Necromancer: These wizards (caster/melee) have a powerful life drain spell called Soul Tap(4200 health and mana leeched over 12 seconds, channeled). It is imperative that one interrupts the spell quickly. Two Soul Tap spells on you and in addition to mobs beating you up can result in quick deaths. |
||
| − | *Thuzadin Shadowcaster: Similar to a warlock (caster) with a chain cast Shadowbolt. |
||
| − | *Venom Belcher: Abomination (melee) with approximately 15k health which periodically casts a poison spit (snare effect). |
||
| − | *Bile Spewer: Abomination (melee) with approximately 15k health which periodically summons an ooze to assist it. Upon death, a Bile Spewer will explode into 5 oozes (melee). |
||
| − | *Eye of Naxxramas: Melee; invisible wraith which patrolls the area. If you are spotted, it'll yell, "The Living Are Here!" If it is not killed within approximately 8 seconds, it'll summon 2 Rockwing Gargoyles which proceed to attack you along with the Eye of Naxxramas. Any enemy mobs in the near vicinity will also aggro at this point. |
||
| − | |||
| − | ''Runthrough UD Stratholome'' |
||
| − | *Once you enter stratholme by the Service Entrance, hug the wall to the left and skip all three groups of undead. Killing them is not advised. Open the gate to start the 45 minute Baron run. |
||
| − | |||
| − | *45:00 Once in the area called the Gauntlet, take the left junction. Hug the wall until you are facing a group of Thuzadin on the other side of the road. Cross the road and kill them. Be careful not to aggro the Gargoyle patrols and the stationery Crypt Fiend. |
||
| − | *44:00 Hug the wall until you reach the ziggurat where [[Nerub'enkan]] (boss) is standing. Make sure the way is clear, do not bang into patrols. There is no need to clear the groups on either side or the Banshee blocking your way. Walk past them carefully and charge up to Nerub'enkan. Blast him down quickly, walk into the ziggurat and kill all the Thuzadin inside. |
||
| − | *42:00 Make your way back to the junction where you started. Next, kill the group of three Ghouls at the right side of the junction. |
||
| − | *41:00 Then, hug the wall and walk all the way to the second ziggurat where [[Baroness Anastari]] (boss) is standing. When you are halfway to the ziggurat, the wall curves to the right. DO NOT hug the wall anymore. Watch for the patrols and when the coast is clear, run up the steps of the ziggurat and kill her. Same as the first ziggurat clear the Thuzadin inside. |
||
| − | *38:00 Walk northeast from the ziggurat where you will see a group of three Ghouls and one Crypt Fiend. Now, it is possible to skip them by hugging the wall VERY carefully. Take note of the supply crate there if there is one. It is probably booby trapped. |
||
| − | *37:00 Now, you are in a small alley way. It is recommended to kill the Gargoyle patrols that patrol this stretch of road. There are two of them. Next, to your right, there is a lone Ghoul, pull him. Next, a lone Banshee. When she walks towards the left, away from a group of Ghouls, pull her and kill her. |
||
| − | *35:00 There is a Crypt Fiend in your way. Let him walk towards the left and you must quickly run towards the ziggurat. There are three Thuzadin kneeling before [[Maleki the Pallid]] (boss). Pull them and cut them to pieces. Now, pull Maleki and kill him. As usual, kill the Thuzadin inside. |
||
| − | *33:00 Now, to your left (when you are standing on the ziggurat facing the same way as the boss) there is a group of four Thuzadin and another group of three Ghouls. You will also notice two Gargoyle patrols. It is recommended to kill both groups, but it is possible to kill the Ghouls without aggroing the Thuzadin and/or the two Gargoyle patrols. |
||
| − | *29:00 Hug the wall until you reach a junction. Hug the wall as you turn right. There will be a group of three Ghouls and three Banshees and Crypt Fiends arranged in a line. The Banshees and Crypt Fiends do not aggro together. When the lone mobs move to the left, run past them to the big gate. |
||
| − | *28:00 Start pulling the Abominations. It is recommended to start from the left and working your way towards the right. |
||
| − | *23:00 Rest up. when the last abomination is dead, [[Ramstein the Gorger]] (boss) will emerge from the Slaughterhouse. Kill him quickly for he hits very hard and fast. |
||
| − | *21:00 A large wave of undead will come out from the porticullis on the left. If you are on the right side, your have ample time to rest up. AoE them down. Rogues, enhancement Shaman and Feral druids might have a problem. To solve this, one can auctually skip this wave. Simply run into the building when Ramstein comes out of it. Fight the boss inside the building. |
||
| − | *20:00 The last of the Baron's guard are coming. A group of five Black Guard Sentries will come out. They are easy to kill and should not be a problem. Get to full health and mana, check that everything is in order and get ready to fight [[Baron Rivendare]] himself! Good luck! |
||
| − | |||
| − | Just keep doing this again and again till you get the mount. Remember to collect [[Stratholme Holy Water]] from the crates in the city. It helps with the skeletons that the Baron summons. |
||
| − | |||
| − | |||
| − | '''NOTE''': At level 80, one can simply run around/through the packs of trash leading up to each boss, kill said boss and the room behind them. Repeat this for the two other ziggurats and then proceed to the slaughterhouse. Doing so takes approximately 10 minutes. |
||
| − | |||
| − | Also of note is a high level player can simply run in and fight [[Ramstein the Gorger]] inside the room he spawns in. The doors will close behind you and you will skip both the wave of non-elite mobs and the slight delay as the script executes. Be warned, once Ramstein dies the elites will spawn right next to you. If done correctly, one can pull Ramstein down the stairs toward Baron and avoid the elites as well. |
||
| − | |||
| − | ==Notes== |
||
| − | *Rivendare has a '''1% chance of dropping''' this mount. '''Don't assume this means that in 100 runs it will appear''' without fail. |
||
| − | |||
| − | ==External links== |
||
| − | <!-- Read http://www.wowwiki.com/WoWWiki:External_links before posting your links here. |
||
| − | Links that do not conform to the rules will be DELETED. |
||
| − | Repeat violations may result in a BAN. |
||
| − | Have a nice day. :) --> |
||
| − | {{elinks-item|13335}} |
||
| − | |||
| − | {{Mountfooter|Skeletal}} |
||
| ⚫ | |||
| − | [[Category:Fast ground mounts]] |
||
| − | [[Category:World of Warcraft epic items]] |
||
| − | [[Category:Stratholme items]] |
||
Revision as of 23:15, 14 October 2011
| Shu'ma | |
|---|---|
 | |
| Title | <Maw of Ruin> |
| Race(s) | Forgotten one (presumed) |
| Affiliation(s) | Old Gods |
| Location | Dragonblight |
| Status | Active |
Shu'ma is a servant of the Old Gods, living in a Maw of Ruin. The faceless one Yor'sahj binds the blood of Shu'ma to his will, granting him power.