Sarvam50076 (talk | contribs) |
(Created page with "{{NYI}} {{Stub/Mob}} {{npcbox |name = {{SUBST:PAGENAME}} |image = {{SUBST:PAGENAME}}.jpg |race = Faceless one |creature = |type = Boss |level = ?? |location = [[Dragon Soul (ins...") |
||
| Line 1: | Line 1: | ||
| + | {{NYI}} |
||
| − | {{this|the strategy for defeating Deathbringer Saurfang in Icecrown Citadel|his character biography|Dranosh Saurfang}} |
||
| + | {{Stub/Mob}} |
||
| − | {{Npcbox |
||
| + | {{npcbox |
||
| − | | name = Deathbringer Saurfang |
||
| + | |name = Yor'sahj the Unsleeping |
||
| − | | image = Deathbinger Saurfang in armor.jpg |
||
| + | |image = Yor'sahj the Unsleeping.jpg |
||
| − | | gender = Male |
||
| − | | |
+ | |race = Faceless one |
| − | | |
+ | |creature = |
| + | |type = Boss |
||
| − | | health = 8,785,000 (10 player Normal)<br />31,860,000 (25 player Normal)<br />12,300,000 (10 player Heroic)<br />43,930,000 (25 player Heroic) |
||
| − | | |
+ | |level = ?? |
| + | |location = [[Dragon Soul (instance)|Dragon Soul]] |
||
| − | | status = Killable |
||
| + | |faction=Combat |
||
| − | | location = [[Deathbringer's Rise]], [[Icecrown Citadel]] |
||
| + | |health = ?? |
||
| − | | instance = Icecrown Citadel |
||
| + | |instance=Dragon Soul |
||
}} |
}} |
||
| − | ''' |
+ | '''Yor'sahj the Unsleeping''' is the third boss to appear in the [[Dragon Soul (instance)|Dragon Soul]] raid.<ref>http://us.battle.net/wow/en/blog/3516572</ref> |
| + | ==Background== |
||
| − | After falling to [[Frostmourne]] at the [[Battle of Angrathar the Wrathgate]], [[Dranosh Saurfang]] was raised in undeath by the Lich King and brought to Icecrown Citadel. Imbued with the power of the Scourge, the Deathbringer bars the way of any attackers trying to enter the [[Spire|Upper Spire]]. |
||
| + | Since the fall of the Bastion of Twilight, Yor'sahj the Unsleeping has eagerly assisted Deathwing, providing the Destroyer with the means to release more faceless ones from their prisons deep beneath the earth. Their numbers are endless and their power is beyond reckoning, and Yor'sahj intends to reap a grim reward for his faithful service. |
||
| − | == |
+ | ==Abilities== |
| + | [[Image:Stub.png|20px]] ''To be announced...'' |
||
| − | *{{abilities|Blood Link|Saurfang gains Blood Power from damage he inflicts with abilities and summoned creatures. Also increases his Energy by 1 each time Blood Link triggers.|id=72195|image=Spell DeathKnight BloodTap}} |
||
| − | **{{abilities|Blood Power|Saurfang grows 1% larger and deals 1% more damage for each point of Blood Power he has.|id=72371|image=Spell DeathKnight BloodPresence}} |
||
| − | *{{abilities|Blood Nova|Blood explodes outward from a random enemy target, inflicting 10,000 Physical damage to nearby enemies.|id=72438|image=Spell DeathKnight BloodBoil}} |
||
| − | *{{abilities|Boiling Blood|Boils the blood of an enemy, inflicting 9,500 Physical damage every 3 seconds for 24 seconds.|id=72442|image=Spell DeathKnight BloodBoil}} |
||
| − | *{{abilities|Call Blood Beast|Saurfang calls forth 5 blood beasts every 40 seconds.|id=72173|image=Spell Shadow Rune}} |
||
| − | *{{abilities|Frenzy|Saurfang goes into a frenzy, increasing his attack speed by 30%.|id=72737|image=Spell Shadow DeathPact}} |
||
| − | *{{abilities|Mark of the Fallen Champion|Causes Deathbringer Saurfang's melee attacks to splash to this target, inflicting 5,700 to 6,300 additional Physical damage. If the target dies while under this effect Saurfang is healed for 5% of his total health. Cannot be dispelled or removed by any means, including death.|id=72444|image=Spell DeathKnight BladedArmor}} |
||
| − | *{{abilities|Rune of Blood|Saurfang leeches health when he performs melee attacks on targets marked with Rune of Blood. Leeches 5,100 to 6,900 health from an enemy target and heals Saurfang for 10 times that amount. Lasts for 20 seconds.|id=72447|image=Spell DeathKnight DeathStrike}} |
||
| − | ===Blood Beast=== |
||
| − | *{{abilities|Resistant Skin|The skin of this creature is highly resistant. Damage from area of effect attacks is reduced by 95% and damage from Diseases is reduced by 70%.|id=72723|image=INV Misc LeatherScrap 11}} |
||
| − | |||
| − | ===Hard Mode=== |
||
| − | *{{abilities|Scent of Blood|Saurfang's Blood Beasts catch the scent of blood, reducing all nearby enemies movement speed by 80% and increasing their damage by 300% for 10 seconds.|id=72769|image=Spell Shadow FelMending}} |
||
| − | |||
| − | ==10-man Abilities== |
||
| − | *{{abilities|Blood Link|Saurfang gains Blood Power from damage he inflicts with abilities and summoned creatures. Also increases his Energy by 1 each time Blood Link triggers.|id=72195|image=Spell DeathKnight BloodTap}} |
||
| − | **{{abilities|Blood Power|Saurfang grows 1% larger and deals 1% more damage for each point of Blood Power he has.|id=72371|image=Spell DeathKnight BloodPresence}} |
||
| − | *{{abilities|Blood Nova|Blood explodes outward from a random enemy target, inflicting 10,000 Physical damage to nearby enemies.|id=72438|image=Spell DeathKnight BloodBoil}} |
||
| − | *{{abilities|Boiling Blood|Boils the blood of an enemy, inflicting 9,500 Physical damage every 3 seconds for 24 seconds.|id=72442|image=Spell DeathKnight BloodBoil}} |
||
| − | *{{abilities|Call Blood Beast|Saurfang calls forth 2 blood beasts every 40 seconds.|id=72173|image=Spell Shadow Rune}} |
||
| − | *{{abilities|Frenzy|Saurfang goes into a frenzy, increasing his attack speed by 30%.|id=72737|image=Spell Shadow DeathPact}} |
||
| − | *{{abilities|Mark of the Fallen Champion|Causes Deathbringer Saurfang's melee attacks to splash to this target, inflicting 5,700 to 6,300 additional Physical damage. If the target dies while under this effect Saurfang is healed for 5% of his total health. Cannot be dispelled or removed by any means, including death.|id=72444|image=Spell DeathKnight BladedArmor}} |
||
| − | *{{abilities|Rune of Blood|Saurfang leeches health when he performs melee attacks on targets marked with Rune of Blood. Leeches 5,100 to 6,900 health from an enemy target and heals Saurfang for 10 times that amount. Lasts for 20 seconds.|id=72447|image=Spell DeathKnight DeathStrike}} |
||
| − | ===Blood Beast=== |
||
| − | *{{abilities|Resistant Skin|The skin of this creature is highly resistant. Damage from area of effect attacks is reduced by 95% and damage from Diseases is reduced by 70%.|id=72723|image=INV Misc LeatherScrap 11}} |
||
==Strategy== |
==Strategy== |
||
| + | [[Image:Stub.png|20px]] ''To be announced...'' |
||
| − | Saurfang does hard [[enrage]] after 8 minutes. At 30% there's a soft enrage (Frenzy), [[DPS cooldowns]] are normally saved for that point (although some raids have success using them early, and thus delaying the first Mark as long as possible). |
||
| − | |||
| − | Mages can use [[Amplify Magic]] during this fight, as all of the damage is Physical. |
||
| − | |||
| − | === Blood Power === |
||
| − | Saurfang starts with 0 Blood Power. He can accumulate up to 100 in his Energy bar (akin to death knights). He gains Blood Power whenever one of his special attacks hits or ticks. When Blood Power reaches 100, he casts Mark of the Fallen Champion on a random raid member, resetting his Blood Power to 0. |
||
| − | |||
| − | Due to this mechanic, it's imperative to limit the amount of Blood Power he gains. The first Mark should be cast not before Saurfang is at 60% health or lower. |
||
| − | |||
| − | ===Tanking=== |
||
| − | Saurfang should be tanked right where he spawns. His melee damage is not high. Tanks must pay attention though that Saurfang doesn't gain Blood Power from {{abilities|Rune of Blood}}. If a tank gets it, another tank must quickly taunt and take over. The debuff lasts 20 seconds. |
||
| − | |||
| − | ===Positioning=== |
||
| − | The melee should stand right on Saurfang. Ranged damage dealers can stand closer to the boss, while healers should be furthest away. Healers need to be well spread out, so that all raid members are in range of several healers. |
||
| − | |||
| − | All non-melee raid members must stay at least 12 yards away from each other to avoid activating {{abilities|Blood Nova}}, a DoT that also causes other raid members within 12 yards of the affected player to take damage, which in turn rewards Saurfang with extra Blood Power. |
||
| − | |||
| − | ===Blood Beasts=== |
||
| − | Saurfang summons Blood Beasts every 35 seconds. In: |
||
| − | *25-player – five are summoned in a pentagon shape: one in front of him, two at his sides, and two behind. |
||
| − | *10-player – two are summoned: one left, one right. |
||
| − | Blood Beasts must be slowed and kited between ranged DPS because Saurfang gains Blood Power whenever a Blood Beast successfully deals melee damage to any player. |
||
| − | |||
| − | All damage dealers should avoid using [[AoE]] abilities, since Blood Beasts are resistant to AoE. Melee in particular should avoid using any multi-target abilities (such as [[Heart Strike]], [[Hammer of the Righteous]], or [[Divine Storm]]) in order to avoid drawing aggro; Blood Beasts that are not immediately kited off of the platform are likely to hit the melee (and in hard mode, one-shot them). |
||
| − | |||
| − | In addition to AoE resistance, Blood Beasts are immune to crowd-control effects such as polymorph and fear. You can and should, however, root, snare, slow, and stun them—being mindful not to root them near any raid members, especially right off the bat while they are still in range of the melee group. |
||
| − | |||
| − | Any class with a root, snare, or stun ability should use this macro whenever the Blood Beasts spawn: |
||
| − | #showtooltip |
||
| − | /tar Blood |
||
| − | /cast (Name of ability) |
||
| − | /tar Death |
||
| − | This immediately casts your ability and keeps you targeting Saurfang, minimizing DPS loss. |
||
| − | |||
| − | Since the Beasts typically go for those healers who are generating the most threat, healers should stand away from the boss and let ranged pick up the beasts. An alternate strategy is to have the healers stand on the platform among the melee, so that the Beasts are immediately picked up and pulled away by the ranged DPS. This alternate option works best for healers who can temporarily reduce aggro, such as a priest using [[Fade]]. |
||
| − | |||
| − | Ranged DPS should target the beast furthest away, and as soon as the beast gains aggro, switch away to another one. Ping-ponged between different ranged DPS prevents anyone from being hit in melee. Tanks can also help by taunting Beasts that are far away from melee, but close to their aggro target. If a Beast gets close to its aggro target, that target must run away and start kiting—do not let them hit anyone. |
||
| − | |||
| − | If the raid is too melee-heavy, it is possible to stunlock one Beast and kill it with melee, while the other beasts are kited by ranged. |
||
| − | |||
| − | ====Class-specific tactics==== |
||
| − | These abilities are particularly helpful for slowing down Blood Beasts: |
||
| − | |||
| − | *'''Death Knight''' (Unholy) – {{ability|Desecration}}, {{Ability|Chains of Ice}} |
||
| − | *'''Druid''' – {{Ability|Entangling Roots}}; Balance druids can also use {{Ability|Typhoon}} (without {{Item|Glyph of Typhoon}}) |
||
| − | *'''Hunter''' – {{ability|Frost Trap}} (without {{ability|Entrapment}}), which causes a Blood Beast to change targets and attacked the nearest player |
||
| − | *'''Mage''' – {{Ability|Frost Nova}} |
||
| − | *'''Paladin''' |
||
| − | **{{ability|Hammer of Justice}} – specced for {{ability|Improved Hammer of Justice}}, a Protection-specced Paladin can use {{ability|Hammer of Justice}} on one Blood Beast every time they spawn since the cooldown will match the spawn time. |
||
| − | **{{ability|Righteous Fury}} – Holy Paladins can stand in the back center and activate this to gain initial aggro on the Blood Beasts, allowing ranged DPS to pick them up as the Beasts move off of the platform. |
||
| − | *'''Priest''' (Shadow) – {{Ability|Mind Flay}}. Priests can quickly cast {{Ability|Vampiric Touch}} and {{Ability|Shadow Word: Pain}} on a Beast as soon as it spawns, then begin flaying. |
||
| − | *'''Rogue''' – {{ability|Feint}} can greatly reduce the damage they take from Mark of the Fallen Champion, which is considered AoE damage. |
||
| − | *'''Shaman''' |
||
| − | **{{Ability|Thunderstorm}} without {{Item|Glyph of Thunderstorm}} |
||
| − | **{{ability|Chain Lightning}} does not count as AoE versus Blood Beasts, so an elemental shaman can pull up to four of the beasts with one cast (if glyphed and no charge hits Saurfang). |
||
| − | **{{ability|Earthbind Totem}} – with talents, this ability can root several beasts at once. |
||
| − | *'''Warlock''' (Destruction) – {{ability|Shadowfury}} |
||
| − | |||
| − | ====Alternate Strategy==== |
||
| − | An alternative to having ranged DPS simply kite Blood Beasts in their direction, is to have them pulled back and forth between ranged and melee, with melee taunting, or a Death Knight using {{ability|Death Grip}}. This is viable in both 10- and 25-player encounters. |
||
| − | |||
| − | === Boiling Blood === |
||
| − | Saurfang casts {{abilities|Boiling Blood}} on random raid members. This can simply be healed through, although every tick grants Blood Power. {{ability|Blessing of Protection}} will remove this debuff, though it is usually only needed in Hard Mode on a player afflicted with {{abilities|Mark of the Fallen Champion}}. |
||
| − | |||
| − | ===Mark of the Fallen Champion=== |
||
| − | Whenever Saurfang gains 100 Blood Power, he casts {{abilities|Mark of the Fallen Champion}} on a random raid member. This debuff inflicts heavy damage (about 6,000 per second in 25 player). When a player with a Mark dies, this heals Saurfang about 5%. The Mark persists through death—''do not combat rez a player that dies from it''. |
||
| − | |||
| − | A good healer can handle about two active Marks if focusing exclusively on the Mark targets. Two active Marks in 10 player generally lead to a wipe, in 25 players more than 8 Marks is probably too much. |
||
| − | |||
| − | It may be a viable tactic to let the Mark of the Fallen Champion victims die. It's much easier to deal an extra 5% damage to Saurfang than to heal the Mark victim and deal with the increased frequency of future Marks. There are diminishing returns however, as living DPS are required to take down the Blood Beasts. |
||
| − | |||
| − | ===Heroic Mode=== |
||
| − | The primary differences of Heroic mode are Blood Beasts catching {{abilities|Scent of Blood}} 5 seconds after spawning, reducing the movement speed of the entire raid by 80% for 10 seconds, and Saurfang healing for 20% HP upon a mark of the fallen champion death. His blood power gain is also much faster compared to normal (Beasts give 5 Blood Power per melee hit. Rune of Blood gives 3 Blood Power per hit). Blood Beasts will also hit hard enough to one shot any non tank. |
||
| − | |||
| − | On a first kill, prepare for at least two marks on 10-man and six marks on 25-man (the number of marks you get will naturally decrease as you get better geared and/or when zone-wide buff increases). Assign one dedicated healer per mark. If healers are struggling towards the end of the fight, they can stop healing one of the tanks because of the mechanics of {{abilities|Rune of Blood}}. |
||
| − | |||
| − | ===Resetting=== |
||
| − | If it is clear that a Saurfang fight is not going well, it is possible to reset him and avoid a potential wipe by having everyone run back to the gunship. |
||
==Loot== |
==Loot== |
||
| + | [[Image:Stub.png|20px]] ''To be announced...'' |
||
| − | {{:Deathbringer's Cache}} |
||
==Quotes== |
==Quotes== |
||
| + | [[Image:Stub.png|20px]] ''To be announced...'' |
||
| − | ;Intro as Alliance |
||
| − | :{{text|yell|Deathbringer Saurfang|For every Horde soldier that you killed, for every Alliance dog that fell, the [[Lich King]]'s armies grew. Even now the [[Val'kyr]] work to raise your fallen... As [[Scourge]].}} |
||
| − | :{{text|yell|Deathbringer Saurfang|Things are about to get much worse. Come, taste the power that the Lich King has bestowed upon me!}} |
||
| − | :{{text|yell|Muradin Bronzebeard|A lone orc, against the might of the Alliance? Charge!}} |
||
| − | :{{text|yell|Deathbringer Saurfang| Hahahaha! Dwarves.}} |
||
| − | :''Deathbringer Saurfang immobilises Muradin and his guards.'' |
||
| − | |||
| − | ;Intro as Horde |
||
| − | :{{text|yell|High Overlord Saurfang|Kor'kron, move out! [[Adventurer|Champions]], watch your backs. The Scourge have been...}} |
||
| − | :{{text|yell|Deathbringer Saurfang|Join me, father. Join me and we will crush this world in the name of the Scourge -- for the glory of the Lich King!}} |
||
| − | :{{text|say|High Overlord Saurfang|My boy died at [[Angrathar the Wrathgate|the Wrath Gate]]. I am here only to collect his body.}} |
||
| − | :{{text|yell|Deathbringer Saurfang|Stubborn and old. What chance do you have? I am stronger, and more powerful than you ever were.}} |
||
| − | :{{text|say|High Overlord Saurfang|We named him Dranosh. It means "Heart of Draenor" in [[orcish]]. I would not let the [[History of the Horde#Rise of the Horde|warlocks take him]]. My boy would be safe, hidden away by the elders of [[Garadar]].}} |
||
| − | :{{text|say|High Overlord Saurfang|I made a promise to his mother before she died; that I would cross the [[Dark Portal]] alone - whether I lived or died, my son would be safe. [[Blood Curse|Untainted]]...}} |
||
| − | :{{text|say|High Overlord Saurfang|Today, I fulfill that promise.}} |
||
| − | :{{text|emote|High Overlord Saurfang charges!}} |
||
| − | :{{text|yell|Deathbringer Saurfang|Pathetic old orc. Come then heroes. Come and face the might of the Scourge!}} |
||
| + | ==References== |
||
| − | ;Aggro |
||
| + | {{Reflist}} |
||
| − | *{{text|yell|BY THE MIGHT OF THE LICH KING!}} |
||
| + | ==Patches and hotfixes== |
||
| − | ;Casting Mark of the Fallen Champion |
||
| + | *{{Patch 4.3.0|note=Added.}} |
||
| − | *{{text|yell|The ground runs red with your blood!}} |
||
| − | |||
| − | ;Summoning Blood Beasts |
||
| − | *{{text|yell|Feast, my minions!}} |
||
| − | |||
| − | ;Killing a player |
||
| − | *{{text|yell|You are nothing!}} |
||
| − | *{{text|yell|Your soul will find no redemption here!}} |
||
| − | |||
| − | ;Berserk |
||
| − | *{{text|yell|I have become...DEATH!}} |
||
| − | |||
| − | ;Death |
||
| − | *{{text|yell|I... Am... Released.}} |
||
| − | |||
| − | ;Outro as Alliance |
||
| − | :{{text|emote|Muradin Bronzebeard gasps for air.}} |
||
| − | :{{text|say|Muradin Bronzebeard|That was Saurfang's boy - the Horde commander at the Wrath Gate. Such a tragic end...}} |
||
| − | :{{text|say|Muradin Bronzebeard|What in the... There, in the distance!}} |
||
| − | :''A Horde Zeppelin flies up to the rise'' |
||
| − | :{{text|yell|Muradin Bronzebeard|Soldiers, fall in! Looks like the Horde are comin' in to take another shot!}} |
||
| − | :''The Zeppelin docks, and High Overlord Saurfang hops out, confronting the Alliance soldiers and Muradin'' |
||
| − | :{{text|say|Muradin Bronzebeard|Don't force my hand, orc. We can't let you pass.}} |
||
| − | :{{text|say|High Overlord Saurfang|Behind you lies the body of my only son. Nothing will keep me from him.}} |
||
| − | :{{text|say|Muradin Bronzebeard|He... I can't do it. Get back on [[Orgrim's Hammer|your ship]] and we'll spare your life.}} |
||
| − | :''A mage portal from Stormwind appears between the two and Varian Wrynn and Jaina Proudmoore emerge'' |
||
| − | :{{text|say|King Varian Wrynn|Stand down, Muradin. Let a grieving father pass.}} |
||
| − | :''High Overlord Saurfang walks over to his son and kneels before his son's body.'' |
||
| − | :{{text|say|High Overlord Saurfang|[Orcish] No'ku kil zil'nok ha tar.}} |
||
| − | :''Higher Overlord Saurfang picks up the body of his son and walks over towards Varian'' |
||
| − | :{{text|say|High Overlord Saurfang|I will not forget this kindess. I thank you, highness.}} |
||
| − | :{{text|say|King Varian Wrynn says|I... I was not at the Wrathgate. But the soldiers who survived told me much of what happened. Your son fought with honor. He died a hero's death. He deserves a hero's burial.}} |
||
| − | :{{text|emote|Lady Jaina Proudmoore cries.}} |
||
| − | :{{text|say|King Varian Wrynn says|Jaina, why are you crying?}} |
||
| − | :{{text|say|[[Jaina Proudmoore|Lady Jaina Proudmoore]]|It was nothing, your majesty. Just... I'm proud of my king.}} |
||
| − | :{{text|say|King Varian Wrynn says|Muradin, secure the deck and prepare our soldiers for an assault on the Upper Citadel. I'll send out another regiment from [[Stormwind]].}} |
||
| − | :{{text|say|Muradin Bronzebeard says|Let's get the move then. Move out!}} |
||
| − | |||
| − | ;Outro as Horde |
||
| − | :{{text|emote|High Overlord Saurfang coughs.}} |
||
| − | :{{text|emote|High Overlord Saurfang weeps over the corpse of his son.}} |
||
| − | :{{text|say|High Overlord Saurfang|You will have a proper ceremony in [[Nagrand]] next to the pyres of your mother and ancestors.}} |
||
| − | :{{text|say|High Overlord Saurfang|Honor, young heroes... no matter how dire the battle... Never forsake it!}} |
||
| − | |||
| − | ==Videos== |
||
| − | <!--Any new videos displayed full frame must displace an existing full-frame video, and be able to justify displacing the old one. Placed displaced video in the video links section. New videos can be added to the links section with much more leniency. Do not add standard "boss kill" videos; they should provide a verbal narrative, in-video text, or describe things not found in the "base mode" videos. This is not the place to show off your guild's boss kill.--> |
||
| − | ===10-player Normal encounter=== |
||
| − | <!--Do not remove this notice. This section already has 2 embedded videos--do not add a new video here; replace a video only after reading the video-inclusion policy in the Videos section, above.--> |
||
| − | *Lost Society, text-in-video guide. |
||
| − | *Tremor's Strategy, narrated video guide. |
||
| − | <youtube>hzjfMg1t4-o</youtube> |
||
| − | <youtube>FsOGFWLRDXs</youtube> |
||
| − | |||
| − | ===10-player Heroic encounter=== |
||
| − | <!--Do not remove this notice. This section already has 2 embedded videos--do not add a new video here; replace a video only after reading the video-inclusion policy in the Videos section, above.--> |
||
| − | *Lost Society, text-in-video guide. |
||
| − | <youtube>pHuLH72_dhw</youtube> |
||
| − | |||
| − | ===25-player Normal encounter=== |
||
| − | <!--Do not remove this notice. This section already has 2 embedded videos--do not add a new video here; replace a video only after reading the video-inclusion policy in the Videos section, above.--> |
||
| − | *Tankspot, narrated guide. |
||
| − | *Tofu Council, text-in-video guide. |
||
| − | <youtube>zJGlNCxfgPs</youtube> |
||
| − | <youtube>MazRaNehskY</youtube> |
||
| − | |||
| − | ===25-player Heroic encounter=== |
||
| − | <!--Do not remove this notice. This section already has 2 embedded videos--do not add a new video here; replace a video only after reading the video-inclusion policy in the Videos section, above.--> |
||
| − | *Lost Society (Shattered Halls-Eu) 25-player heroic, text-in-video guide with audible vent |
||
| − | *Learn2playwow, narrated guide. |
||
| − | <youtube>LSXsYGrPSkw</youtube> |
||
| − | <youtube>RdqBBmwwWkA</youtube> |
||
| − | |||
| − | ===Additional videos=== |
||
| − | ====10-Player==== |
||
| − | {{elink|type=youtube|link=http://www.youtube.com/watch?v=RkNCMuH-6Ys|desc=Tofu Council (Blackrock-US) 10-player, text-in-video guide}} |
||
| − | {{elink|type=youtube|link=http://www.youtube.com/watch?v=wD9OJtC1kAQ|desc=Renaissance (Anachronos-EU) 10-player, text-in-video guide}} |
||
| − | {{elink|type=youtube|link=http://www.youtube.com/watch?v=J9JmXDqXIno|desc=Night Shift (Undermine-US) 10-player, alternate method showing tank picking up Blood Beasts, no kiting}} |
||
| − | {{elink|type=youtube|link=http://www.youtube.com/watch?v=KjVS2umRsg4|desc=Shadows Embrace 10-player, tank PoV}} |
||
| − | ====25-Player==== |
||
| − | {{elink|type=youtube|link=http://www.youtube.com/watch?v=gNVzY1C27ow|desc=Lost Society (Shattered Halls-Eu) 25-player, audible in-game audio and Vent with text guide/ strategy for the encounter.}} |
||
| − | {{elink|type=youtube|link=http://www.youtube.com/watch?v=zAUcrT78wko|desc=Shattered Oath (Emerald Dream-US) 25-player, audible in-game audio and Vent; no music.}} |
||
| − | {{elink|type=youtube|link=http://www.youtube.com/watch?v=HWbCoDtKQA4|desc=Active Gaming (Silvermoon-EU) narrated guide.}} |
||
| − | {{elink|type=youtube|link=http://www.youtube.com/watch?v=xrYUjoDcDFA|desc=Renaissance (Anachronos-EU) 25-player, no text/narrative; metal music soundtrack overlay.}} |
||
| − | {{elink|type=youtube|link=http://www.youtube.com/watch?v=w_J5C7fiIXI|desc=Forlorn Legacy (Windrunner-US) 25-player, music soundtrack.}} |
||
| − | {{elink|type=youtube|link=http://www.youtube.com/watch?v=CMXZMZBrXLs|desc=Wolves of War (Draka-US) 25-player heroic mode, in-game audio and Vent. Player communication provides information on some strategy on dealing with Mark targets.}} |
||
| − | {{elink|type=youtube|link=http://www.youtube.com/watch?v=HWbCoDtKQA4|desc=learn2playwow, narrated guide.}} |
||
| − | ====25-Player Heroic==== |
||
| − | {{elink|type=youtube|link=http://www.youtube.com/watch?v=4MGi_uD5dAQ|desc=Virulence (Kilrogg-US) 25 player heroic, music soundtrack.}} |
||
| − | {{elink|type=youtube|link=http://www.youtube.com/watch?v=dj8BIDFe-Hs|desc=Unleash (Blutkessel-EU), fury warrior PoV}} |
||
| − | {{elink|type=youtube|link=http://www.youtube.com/watch?v=6sVE0yJ-6qs|desc=Midwinter (Ysera-US)}} |
||
| − | |||
| − | ==Trivia== |
||
| − | *The Horde Intro is reminiscent of the famous [[wikipedia:Star Wars|Star Wars dialogue]] between Luke and Darth Vader, except that the roles of the evil father and the good son are reversed. |
||
| − | *His berserk quote is reminiscent of the infamous "Now I am become Death, the destroyer of worlds." This passage from the [[wikipedia:Bhagavad Gita|Bhagavad Gita]] (Hindu scriptures), was most famously quoted by [[wikipedia:J. Robert Oppenheimer|Robert Oppenheimer]], designer of the nuclear bomb, when the bomb was detonated in [[wikipedia:Trinity (nuclear test)|its first successful test]]. |
||
| − | |||
| − | ==Related achievements== |
||
| − | {|class="darktable zebra" |
||
| − | ! 10-player mode !! 25-player mode !! Objective |
||
| − | |- |
||
| − | |{{achievementlong|I've Gone and Made a Mess (10 player)|I've Gone and Made a Mess}} |
||
| − | |{{achievementlong|I've Gone and Made a Mess (25 player)|I've Gone and Made a Mess}} |
||
| − | |Defeat the Deathbringer before Mark of the Fallen Champion is cast three/five times |
||
| − | |- |
||
| − | |{{achievementlong|Storming the Citadel (10 player)|Storming the Citadel}} ({{achievement|Heroic: Storming the Citadel (10 player)|Heroic}}) |
||
| − | |{{achievementlong|Storming the Citadel (25 player)|Storming the Citadel}} ({{achievement|Heroic: Storming the Citadel (25 player)|Heroic}}) |
||
| − | |Defeat the first four bosses in Icecrown Citadel |
||
| − | |} |
||
| − | |||
| − | ==Gallery== |
||
| − | <gallery> |
||
| − | File:Deathbringer Saurfang.JPG|PTR model |
||
| − | File:Saurfang Claims His Son's Body.jpg|After the Deathbringer is killed, Varok Saurfang comes to claim his son's body |
||
| − | </gallery> |
||
| − | |||
| − | == Patch changes == |
||
| − | * {{Patched|date=2010-03-04|bluenote=In the Deathbringer Saurfang encounters, the boss is now less likely to cast Blood Nova on targets affected by Mark of the Fallen Champion.|link=http://blue.mmo-champion.com/23/23425638763-recent-ingame-fixes--march-2010--34.html}} |
||
| − | * {{Patched|date=2010-02-05|bluenote=Deathbringer Saurfang should gain blood power less rapidly in normal 10 and normal 25 player modes and players can also no longer zone in while this encounter is active.|link=http://blue.mmo-champion.com/23/22748763261-recent-ingame-fixes--february-2010--23.html}} |
||
| − | * {{Patch 3.3.2|date=2010-02-02|note=Deathbringer Saurfang will no longer gain blood power from Mark of the Fallen Champion. In addition, mitigation abilities such as [[Power Word: Shield]] will no longer prevent blood power generation.}} |
||
| − | * {{Patched|date=2009-12-16|bluenote=Deathbringer Saurfang's Rune of Blood has been modified to heal 10 times the amount of damage dealt instead of 5 times the damage. This will make the encounter more difficult if you try to tank Saurfang with just one character. The tooltip does not reflect this change, but it will in a future patch.|link=http://blue.mmo-champion.com/12/21971507971-deathbringer-saurfang-hotfix.html}} |
||
| − | * {{Patch 3.3.0|note=Added.}} |
||
| − | |||
| − | ==References== |
||
| − | {{reflist}} |
||
==External links== |
==External links== |
||
| − | <!-- Read http://www. |
+ | <!-- Read http://www.wowpedia.org/Wowpedia:External_links before posting your links here. |
Links that do not conform to the rules will be DELETED. |
Links that do not conform to the rules will be DELETED. |
||
Repeat violations may result in a BAN. |
Repeat violations may result in a BAN. |
||
Have a nice day. :) --> |
Have a nice day. :) --> |
||
| − | {{elinks-NPC| |
+ | {{elinks-NPC|}} |
| − | {{elink|type=bosskillers|link=http://www.bosskillers.com/cgi-bin/bbguild/index.cgi?action=view_guide&guide_id=730|site=Bosskillers|desc=Full strategy guide with diagrams}} |
||
| − | {{Elink|type=wowjuju|site=WoWJuju|link=http://www.wowjuju.com/guides/deathbringer-saurfang-guide-1235/|desc=Stats, abilities and strategy for Deathbringer Saurfang.}} |
||
| − | {{elink|type=todowow|link=http://todowow.com/ciudadela-jefes/gunship-battle-la-gran-entrada-a-la-ciudadela/|site=Todowow|desc=Guía del Fansite oficial Español}} |
||
| − | |||
| + | [[Category:Faceless ones]] |
||
| − | {{DEFAULTSORT:Saurfang, Deathbringer}} |
||
| − | [[Category:Icecrown Citadel mobs]] |
||
[[Category:Bosses]] |
[[Category:Bosses]] |
||
| + | [[Category:The Dragon Soul mobs]] |
||
Revision as of 02:21, 20 September 2011
Not yet implemented!
|
 | ||||||||
| Race | Faceless one | |||||||
| Level | ?? Boss | |||||||
| Location | Dragon Soul | |||||||
| ||||||||
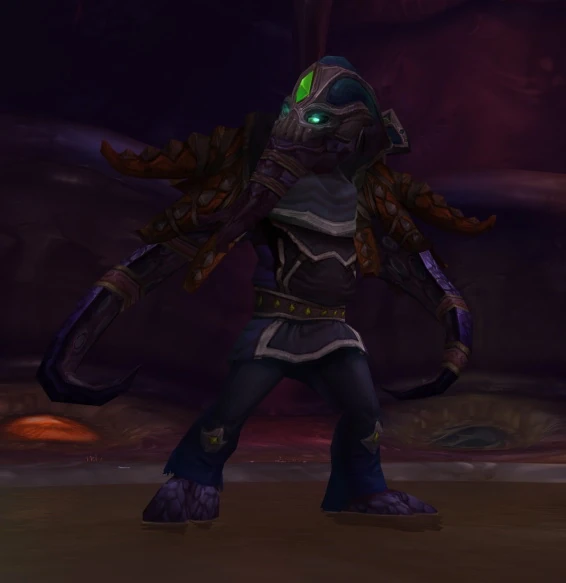
Yor'sahj the Unsleeping is the third boss to appear in the Dragon Soul raid.[1]
Background
Since the fall of the Bastion of Twilight, Yor'sahj the Unsleeping has eagerly assisted Deathwing, providing the Destroyer with the means to release more faceless ones from their prisons deep beneath the earth. Their numbers are endless and their power is beyond reckoning, and Yor'sahj intends to reap a grim reward for his faithful service.
Abilities
![]() To be announced...
To be announced...
Strategy
![]() To be announced...
To be announced...
Loot
![]() To be announced...
To be announced...
Quotes
![]() To be announced...
To be announced...
References
Patches and hotfixes
 Patch 4.3.0 (2011-11-29): Added.
External links
No NPC ID specified. Please edit this article and add it.