Alatur1593@legacy41523088 (talk | contribs) m (→Quotes) |
Darksora110 (talk | contribs) (→Quotes) |
||
| Line 1: | Line 1: | ||
{{npcbox |
{{npcbox |
||
| − | |name= |
+ | |name = Murozond |
| + | |title = The Lord of the Infinite |
||
| − | |image=Broodlord Lashlayer.jpg |
||
| + | |image = Murozond2.jpg |
||
| ⚫ | |||
| + | |race = Infinite wyrm |
||
| ⚫ | |||
| ⚫ | |||
| − | |location=Blackwing Lair |
||
| ⚫ | |||
| − | |race=Drakonid |
||
| ⚫ | |||
| ⚫ | |||
| + | |location = [[Bronze Dragonshrine]], [[Dragonblight]] |
||
| − | |faction=Combat |
||
| − | | |
+ | |faction = Combat |
| + | |health = 18,258,680 |
||
| − | |affiliation=[[Black dragonflight]] |
||
| − | | |
+ | |mana = 931,000 |
| + | |relatives = [[Nozdormu]] (past self) |
||
| − | |instance= |
+ | |instance=End Time |
| ⚫ | |||
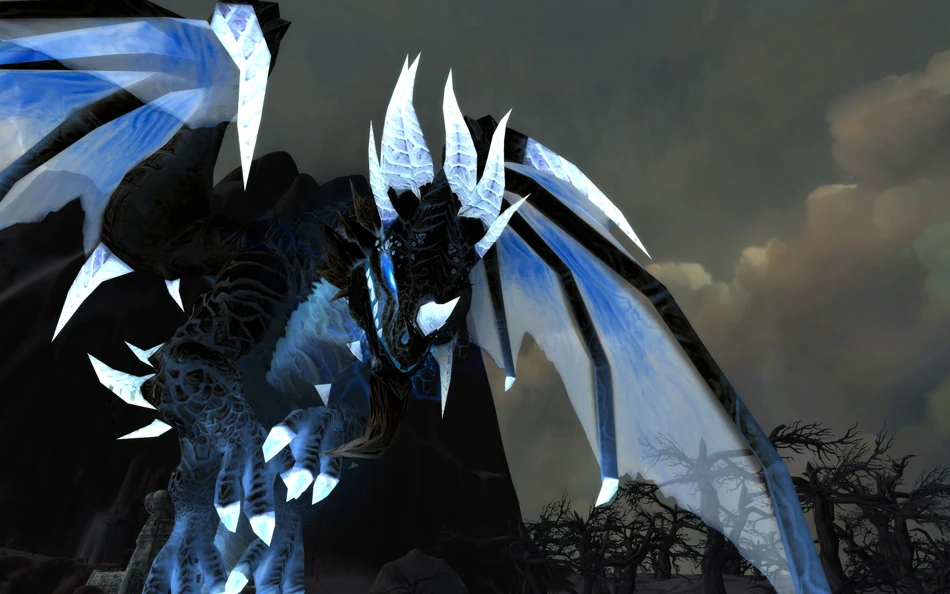
| + | '''Murozond''' is a future counterpart of Aspect of Time, [[Nozdormu]], leader of the [[Infinite dragonflight]] and a final boss to appear in the [[End Time]] instance. Using the Hourglass of Time, he managed to interfere with his past counterpart's efforts to send heroes to the past, which would result in a change of the bleak future, in which the maddened wyrm made his lair. |
||
| − | '''Broodlord Lashlayer''' is a Black [[Drakonid]] in [[Nefarian]]'s service who resides in [[Blackwing Lair]], after [[Vaelastrasz the Corrupt]] and before [[Firemaw]]. |
||
| + | Now living outside of time, Murozond was once the great Dragon Aspect Nozdormu the Timeless One. After the titans showed him his own death, the tormented Nozdormu was tricked by the Old Gods into trying to subvert his mortality. As a result, Nozdormu shattered the timeways and created the infinite dragonflight... jeopardizing the very future of Azeroth.<ref>[[Encounter Journal]]</ref> |
||
| − | ==Background== |
||
| − | Broodlord Lashlayer guards the Halls of Strife, blocking the way into Nefarian's inner sanctum. |
||
| + | ==Abilities== |
||
| − | Broodlord Lashlayer is another boss in a long line of interesting and dynamic boss fights. Though more straight forward than Razorgore and less touchy than Vael, Broodlord is still a very chaotic and engaging encounter. Though the actual fight with the Broodlord can and should be relatively free of adds, the entire encounter begins long before you ever lay eyes on him. |
||
| + | *{{abilities|Temporal Blast|Murozond deals 25000 Shadow damage to all nearby enemies and increases their Arcane damage taken by 10% for 20 sec..|image=spell_shadow_unstableafllictions}} |
||
| + | *{{abilities|Distortion Bomb|Murozond launches an orb of temporal energy at the location of a random player. When the orb reaches this location, it explodes and leaves an 8 yard radius area of temportal distortion. The distortion area inflicts 25000 Arcane damage every second to all enemies standing within the area.|image=inv_misc_orb_04}} |
||
| + | *{{abilities|Infinite Breath|Inflicts 75000 Fire damage to all enemies in front of the caster.|image=ability_warlock_shadowflame}} |
||
| + | ===Nozdormu=== |
||
| − | ==The Suppression Rooms== |
||
| + | Nozdormu is unable to assist the players directly, but grants them the Blessing of the Bronze Dragonflight. |
||
| − | [[Image:Supressionroom.jpg|thumb|Suppression Room]] |
||
| + | *{{abilities|Blessing of the Bronze Dragonflight|Blesses the target with the power of the Bronze Dragonflight. Melee, ranged, and spell casting speed is increased by 40%. Movement speed increased by 40%.|image=inv_misc_head_dragon_bronze}} |
||
| − | The first room contains two groups of dragonkin, which we call a [[Death Talon Pack]]. Once the Death Talon Packs have been cleared, your path leads up some stairs and to a pair of interconnected Suppression Rooms. |
||
| + | ===Hourglass of Time=== |
||
| − | Much of the challenge in the Broodlord encounter is embodied by the two mob-infested "suppression" rooms that must be traversed before the fight actually begins. Each room is littered with suppression traps, which must be disarmed by rogues. Guarding the traps are a colorful galaxy of non-elite dragon whelps that must be AoE'd down by Mages and Warlocks, which respawn after 30 seconds. Both rooms also have their own sets of patrolling elite humanoids and [[Death Talon Hatchers]], which respawn on a 20 minute timer. When the suppression traps are up, they radiate an aura that reduces movement speed, attack speed, and casting speed, to 20%. |
||
| + | [[File:Hourglass of time.jpg|thumb|The Hourglass of Time]] |
||
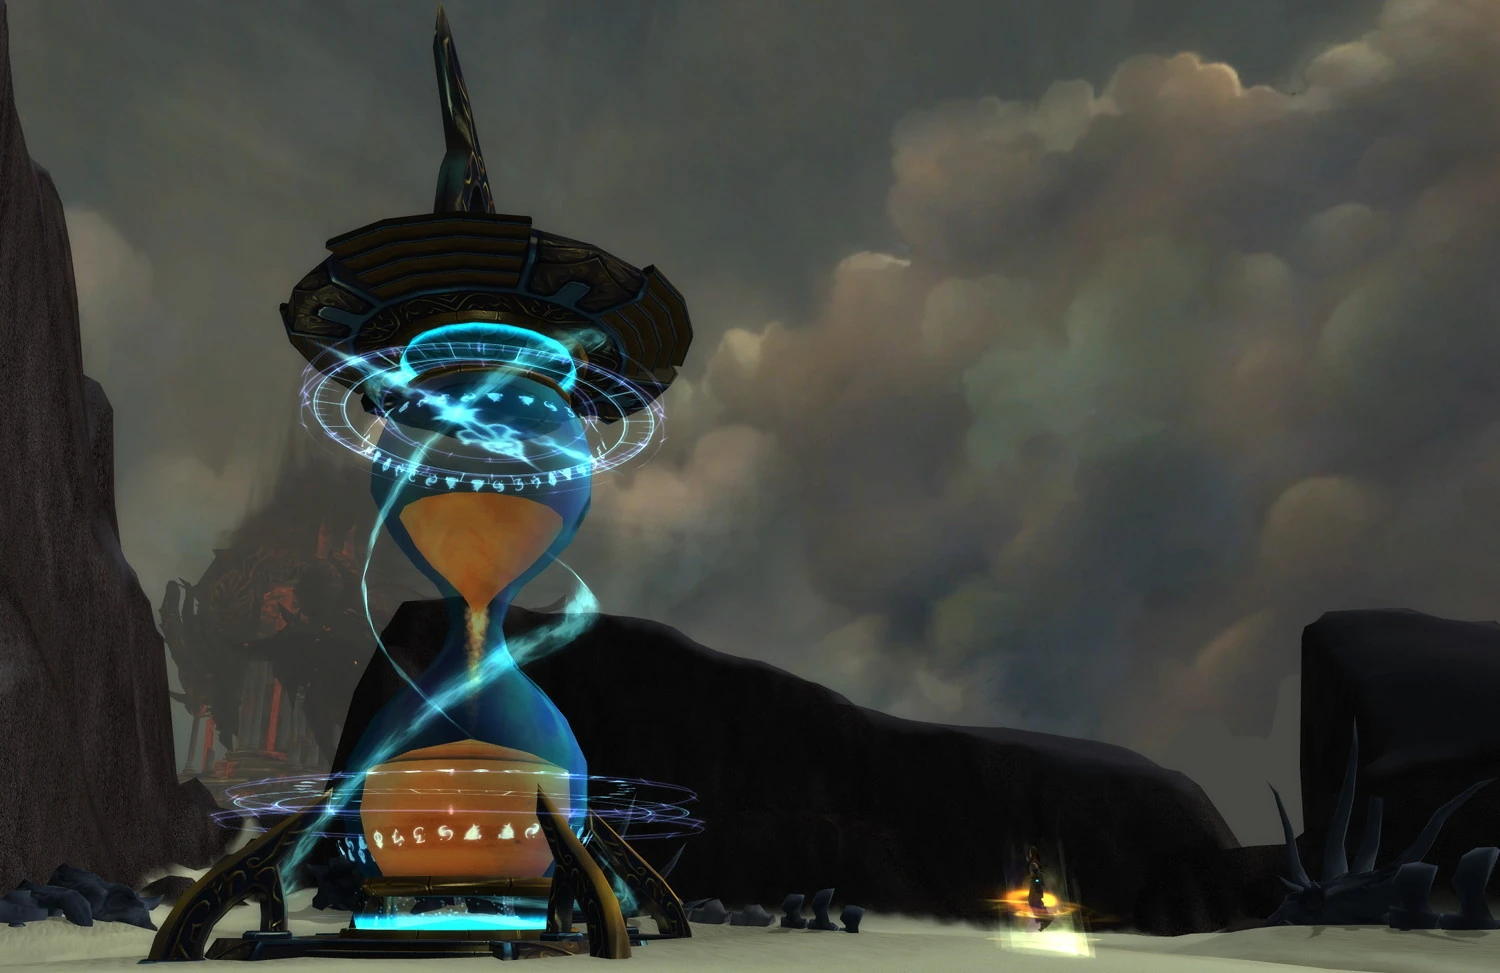
| + | Murozond stole the Hourglass of Time and trapped it here within the End Time of Azeroth. The Hourglass casts Rewind Time when a player interacts with it, but the Hourglass can only be used up to five times during the encounter. |
||
| + | *{{abilities|Rewind Time|The Reverse Time effect rewinds everything back to the beginning of the encounter. The reversal restores each players' health and mana, then resets all of their ability cooldowns. The reversal also removes all Distortion Bombs.}} |
||
| ⚫ | |||
| − | Rogues in this portion of the encounter should be doing nothing but disarming traps. Their job is to remain in stealth and move around disarming traps so that the raid can pass through unhindered. Distract should be used as much as possible to prevent the mobs from detecting the rogues' stealth. Disarmed traps pop back up after what seems to be a random amount of time. If this is the case with a trap that the raid is near, it must be guarded and disarmed again until it is safe to leave. Please note also that from the moment a trap pops back up, it takes a second until it may be disarmed again. This process takes just long enough that the trap can release a suppression aura before it is disarmed. |
||
| + | Murozond is a DPS race with a unique hourglass mechanic. The overall strategy is to kill the boss before the hourglass runs out of charges and damage becomes unhealable. Timely use of the hourglass can trivialize this boss greatly. |
||
| + | One key detail for all players to remember is that ability cooldowns are reset each time the hourglass is used and it is highly recommended players use all their cooldowns every time they are up. Abilities like [[Mirror Image]], [[Avenging Wrath]] and [[Rapid Fire]] are all good examples, but also major defensive cooldowns like [[Shield Wall]], [[Divine Guardian]], [[Army of the Dead]] and [[Tranquility]] are reset with each use of the hour glass as well. All debuffs are also wiped from players allowing reuse of [[Bloodlust]]/[[Heroism]]/[[Time Warp]] as well (Note, it does not reset a Core Hound's [[Ancient Hysteria]]), it is recommended to wait for the Blessing of the Bronze Dragonflight to fade before use to maximize the longevity of the haste. A final benefit of the hourglass is all dead players are brought back to life with each use. |
||
| − | Also important is keeping mages and warlocks alive to keep the dragon whelps under control. Hunters will be the main source of DPS against elites as caster mana must focused on killing whelps. Mages should have Mage Armor active to allow some regeneration of mana during their AoEs, and should drop to wandshots when their mana is low. It is also a good idea to make sure mages have different types of wand damage as each color whelp is resistant to different types of magic. |
||
| + | Murozond needs to be faced away from the group, but positioning can quickly become compromised from Distortion Bombs. Healers need to ensure they can stay in range of tanks as best as possible while keeping DPS alive. Hourglass use should be assigned to the ranged DPS, Mages are a great choice for this because of [[Blink]]. Players should stay away from the hourglass until they are about to use it to avoid getting Distortion Bombs placed near it. If done well, Murozond will die on the fourth or final use of the hourglass, depending on your group's overall DPS. |
||
| − | The first suppression room is naturally the easiest, as elites can be pulled out of the suppression traps and effectively tanked in a spot that isn't being hit with periodic suppression auras. Packs should be pulled so that there is only one dragonkin left. At this point, the raid must move itself to the far southwest corner of the room, with everyone positioned so that only the nearby pack of whelps aggroes when they respawn. The time between respawns is when mages and healers can stop to regen their mana/health as well as res any fallen players who would otherwise simply be left behind. |
||
| + | The player assigned to activate the hourglass should wait until one of the following conditions occurs: |
||
| − | After the last dragonkin is pulled and killed, the raid moves into the hallway that connects the two suppression rooms. From this spot, the raid must destroy more groups of elites until it is safe to move into the southeast corner of the final suppression room. From here, the remaining elites are cleared and the raid moves into one of the cubby holes to prepare to pull Broodlord. Casters should drink whenever possible and healers should attempt to resurrect anyone that dies whenever they have time. |
||
| + | * The tank or healer dies |
||
| + | * The number of Distortion areas makes it hard for DPS to stay in range of Murozond. |
||
| + | * The hourglass activator is at imminent risk of death, with no player available as backup to activate the hourglass |
||
| + | Fallen players should not release when dying before all hourglasses are consumed, since the hourglass will return the player to their living state. Battle resurrections reset their cooldowns as well, but rarely have much utility in this fight. |
||
| ⚫ | |||
| − | The encounter with Broodlord, like all encounters in the instance, seems to have several ways it can be accomplished. Positioning is key, as is how fast your groups elects to dish out the punishment. Broodlord has four main attacks that you are going to need to deal with. Where your party decides to tank him and where your "camp" is positioned is very important due to his abilities and due to the rigors of the environment (unavoidable suppression traps and repopping dragonlings.) |
||
| ⚫ | |||
| − | * He does a Blastwave / AoE Knockback similar to the Scholomance Handlers (in the undead dragonkin room). It is fire based and does quite a hefty amount of damage. |
||
| + | {{:Murozond's Temporal Cache}} |
||
| − | * Like most nasty bosses, he has a cleave that your cloth wearers are going to want to avoid. While not as nasty as Vael's, it's still pretty nasty. |
||
| − | * Possibly the most problematic attack that Broodlord has is an ungodly Mortal Strike that he will do frequently on your Main Tank. This can crit for up to 8000 damage on plate and 15000+ on cloth. It also leaves the MS debuff that reduces healing, which is Not Good. It is recommended that priests power word shield the tank when he applies the MS debuff. |
||
| − | * The trickiest part of Broodlord is a single target knockback that he will do on whomever is highest on his threat list. After he knocks a target back, that target's aggro is reduced by 50%. Over the course of this fight, he will do this repeatedly on all of your tanks. The challenge of this fight is then killing him before your cloth's aggro crests over your tank's aggro and he cannot be brought back under control but not doing so much damage that he loses tank aggro early. There are several different strats dealing with this including the "Wand Method" which is doing as little damage as possible over time but before he aggros on healers, the "DPS Method" in which he is Nuked into oblivion before aggro ever becomes a problem and the "Wave Method" where DPS is modulated every time he switches aggro to a new tank. Since 1.9.3 it is no longer possible to have an OOC resser so suiciding DPS and healers is no longer an option. |
||
| − | |||
| − | ==Notes== |
||
| − | * In this fight, aggro management and DPS modulation is everything. Aggro reducing talents for Mages, Priests and Warlocks (down the demonology tree) make a huge difference and should be considered if the raid is having problems. Ruin and other crit talents for classes like Warlocks who have poor aggro management should be considered carefully as spiked burst damage is detrimental in this encounter. Warlocks who refuse to drop Ruin can be made to DoT or Wand for this encounter to help normalize their damage. Rogues and Hunters should be using their aggro reducing talents and using [[Vanish]] or [[Feign Death]] at every available opportunity. |
||
| − | * This fight almost requires tanking warriors (of which you should have several) to have plenty of defense and AC. Though the raid may not be big on consumables, [[Flask of the Titans|Flasks of the Titans]] and potions that increase AC and Health are a huge help in this fight as Broodlord's Mortal Strike can and will one-shot a tank with less than 8,000 health if it crits (it is rumored that a mob's special abilities can't crit as of Patch 1.8). An unfortunate MS and Blastwave in quick succession spells almost certain doom for tanks with low AC, Defense and Health. |
||
| − | * All healing should be eyes-forward and focused on the tanks. Rogues should be prepared, if needed, to step back and bandage. Timing it so the Main Tank gets a [[Power Word: Shield]] immediately after being hit with Mortal Strike is also a huge help in mitigating the amount of burst damage and the subsequent debuff. |
||
| − | * [[Curse of Recklessness]] on the Broodlord is dangerous, since some data below indicates that mobs do not use the same attack power formula. Similarly, effects that reduce the Broodlord's attack power can be very beneficial ([[Demoralizing Shout]] and [[Screech]]). |
||
==Quotes== |
==Quotes== |
||
| + | ;Intro |
||
| + | :{{text|yell|The "End Time," I once called this place. I had not seen, by then; I did not know. You hope to... what? Stop me, here? Change the fate I worked so tirelessly to weave?}} |
||
| + | :{{text|yell|You crawl unwitting, like a blind, writhing worm, towards endless madness and despair. I have witnessed the true End Time. This? This is a blessing you simply cannot comprehend.}} |
||
| + | |||
;Aggro |
;Aggro |
||
| − | + | :{{text|yell|Murozond|So be it.}} |
|
| + | :{{text|yell|Nozdormu|Mortals! I cannot follow you any further - accept my blessing and use the Hourglass of Time to defeat Murozond!}} |
||
| + | ;Using Hourglass of Time |
||
| − | ;When pulling Lashlayer out of the Suppression Rooms |
||
| − | *{{text|yell| |
+ | *{{text|yell|The powers of the Hourglass do nothing to me!}} |
| + | *{{text|yell|To repeat the same action and expect different results is madness.}} |
||
| + | *{{text|yell|Another chance will make no difference. You will fail.}} |
||
| + | *{{text|yell|Again...? Is this your plot, your scheme?}} |
||
| + | ;Hourglass depleted |
||
| ⚫ | |||
| + | *{{text|yell|The Hourglass' power is exhausted. No more games, mortals. Relent, or perish.}} |
||
| − | {{lootbox|[[Tier 2]] Feet|Bloodfang Boots|Boots of Transcendence|Dragonstalker's Greaves|Greaves of Ten Storms|Judgement Sabatons|Nemesis Boots|Netherwind Boots|Sabatons of Wrath|Stormrage Boots}} |
||
| + | ;Killing a player |
||
| − | {{lootbox|Broodlord Lashlayer non-set loot|Black Brood Pauldrons|Bracers of Arcane Accuracy|Lifegiving Gem|Heartstriker|Maladath, Runed Blade of the Black Flight|Venomous Totem}} |
||
| + | *{{text|yell|The sand has run out.}} |
||
| + | *{{text|yell|Time ends.}} |
||
| + | *{{text|yell|Your time has come.}} |
||
| + | ;Defeated |
||
| − | {{lootbox|Quest items|Head of the Broodlord Lashlayer}} |
||
| + | :{{text|yell|Murozond|You know not what you have done. [[Aman'Thul]]... What I... have... seen...}} |
||
| + | :{{text|say|Nozdormu|At last it has come to pass. The moment of my demise. The loop is closed. My future self will cause no more harm from this day on.}} |
||
| + | :{{text|say|Nozdormu|Still, in the future, I will... fall to madness. And you, heroes... will vanquish me. The cycle will repeat. So it goes.}} |
||
| + | :{{text|say|Nozdormu|What matters is that Azeroth did not fall; that humanity survived to live another day.}} |
||
| + | :{{text|say|Nozdormu|All that matters... is this moment.}} |
||
| − | == |
+ | ==Trivia== |
| + | * Murozond's name is an anagram of [[Nozdormu]]. |
||
| − | {| class="darktable" style="text-align:center;" |
||
| + | * One of Murozond's quotes ({{text|yell|To repeat the same action and expect different results is madness.}}) is derived from Albert Einstein. |
||
| − | |- |
||
| + | * Unlike other [[Infinite Dragonflight|infinite dragons]] Murozond's emotes do not have an echoing quality to them. |
||
| − | ! Broodlord Lashlayer from a Hunter's Perspective |
||
| + | |||
| − | |- |
||
| + | ==Videos== |
||
| − | | <youtube>HYgtyeSAiYA</youtube> |
||
| + | <vplayer /> |
||
| ⚫ | |||
| + | * {{#vlink:T_MbgGq0OR4|Tank PoV + Guide}} |
||
| + | * {{#vlink:ZKYjrg1Yqcg|Cause & Effect, annotated guide, low ingame sound, Teamspeak included}} |
||
| + | |||
| + | ==References== |
||
| + | {{Reflist}} |
||
==Patches and hotfixes== |
==Patches and hotfixes== |
||
| − | {{Patch |
+ | *{{Patch 4.3.0|note=Added.}} |
==External links== |
==External links== |
||
| − | <!-- Read http://www. |
+ | <!-- Read http://www.wowpedia.org/Wowpedia:External_links before posting your links here. |
Links that do not conform to the rules will be DELETED. |
Links that do not conform to the rules will be DELETED. |
||
Repeat violations may result in a BAN. |
Repeat violations may result in a BAN. |
||
Have a nice day. :) --> |
Have a nice day. :) --> |
||
| − | {{elinks-NPC| |
+ | {{elinks-NPC|54432}} |
| − | |||
| − | {{Black Dragonflight}} |
||
| − | {{dragonkin}} |
||
| + | {{Dragonflightfooter|Infinite Dragonflight}} |
||
| − | {{DEFAULTSORT:Lashlayer, Broodlord}} |
||
| − | [[Category: |
+ | [[Category:Dragons]] |
| − | [[Category: |
+ | [[Category:Infinite Dragonflight]] |
[[Category:Bosses]] |
[[Category:Bosses]] |
||
| − | [[Category: |
+ | [[Category:End Time mobs]] |
Revision as of 05:16, 26 December 2011
 | |||||||||||
| Title | <The Lord of the Infinite> | ||||||||||
| Race | Infinite wyrm (Dragonkin) | ||||||||||
| Level | 87 Elite | ||||||||||
| Location | Bronze Dragonshrine, Dragonblight | ||||||||||
| Relative(s) | Nozdormu (past self) | ||||||||||
| |||||||||||
Murozond is a future counterpart of Aspect of Time, Nozdormu, leader of the Infinite dragonflight and a final boss to appear in the End Time instance. Using the Hourglass of Time, he managed to interfere with his past counterpart's efforts to send heroes to the past, which would result in a change of the bleak future, in which the maddened wyrm made his lair.
Now living outside of time, Murozond was once the great Dragon Aspect Nozdormu the Timeless One. After the titans showed him his own death, the tormented Nozdormu was tricked by the Old Gods into trying to subvert his mortality. As a result, Nozdormu shattered the timeways and created the infinite dragonflight... jeopardizing the very future of Azeroth.[1]
Abilities
 Temporal Blast — Murozond deals 25000 Shadow damage to all nearby enemies and increases their Arcane damage taken by 10% for 20 sec..
- Distortion Bomb — Murozond launches an orb of temporal energy at the location of a random player. When the orb reaches this location, it explodes and leaves an 8 yard radius area of temportal distortion. The distortion area inflicts 25000 Arcane damage every second to all enemies standing within the area.
- Infinite Breath — Inflicts 75000 Fire damage to all enemies in front of the caster.
Nozdormu
Nozdormu is unable to assist the players directly, but grants them the Blessing of the Bronze Dragonflight.
- Blessing of the Bronze Dragonflight — Blesses the target with the power of the Bronze Dragonflight. Melee, ranged, and spell casting speed is increased by 40%. Movement speed increased by 40%.
Hourglass of Time
The Hourglass of Time
Murozond stole the Hourglass of Time and trapped it here within the End Time of Azeroth. The Hourglass casts Rewind Time when a player interacts with it, but the Hourglass can only be used up to five times during the encounter.
- Rewind Time — The Reverse Time effect rewinds everything back to the beginning of the encounter. The reversal restores each players' health and mana, then resets all of their ability cooldowns. The reversal also removes all Distortion Bombs.
Strategy
Murozond is a DPS race with a unique hourglass mechanic. The overall strategy is to kill the boss before the hourglass runs out of charges and damage becomes unhealable. Timely use of the hourglass can trivialize this boss greatly.
One key detail for all players to remember is that ability cooldowns are reset each time the hourglass is used and it is highly recommended players use all their cooldowns every time they are up. Abilities like ![]() [Mirror Image],
[Mirror Image], ![]() [Avenging Wrath] and
[Avenging Wrath] and ![]() [Rapid Fire] are all good examples, but also major defensive cooldowns like
[Rapid Fire] are all good examples, but also major defensive cooldowns like ![]() [Shield Wall],
[Shield Wall], ![]() [Divine Guardian],
[Divine Guardian], ![]() [Army of the Dead] and
[Army of the Dead] and ![]() [Tranquility] are reset with each use of the hour glass as well. All debuffs are also wiped from players allowing reuse of
[Tranquility] are reset with each use of the hour glass as well. All debuffs are also wiped from players allowing reuse of ![]() [Bloodlust]/
[Bloodlust]/![]() [Heroism]/
[Heroism]/![]() [Time Warp] as well (Note, it does not reset a Core Hound's
[Time Warp] as well (Note, it does not reset a Core Hound's ![]() [Ancient Hysteria]), it is recommended to wait for the Blessing of the Bronze Dragonflight to fade before use to maximize the longevity of the haste. A final benefit of the hourglass is all dead players are brought back to life with each use.
[Ancient Hysteria]), it is recommended to wait for the Blessing of the Bronze Dragonflight to fade before use to maximize the longevity of the haste. A final benefit of the hourglass is all dead players are brought back to life with each use.
Murozond needs to be faced away from the group, but positioning can quickly become compromised from Distortion Bombs. Healers need to ensure they can stay in range of tanks as best as possible while keeping DPS alive. Hourglass use should be assigned to the ranged DPS, Mages are a great choice for this because of ![]() [Blink]. Players should stay away from the hourglass until they are about to use it to avoid getting Distortion Bombs placed near it. If done well, Murozond will die on the fourth or final use of the hourglass, depending on your group's overall DPS.
[Blink]. Players should stay away from the hourglass until they are about to use it to avoid getting Distortion Bombs placed near it. If done well, Murozond will die on the fourth or final use of the hourglass, depending on your group's overall DPS.
The player assigned to activate the hourglass should wait until one of the following conditions occurs:
- The tank or healer dies
- The number of Distortion areas makes it hard for DPS to stay in range of Murozond.
- The hourglass activator is at imminent risk of death, with no player available as backup to activate the hourglass
Fallen players should not release when dying before all hourglasses are consumed, since the hourglass will return the player to their living state. Battle resurrections reset their cooldowns as well, but rarely have much utility in this fight.
Loot
Quotes
- Intro
- The "End Time," I once called this place. I had not seen, by then; I did not know. You hope to... what? Stop me, here? Change the fate I worked so tirelessly to weave?
- You crawl unwitting, like a blind, writhing worm, towards endless madness and despair. I have witnessed the true End Time. This? This is a blessing you simply cannot comprehend.
- Aggro
- Murozond yells: So be it.
- Nozdormu yells: Mortals! I cannot follow you any further - accept my blessing and use the Hourglass of Time to defeat Murozond!
- Using Hourglass of Time
- The powers of the Hourglass do nothing to me!
- To repeat the same action and expect different results is madness.
- Another chance will make no difference. You will fail.
- Again...? Is this your plot, your scheme?
- Hourglass depleted
- The Hourglass' power is exhausted. No more games, mortals. Relent, or perish.
- Killing a player
- The sand has run out.
- Time ends.
- Your time has come.
- Defeated
- Murozond yells: You know not what you have done. Aman'Thul... What I... have... seen...
- Nozdormu says: At last it has come to pass. The moment of my demise. The loop is closed. My future self will cause no more harm from this day on.
- Nozdormu says: Still, in the future, I will... fall to madness. And you, heroes... will vanquish me. The cycle will repeat. So it goes.
- Nozdormu says: What matters is that Azeroth did not fall; that humanity survived to live another day.
- Nozdormu says: All that matters... is this moment.
Trivia
- Murozond's name is an anagram of Nozdormu.
- One of Murozond's quotes (To repeat the same action and expect different results is madness.) is derived from Albert Einstein.
- Unlike other infinite dragons Murozond's emotes do not have an echoing quality to them.
Videos
References
Patches and hotfixes
- Patch 4.3.0 (2011-11-29): Added.
External links
| |||||||||||||||||||||||||||||||